When my stereo amplifier stopped working I could’ve bought a new one but after a quick look inside I was pretty sure the damage was minor so I brought it to a repair service. When I could pick it up again not only were the costs way below the price of a new amplifier but the repair service basically did a full recap with good quality capacitors so not only will it last another decade or two it also still sounds great.
But since this is a pre smart era device it only came with a bulky IR remote, so no possibility to control it via Wi-Fi. I bought a cheap Wi-Fi remote control device that could be flashed with Tasmota and integrated it with my Domoticz setup. Then we got a new thermostat that worked with Domoticz initially but after a firmware update it stopped working. With Home Assistant everything worked except for the IR remote control so for a while I used both solutions.
Not ideal so I dug a bit deeper to get the IR remote control to work with Home Assistant. Since user stories on this matter are pretty much non-existent here are the steps to get a similar solution going on your Home Assistant setup. Be warned that this is not a step-by-step walkthrough, I’m assuming you know how to flash ESP devices, that you know your way around Home Assistant and Tasmota and that you have your own MQTT server running.
First you will have to acquire a Wi-Fi remote control device that can be flashed with Tasmota. I got one from Amazon similar to this unit. Flashed it over the air with tuya-convert. Next step was to add the Pyscript HACS integration to Home Assistant. Then I added the following Python script wich I named irsend.py to the pyscripts directory.
#!/usr/bin/env python3

import paho.mqtt.client as mqtt

mqtt_server = "localhost"
topic = "ir_remote01"

# IR codes
ir_codes = {}
ir_codes['stereo_protocol'] = 'NEC'
ir_codes['stereo_volume_down'] = '0xE13E31CE'
ir_codes['stereo_volume_up'] = '0xE13E11EE'
ir_codes['stereo_off'] = '0xE13E13EC'
ir_codes['stereo_on'] = '0xE13EA45B'
ir_codes['stereo_tuner'] = '0xE13EBB44'
ir_codes['stereo_aux'] = '0xE13ED926'
ir_codes['stereo_cd'] = '0xE13EA15E'
ir_codes['stereo_video'] = '0xE13E43BC'


@service
def send_ir_code(action=None, id=None):
    log.info(f'irsend: got action {action} id {id}')
    ir_protocol = ir_codes[f'{id}_protocol']
    ir_code = ir_codes[f'{id}_{action}']
    ir_payload = f'{{"Protocol":"{ir_protocol}","Bits":32,"Data":"{ir_code}"}}'
    log.info(f'irsend: sending payload {ir_payload}')
    mqtt_client = mqtt.Client()
    mqtt_client.connect(mqtt_server)
    mqtt_publish = mqtt_client.publish(f'{topic}/cmnd/irsend', ir_payload)
    mqtt_client.disconnect()
What this script does is sending a message over MQTT to the IR remote control, the IR remote control then converts this message to an IR signal and transmits this signal. The script needs two input parameters, action and id. These parameters are made available to the script through pyscript. The Python @service decorator makes the script available as a Service in Home Assistant.
With this Service working I can add it to a View. I used a Grid card for this and added Buttons cards to this Grid.

The Grid Card Configuration looks like this.
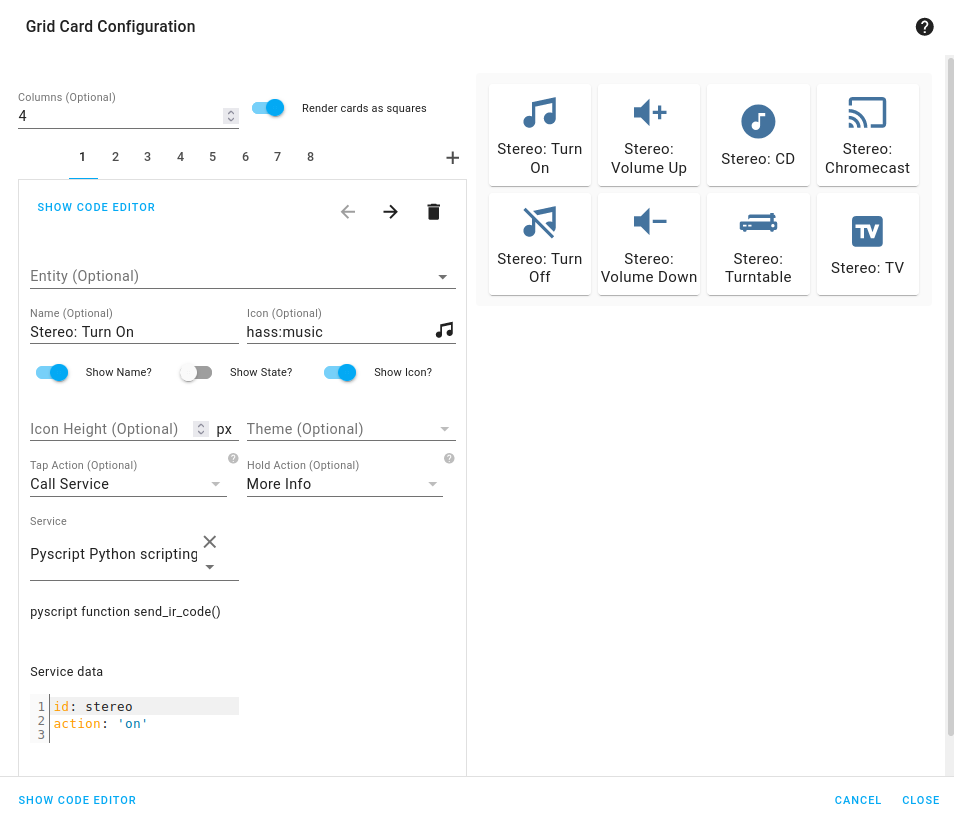
Added a Name, an Icon and set the Tap Action to Call Service. As a Service I could select Pyscript Python scripting: send_ir_code and as Service data I entered an id and an action as a dictionary, so {id: stereo, action: on}. Did this for all the other actions and now I can control my pre smart age stereo in a smart way.
