All other recommendations that for instance rtcqs or Millisecond give are for those that really need stable, ultra low latency. So buffer sizes below 64 samples that result in round-trip latencies below 10 milliseconds. This is the area where threaded IRQs or disabling Spectre/Meltdown mitigations might contribute to getting rid of that stray xrun.
Regarding threaded IRQs, enabling those by itself doesn’t change anything. You will need to configure those threaded IRQs after you’ve enabled them. Tools that can do this are rtcirqus or rtirq. You could also do this manually by using the chrt command on the threaded IRQ process.
Modern systems use MSI(-X) interrupts though (Message Signaled Interrupts) so shared IRQs should be something of the past. On those systems there’s very little gain in prioritising threaded IRQs.
The main difference between rtcirqus and rtirq is that rtcirqus allows you to set the real-time priority of a thread based on ALSA card names. rtirq works differently, it sets the real-time priority based on kernel module names. So with rtcirqus you can be sure the desired audio interface gets the desired real-time prio, with rtirq you’re prioritising all the devices that make use of a specific kernel module (xhci_hcd, snd_hda_intel).
rtirq does allow for some finer grained control regarding USB2 ports and onboard audio devices that use the snd_hda_intel driver. The USB2 ehci_hcd driver and the snd_hda_intel driver add the bus name and card index number respectively to the IRQ thread process name so you can use that designation in the rtirq configuration file. In case of USB2 you’re still prioritising the IRQ of the whole USB bus though but then rtcirqus does the same.
As of June 1st I will start a new adventure at SURF! I’m extremely grateful that I can be a part of this fantastic organization. It took me almost 20 years to get an appointment, I first applied there in June 2005 when it was still called SARA. Third time’s a charm I guess, I also applied for a position back in December but since that was for a storage specialist there wasn’t a full match.
Looking forward to starting there. Back to the field of education and research, I worked in that field before at the University of Amsterdam for 8 years back in the 00s. It feels like the circle is complete, at the UvA I tried really hard to get a Linux position but I was deemed too light for every application I did. But now almost 15 years later with a lot more experience and a solid resume I really was a valid contender for this position, for which I’m happy and also a bit proud.
I’m assigned an Specialist Engineer position within the internal operations team, in my case specialist as in Linux specialist. Work location will be the SURF location at the Science Park in Amsterdam, close to the infamous CWI. Can’t wait to have a daily Linux driver again instead of running a non-sanctioned OS with FreeRDP to be able to access my backlog. But first, document everything, improve and update existing documentation and transfer as much knowledge as possible to my current team members. And also migrate all Ubuntu 20.04 machines and getting the whole software stack to run containerized.
You think you have it all configured right, all common DKIM checks on the interwebs agree with you but still you receive replies prepended with [DKIM ERROR]. You dig and dig, find out that apparently only one major mail server vendor gives back those errors, but no real answer or solution.
Picked up the gauntlet (after having smelled the glove) and tried a mail to the mail admins with zero expectations of getting an answer back. But no, got a reply within a day! And guess what. No it’s not my DKIM configuration. It’s my private key. It’s too secure. No, for real. This major vendor errors out on DKIM keys bigger than 2048 bits:
DKIM: permfail key too large (d=autostatic.com s=dkim i=@autostatic.com)
So if you run into this and you’re using a 4096 bits DKIM key at least now you know a possible cause of this behaviour.
After a great tip from dvzrv with regard to hosting all my stuff I recently moved everything to an instance at Hetzner. Main reason why I chose for Hetzner is that they allow you to run your own mail server. First I moved my mail setup and last week I moved the rest. It’s great that I don’t need a mail gateway anymore and it’s always good to move to a more up to date OS.
So my old instance at Fuga is switched off now. After having it backed up I will delete it with a slight pain in my heart, I have the tendency to grow attached to virtual instances. Something with pets and cattle. I’m inching more towards the pet side I guess.
After some thought and having updated the linuxaudio.org system configuration wiki page I decided to remove three checks from rtcqs. First to go was the background processes check. It checked for two processes that are not used anymore and these days I can’t think of an ubiquitous piece of software that could wreak so much havoc that it needs to be checked for. Second to go was the system timer check. Lore says that in order to achieve accurate MIDI timing one needs a kernel with a clock frequency of 1000Hz. But Linux audio software has been using the snd-hrtimer kernel module for years now which is way more accurate than those measly 1000Hz. This setting is really not needed anymore, same goes for echoing values to /dev/rtc or /dev/hpet max user freq values. Really, using the snd-hrtimer module together with a tickless kernel gives you way more accurate timing than when using a 1000Hz clock frequency. Don’t believe it?
First line is the system timer, it’s 4000 microseconds which corresponds with a kernel clock frequency of 250Hz. But look at the line below, it will automatically pop up as soon as you start a modern Linux audio application that does MIDI. You see that? 0.001 microsecond. That corresponds with a clock frequency of 1.000.000Hz. That’s already a 1000 times more accurate than using a system timer of 1000Hz and this HR timer set at this frequency is available regardless which clock frequency your kernel is using.
Now we got that out of the way, I also removed the max user watches check. It shouldn’t have been there in the first place, I should be the one to know because I asked the gurus about it back in 2011 at LAC2011 in Maynooth. I got no response. For a reason, it’s simply unrelated to increasing the performance of your Linux workstation. So 11 years later it’s good riddance.
The power management check has been improved a bit. Instead of checking the mode and owner of the /dev/cpu_dma_latency device node rtcqs now simply checks if the user running rtcqs has write permissions on that device node. And Robin made it clear to me that even after 15 years or so of running Linux and working with Linux exclusively I still haven’t internalized the idea that Linux doesn’t need a reboot as long as you didn’t touch your kernel.
The tkinter GUI got a promotion, it’s the default GUI now. I’ve demoted the Qt GUI, to the point where it has become a beta feature. The GUI is fully dynamic now, if I add or remove checks to the main rtcqs module I don’t have to bother with the rtcqs_gui module. Maybe it’s getting time to wrap the rtcqs module up in a class.
Other things that got added with this release are a desktop file and two files to facilitate Python packaging. Yes, rtcqs is available on PyPi too as of now, one pip install rtcqs away. These features were requested on the rtcqs project issue tracker in order to facilitate packaging rtcqs for Arch. So if you have a request regarding rtcqs, or run into an issue with it, or spot inconsistencies or just plain false information in the output rtcqs provides, please let me know! Raise an issue at the Codeberg project issue tracker or discuss this release at the linuxmusicians.com forum.
When my stereo amplifier stopped working I could’ve bought a new one but after a quick look inside I was pretty sure the damage was minor so I brought it to a repair service. When I could pick it up again not only were the costs way below the price of a new amplifier but the repair service basically did a full recap with good quality capacitors so not only will it last another decade or two it also still sounds great.
But since this is a pre smart era device it only came with a bulky IR remote, so no possibility to control it via Wi-Fi. I bought a cheap Wi-Fi remote control device that could be flashed with Tasmota and integrated it with my Domoticz setup. Then we got a new thermostat that worked with Domoticz initially but after a firmware update it stopped working. With Home Assistant everything worked except for the IR remote control so for a while I used both solutions.
Not ideal so I dug a bit deeper to get the IR remote control to work with Home Assistant. Since user stories on this matter are pretty much non-existent here are the steps to get a similar solution going on your Home Assistant setup. Be warned that this is not a step-by-step walkthrough, I’m assuming you know how to flash ESP devices, that you know your way around Home Assistant and Tasmota and that you have your own MQTT server running.
First you will have to acquire a Wi-Fi remote control device that can be flashed with Tasmota. I got one from Amazon similar to this unit. Flashed it over the air with tuya-convert. Next step was to add the Pyscript HACS integration to Home Assistant. Then I added the following Python script wich I named irsend.py to the pyscripts directory.
What this script does is sending a message over MQTT to the IR remote control, the IR remote control then converts this message to an IR signal and transmits this signal. The script needs two input parameters, action and id. These parameters are made available to the script through pyscript. The Python @service decorator makes the script available as a Service in Home Assistant.
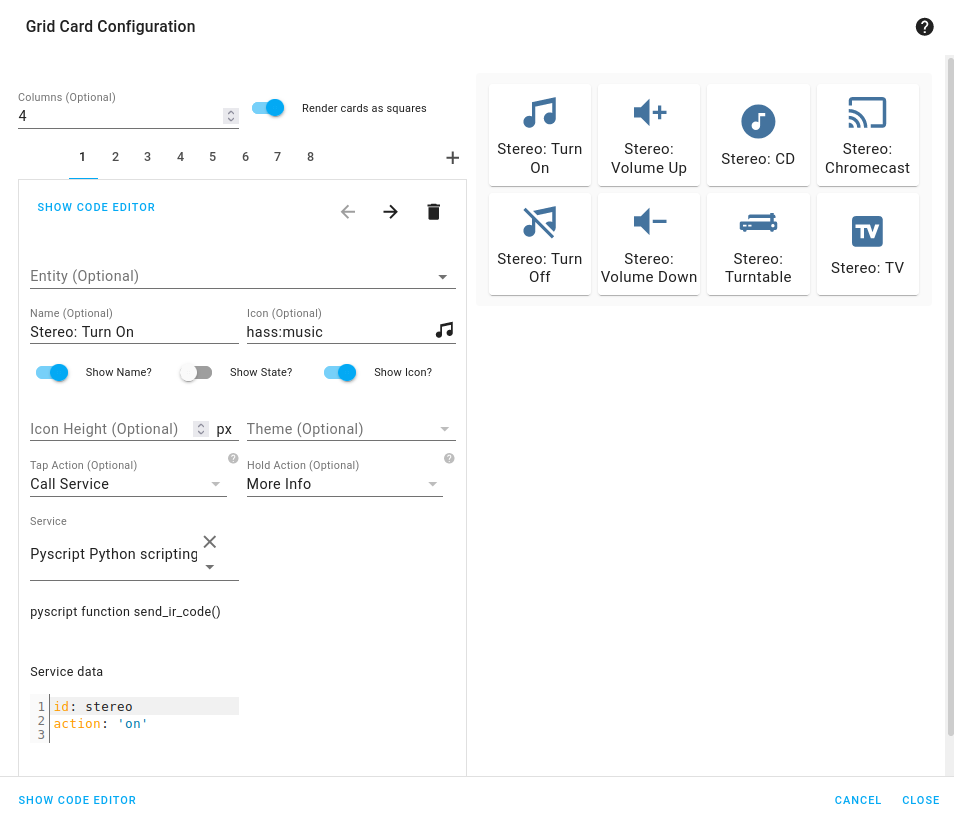
With this Service working I can add it to a View. I used a Grid card for this and added Buttons cards to this Grid.
The Grid Card Configuration looks like this.
Added a Name, an Icon and set the Tap Action to Call Service. As a Service I could select Pyscript Python scripting: send_ir_code and as Service data I entered an id and an action as a dictionary, so {id: stereo, action: on}. Did this for all the other actions and now I can control my pre smart age stereo in a smart way.
Yeah, what about it? Well, not much really. I have acquired the linuxaudio.org domain name since that is more practical when it comes to DNS changes as I am one of the root admins of the linuxaudio.org servers. When it comes to making music I’m still exclusively using Linux but I’ve shifted to a monolithic approach. I bought a Mixbus32C license a couple of years ago, clicked on ALSA as Audio System and never looked back.
My interest also shifted to the analog domain. Having a busy job in the digital domain I found myself more and more avoiding computers outside of work. In the same time I got more involved in making music and I’ve also dived into the world of analog electronics. I’ve always wanted to know how guitar effects and tube amplifiers work so I just started building effects a few years ago and by now I can also bias my own amps and do simple mods. I’m also learning how to get the most out of my guitars when it comes to intonation, action, pickup height and electronics, that kind of stuff. It’s very gratifying to be able to do those kind of things yourself, to pick up a guitar you’ve serviced yourself and that it plays and sounds like a dream.
So next up is building my own amp, got all the parts and I have two weeks off around Christmas so hopefully I can start the new year with a screaming solo from my own amp. Building my own guitar would be awesome too. A complete DIY setup, I’d love that.
Working at home during the Intelligent Lockdown got me thinking about a lot of stuff, including my job at Cyso. I started weighing the many positive aspects against the negative ones and unfortunately the balance tilted too much towards the negative side. So when I got contacted by Evidos I decided to bite the bullet because their offer just ticked so many boxes. Started there in August and I’m now at the point where things are starting to roll. I’m hired as a cloud engineer but as a jack of all trades I already find myself meddling with all kinds of things. Besides maintaining the current cloud platforms, which are mainly used for testing purposes, I’m also heavily involved in the upcoming migration of the current setup into the cloud. And I offer a fresh outlook on a wide variety of subjects that could be done better in my opinion. Think of monitoring, automation and security but also how operational work could be organized better, how existing processes could be improved and I’ve made a start with setting a proper standard for documenting all the things we do.
Evidos itself is a company that does digital signing. Think of all kinds of contracts, deeds or other official documents that need a signature. So no need to go to a notary office, estate agent or your new employer physically, just add your signature in a digital way to the official documents and end up with documents that have been fully signed by all involved parties with a solid judiciary basis. This just saves a lot of time, paper and physical encounters that should be avoided as much as possible these days.
For me this means improving my skills when it comes to encryption standards and methods, security awareness and compliancy. And a great opportunity to make good use of the knowledge I’ve amassed over the years. So far I’m happy about the decision I’ve made, it’s quite a step to change jobs, especially when you already work for a great company with a permanent contract and also given the current circumstances. But sometimes you’re just forced to step back and reconsider. I’m glad that happened, I’m regaining my enthusiasm to work with Linux and open source software in general which is a good sign and I’m starting to find more focus and peace in my current job. A good thing, not just on a professional level but also on a personal level.
As a beta tester for MOD I thought it would be cool to play around with netJACK which is supported on the MOD Duo. The MOD Duo can run as a JACK master and you can connect any JACK slave to it as long as it runs a recent version of JACK2. This opens a plethora of possibilities of course. I’m thinking about building a kind of sidecar device to offload some stuff to using netJACK, think of synths like ZynAddSubFX or other CPU greedy plugins like fat1.lv2. But more on that in a later blog post.
So first I need to set up a sidecar device and I sacrificed one of my RPi’s for that, an RPi 3. Flashed an SD card with Raspbian Jessie Lite and started to do some research on the status of real time kernels and the Raspberry Pi because I’d like to use a real time kernel to get sub 5ms system latency. I compiled real time kernels for the RPi before but you had to jump through some hoops to get those running so I hoped things would have improved somewhat. Well, that’s not the case so after having compiled a first real time kernel the RPi froze as soon as I tried to runapt-get install rt-tests. After having applied a patch to fix how the RPi folks implemented the FIQ system the kernel compiled without issues:
Linux raspberrypi 4.9.33-rt23-v7+ #2 SMP PREEMPT RT Sun Jun 25 09:45:58 CEST 2017 armv7l GNU/Linux
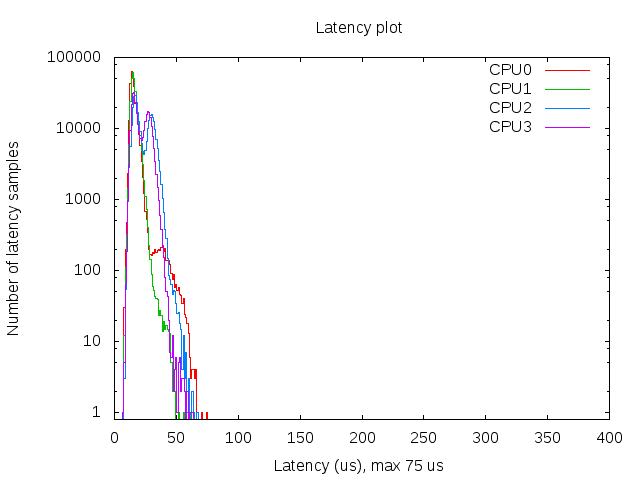
And the RPi seems to run stable with acceptable latencies:
Histogram of the latency on the RPi with a real time kernel during 300000 cyclictest loops
So that’s a maximum latency of 75 µs, not bad. I also spotted some higher values around 100 but that’s still okay for this project. The histogram was created with mklatencyplot.bash. I used a different invocation of cyclictest though:
cyclictest -Sm -p 80 -n -i 500 -l 300000
And I ran hackbench in the background to create some load on the RPi:
(while true; do hackbench > /dev/null; done) &
Compiling a real time kernel for the RPi is still not a trivial thing to do and it doesn’t help that the few howto’s on the interwebs are mostly copy-paste work, incomplete and contain routines that are unclear or even unnecessary. One thing that struck me too is that the howto’s about building kernels for RPi’s running Raspbian don’t mention the make deb-pkg routine to build a real time kernel. This will create deb packages that are just so much easier to transfer and install then rsync’ing the kernel image and modules. Let’s break down how I built a real time kernel for the RPi 3.
First you’ll need to git clone the Raspberry Pi kernel repository:
This will only clone the rpi-4.9.y branch into a directory called linux without any history so you’re not pulling in hundreds of megs of data. You will also need to clone the tools repository which contains the compiler we need to build a kernel for the Raspberry Pi:
The KERNEL variable is needed to create the initial kernel config. The ARCH variable is to indicate which architecture should be used. The CROSS_COMPILE variable indicates where the compiler can be found. The CONCURRENCY_LEVEL variable is set to the number of cores to speed up certain make routines like cleaning up or installing the modules (not the number of jobs, that is done with the -j option of make).
Now that the environment variables are set we can create the initial kernel config:
cd linux
make bcm2709_defconfig
This will create a .config inside the linux directory that holds the initial kernel configuration. Now download the real time patch set and apply it:
cd ..
wget https://www.kernel.org/pub/linux/kernel/projects/rt/4.9/patch-4.9.33-rt23.patch.xz
cd linux
xzcat ../patch-4.9.33-rt23.patch.xz | patch -p1
Most howto’s now continue with building the kernel but that will result in a kernel that will freeze your RPi because of the FIQ system implementation that causes lock ups of the RPi when using threaded interrupts which is the case with real time kernels. That part needs to be patched so download the patch and dry-run it:
cd ..
wget https://www.osadl.org/monitoring/patches/rbs3s/usb-dwc_otg-fix-system-lockup-when-interrupts-are-threaded.patch
cd linux
patch -i ../usb-dwc_otg-fix-system-lockup-when-interrupts-are-threaded.patch -p1 --dry-run
You will notice one hunk will fail, you will have to add that stanza manually so note which hunk it is for which file and at which line it should be added. Now apply the patch:
And add the failed hunk manually with your favorite editor. With the FIQ patch in place we’re almost set for compiling the kernel but before we can move on to that step we need to modify the kernel configuration to enable the real time patch set. I prefer doing that with make menuconfig. You will need the libncurses5-dev package to run this commando so install that with apt-get install libncurses5-dev. Then select Kernel Features - Preemption Model - Fully Preemptible Kernel (RT) and select Exit twice. If you’re asked if you want to save your config then confirm. In the Kernel features menu you could also set the the timer frequency to 1000 Hz if you wish, apparently this could improve USB throughput on the RPi (unconfirmed, needs reference). For real time audio and MIDI this setting is irrelevant nowadays though as almost all audio and MIDI applications use the hr-timer module which has a way higher resolution.
With our configuration saved we can start compiling. Clean up first, then disable some debugging options which could cause some overhead, compile the kernel and finally create ready to install deb packages:
make clean
scripts/config --disable DEBUG_INFO
make -j$(nproc) deb-pkg
Sit back, enjoy a cuppa and when building has finished without errors deb packages should be created in the directory above the linux one. Copy the deb packages to your RPi and install them on the RPi with dpkg -i. Open up /boot/config.txt and add the following line to it:
kernel=vmlinuz-4.9.33-rt23-v7+
Now reboot your RPi and it should boot with the realtime kernel. You can check with uname -a:
Linux raspberrypi 4.9.33-rt23-v7+ #2 SMP PREEMPT RT Sun Jun 25 09:45:58 CEST 2017 armv7l GNU/Linux
Since Rasbian uses almost the same kernel source as the one we just built it is not necessary to copy any dtb files. Also running mkknlimg is not necessary anymore, the RPi boot process can handle vmlinuz files just fine.
The basis of the sidecar unit is now done. Next up is tweaking the OS and setting up netJACK.
Edit: there’s a thread on LinuxMusicians referring to this article which already contains some very useful additional information.
In the coming days I’m going to move the VPS on which this blog resides from VMware to the Fuga OpenStack cloud. Not because I have to but hey, if I can host my stuff on a fully open source based cloud instead of a proprietary solution the decision is simple. And Fuga has been around for a while now, it’s rock solid and as I have a lot of freedom within my OpenStack tenant I can do with my VPS whatever I want when it comes to resources.
Moving the VM will cause some downtime. I’ve opted for the solution to shut down the VM, copy it from the ESXi host on which it lives to a server with enough storage and the libguestfs-tools package so that I can do some customization and the python-openstackclient package so that I can easily upload the customized image to OpenStack. Then I need to deploy an OpenStack instance from that uploaded image, switch the DNS and my server should be back online.