RPi 3 and the real time kernel

As a beta tester for MOD I thought it would be cool to play around with netJACK which is supported on the MOD Duo. The MOD Duo can run as a JACK master and you can connect any JACK slave to it as long as it runs a recent version of JACK2. This opens a plethora of possibilities of course. I’m thinking about building a kind of sidecar device to offload some stuff to using netJACK, think of synths like ZynAddSubFX or other CPU greedy plugins like fat1.lv2. But more on that in a later blog post.

So first I need to set up a sidecar device and I sacrificed one of my RPi’s for that, an RPi 3. Flashed an SD card with Raspbian Jessie Lite and started to do some research on the status of real time kernels and the Raspberry Pi because I’d like to use a real time kernel to get sub 5ms system latency. I compiled real time kernels for the RPi before but you had to jump through some hoops to get those running so I hoped things would have improved somewhat. Well, that’s not the case so after having compiled a first real time kernel the RPi froze as soon as I tried to runapt-get install rt-tests. After having applied a patch to fix how the RPi folks implemented the FIQ system the kernel compiled without issues:

Linux raspberrypi 4.9.33-rt23-v7+ #2 SMP PREEMPT RT Sun Jun 25 09:45:58 CEST 2017 armv7l GNU/Linux

And the RPi seems to run stable with acceptable latencies:

Histogram of the latency on the RPi with a real time kernel during 300000 cyclictest loops

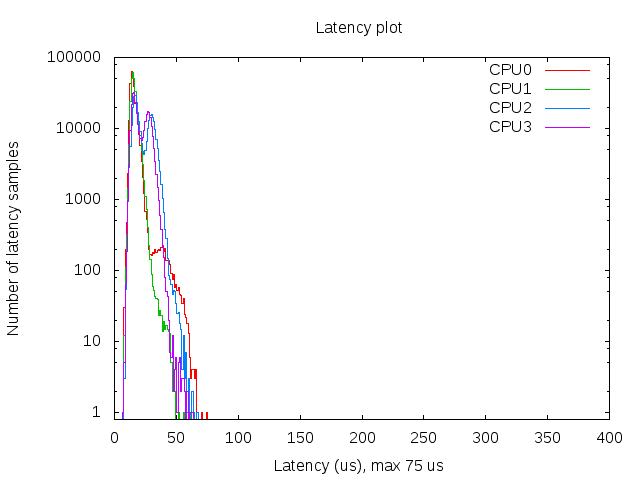
So that’s a maximum latency of 75 µs, not bad. I also spotted some higher values around 100 but that’s still okay for this project. The histogram was created with mklatencyplot.bash. I used a different invocation of cyclictest though:

cyclictest -Sm -p 80 -n -i 500 -l 300000

And I ran hackbench in the background to create some load on the RPi:

(while true; do hackbench > /dev/null; done) &

Compiling a real time kernel for the RPi is still not a trivial thing to do and it doesn’t help that the few howto’s on the interwebs are mostly copy-paste work, incomplete and contain routines that are unclear or even unnecessary. One thing that struck me too is that the howto’s about building kernels for RPi’s running Raspbian don’t mention the make deb-pkg routine to build a real time kernel. This will create deb packages that are just so much easier to transfer and install then rsync’ing the kernel image and modules. Let’s break down how I built a real time kernel for the RPi 3.

First you’ll need to git clone the Raspberry Pi kernel repository:

git clone -b 'rpi-4.9.y' --depth 1 https://github.com/raspberrypi/linux.git

This will only clone the rpi-4.9.y branch into a directory called linux without any history so you’re not pulling in hundreds of megs of data. You will also need to clone the tools repository which contains the compiler we need to build a kernel for the Raspberry Pi:

git clone https://github.com/raspberrypi/tools.git

This will end up in the tools directory. Next step is setting some environment variables so subsequent make commands pick those up:

export KERNEL=kernel7
export ARCH=arm
export CROSS_COMPILE=/path/to/tools/arm-bcm2708/gcc-linaro-arm-linux-gnueabihf-raspbian/bin/arm-linux-gnueabihf-
export CONCURRENCY_LEVEL=$(nproc)

The KERNEL variable is needed to create the initial kernel config. The ARCH variable is to indicate which architecture should be used. The CROSS_COMPILE variable indicates where the compiler can be found. The CONCURRENCY_LEVEL variable is set to the number of cores to speed up certain make routines like cleaning up or installing the modules (not the number of jobs, that is done with the -j option of make).

Now that the environment variables are set we can create the initial kernel config:

cd linux
make bcm2709_defconfig

This will create a .config inside the linux directory that holds the initial kernel configuration. Now download the real time patch set and apply it:

cd ..
wget https://www.kernel.org/pub/linux/kernel/projects/rt/4.9/patch-4.9.33-rt23.patch.xz
cd linux
xzcat ../patch-4.9.33-rt23.patch.xz | patch -p1

Most howto’s now continue with building the kernel but that will result in a kernel that will freeze your RPi because of the FIQ system implementation that causes lock ups of the RPi when using threaded interrupts which is the case with real time kernels. That part needs to be patched so download the patch and dry-run it:

cd ..
wget https://www.osadl.org/monitoring/patches/rbs3s/usb-dwc_otg-fix-system-lockup-when-interrupts-are-threaded.patch
cd linux
patch -i ../usb-dwc_otg-fix-system-lockup-when-interrupts-are-threaded.patch -p1 --dry-run

You will notice one hunk will fail, you will have to add that stanza manually so note which hunk it is for which file and at which line it should be added. Now apply the patch:

patch -i ../usb-dwc_otg-fix-system-lockup-when-interrupts-are-threaded.patch -p1

And add the failed hunk manually with your favorite editor. With the FIQ patch in place we’re almost set for compiling the kernel but before we can move on to that step we need to modify the kernel configuration to enable the real time patch set. I prefer doing that with make menuconfig. You will need the libncurses5-dev package to run this commando so install that with apt-get install libncurses5-dev. Then select Kernel Features - Preemption Model - Fully Preemptible Kernel (RT) and select Exit twice. If you’re asked if you want to save your config then confirm. In the Kernel features menu you could also set the the timer frequency to 1000 Hz if you wish, apparently this could improve USB throughput on the RPi (unconfirmed, needs reference). For real time audio and MIDI this setting is irrelevant nowadays though as almost all audio and MIDI applications use the hr-timer module which has a way higher resolution.

With our configuration saved we can start compiling. Clean up first, then disable some debugging options which could cause some overhead, compile the kernel and finally create ready to install deb packages:

make clean
scripts/config --disable DEBUG_INFO
make -j$(nproc) deb-pkg

Sit back, enjoy a cuppa and when building has finished without errors deb packages should be created in the directory above the linux one. Copy the deb packages to your RPi and install them on the RPi with dpkg -i. Open up /boot/config.txt and add the following line to it:

kernel=vmlinuz-4.9.33-rt23-v7+

Now reboot your RPi and it should boot with the realtime kernel. You can check with uname -a:

Linux raspberrypi 4.9.33-rt23-v7+ #2 SMP PREEMPT RT Sun Jun 25 09:45:58 CEST 2017 armv7l GNU/Linux

Since Rasbian uses almost the same kernel source as the one we just built it is not necessary to copy any dtb files. Also running mkknlimg is not necessary anymore, the RPi boot process can handle vmlinuz files just fine.

The basis of the sidecar unit is now done. Next up is tweaking the OS and setting up netJACK.

Edit: there’s a thread on LinuxMusicians referring to this article which already contains some very useful additional information.

RPi 3 and the real time kernel

Using a Raspberry Pi as a piano

Recently I posted about my successful attempt to get LinuxSampler running on the Raspberry Pi. I’ve taken this a bit further and produced a script that turns the Raspberry Pi into a fully fledged piano. Don’t expect miracles, the sample library I used is good quality so the RPi might choke on it every now and then with regard to disk IO. But it’s usable if you don’t play too many notes at once or make extensive use of a sustain pedal. I’ve tested the script with a Class 4 SD though so a faster SD card could improve stability.

Edit: finally got around buying a better SD card and the difference is huge! I bought a SanDisk Extreme Class 10 SD card and with this SD card I can run LinuxSampler at lower latencies and I can play more notes at once.

Before you can run the script on your Raspberry Pi you will need to tweak your Raspbian installation so you can do low latency audio. How to achieve this is all described in the Raspberry Pi wiki article I’ve put up on wiki.linuxaudio.org. After you’ve set up your RPi you will need to install JACK and LinuxSampler with sudo apt-get install jackd1 linuxsampler. Next step is to get the Salamander Grand Piano sample pack on your RPi:

cd
mkdir LinuxSampler
cd LinuxSampler
wget -c http://download.linuxaudio.org/lau/SalamanderGrandPianoV2
/SalamanderGrandPianoV2_44.1khz16bit.tar.bz2
wget -c http://dl.dropbox.com/u/16547648/sgp44.1khz_V2toV3.tar.bz2
tar jxvf SalamanderGrandPianoV2/SalamanderGrandPianoV2_44.1khz16bit.tar.bz2
tar jxvf sgp44.1khz_V2toV3.tar.bz2 -C SalamanderGrandPianoV2_44.1khz16bit
--strip-components=1

Please note that decompressing the tarballs on the RPi could take some time. Now that you’ve set up the Salamander Grand Piano sample library you can download the script and the LinuxSampler config file:

cd
mkdir bin
wget -c https://raw.github.com/AutoStatic/scripts/rpi/piano -O /home/pi/bin/piano
chmod +x bin/piano
wget -c https://raw.github.com/AutoStatic/configs/rpi/home/pi/LinuxSampler
/SalamanderGrandPianoV3.lscp -O
/home/pi/LinuxSampler/SalamanderGrandPianoV3.lscp

Almost there. We’ve installed the necessary software and downloaded the sample library, LinuxSampler config and piano script. Now we need to dot the i’s and cross the t’s because the script assumes some defaults that might be different in your setup. Let’s dissect the script:

#!/bin/bash

if ! pidof jackd &> /dev/null
then
  sudo killall ifplugd &> /dev/null
  sudo killall dhclient-bin &> /dev/null
  sudo service ntp stop &> /dev/null
  sudo service triggerhappy stop &> /dev/null
  sudo service ifplugd stop &> /dev/null
  sudo service dbus stop &> /dev/null
  sudo killall console-kit-daemon &> /dev/null
  sudo killall polkitd &> /dev/null
  killall gvfsd &> /dev/null
  killall dbus-daemon &> /dev/null
  killall dbus-launch &> /dev/null
  sudo mount -o remount,size=128M /dev/shm &> /dev/null
  echo -n performance
| sudo tee /sys/devices/system/cpu/cpu0/cpufreq/scaling_governor &> /dev/null
  if ip addr | grep wlan &> /dev/null
  then
    echo -n "1-1.1:1.0" | sudo tee /sys/bus/usb/drivers/smsc95xx/unbind &> /dev/null
  fi
  jackd -P84 -p128 -t2000 -d alsa -dhw:UA25 -p512 -n2 -r44100 -s -P -Xseq
&> /dev/null &
fi

This is the first section of the script. An if clause that checks if JACK is already running and if that’s not the case the system gets set up for low latency use, a simple check is done if there is an active WiFi adapter and if so the ethernet interface is disabled and then on the last line JACK is invoked. Notice the ALSA name used, hw:UA25, this could be different on your RPi, you can check with aplay -l.

jack_wait -w &> /dev/null

jack_wait is a simple app that does nothing else but checking if JACK is active, the -w option means to wait for JACK to become active.

if ! pidof linuxsampler &> /dev/null
then
  linuxsampler --instruments-db-location $HOME/LinuxSampler/instruments.db
&> /dev/null &
  sleep 5
netcat -q 3 localhost 8888
< $HOME/LinuxSampler/SalamanderGrandPianoV3.lscp &> /dev/null &
fi

This stanza checks if LinuxSampler is running, if not LinuxSampler is started and 5 seconds later the config file is pushed to the LinuxSampler backend with the help of netcat.

while [ "$STATUS" != "100" ]
do
  STATUS=$(echo "GET CHANNEL INFO 0" | netcat -q 3 localhost 8888
| grep INSTRUMENT_STATUS | cut -d " " -f 2 | tr -d 'rn')
done

A simple while loop that checks the load status of LinuxSampler. When the load status has reached 100% the script will move on.

jack_connect LinuxSampler:0 system:playback_1 &> /dev/null
jack_connect LinuxSampler:1 system:playback_2 &> /dev/null
#jack_connect alsa_pcm:MPK-mini/midi_capture_1 LinuxSampler:midi_in_0 &> /dev/null
jack_connect alsa_pcm:USB-Keystation-61es/midi_capture_1 LinuxSampler:midi_in_0
&> /dev/null

This part sets up the necessary JACK connections. The portnames of the MIDI devices can be different on your system, you can look them up with jack_lsp which will list all available JACK ports.

jack_midiseq Sequencer 176400 0 69 20000 22050 57 20000 44100 64 20000 66150 67 20000 &
sleep 4
jack_connect Sequencer:out LinuxSampler:midi_in_0
sleep 3.5
jack_disconnect Sequencer:out LinuxSampler:midi_in_0
killall jack_midiseq

This is the notification part of the script that will play four notes. It’s based on jack_midiseq, another JACK example tool that does nothing more but looping a sequence of notes. It’s an undocumented utility so I’ll explain how it is invoked:

jack_midiseq

<command> <JACK port name> <loop length> <start value> <MIDI note value> <length value>

Example:
jack_midiseq Sequencer 176400 0 69 20000 22050 57 20000 44100 64 20000 66150 67 20000

JACK port name: Sequencer
Loop length: 4 seconds at 44.1 KHz (176400/44100)
Start value of first note: 0
MIDI note value of first note: 69 (A4)
Length value: 20000 samples, so that's almost half a second
Start value of second note: 22050 (so half a second after the first note)
MIDI note value of second note: 57 (A3)
Length value: 20000 samples
Start value of third note: 44100 (so a second after the first note)
MIDI note value of second note: 64 (E4)
Length value: 20000 samples
Start value of third note: 66150 (so one second and a half after the first note)
MIDI note value of second note: 67 (G4)
Length value: 20000 samples

Now the script is finished, the last line calls exit with a status value of 0 which means the script was run successfully.

exit 0

After making the script executable with chmod +x ~/bin/piano and running it you can start playing piano with your Raspberry Pi! Again, bear in mind that the RPi is not made for this specific purpose so it could happen that audio starts to stutter every now and then, especially when you play busy parts or play more than 4 notes at once.


Using a Raspberry Pi as a piano: quick demo

Using a Raspberry Pi as a piano

Raspberry Pi als virtuele gitaarversterker: MIDI en effecten

Live demo van m’n Raspberry Pi, guitarix en een MIDI floorboard.

Raspberry Pi als virtuele gitaarversterker: MIDI en effecten

Raspberry Pi als virtuele gitaarversterker

M’n Raspberry Pi in actie als virtuele gitaarversterker. Er draait Raspbian op met een gepatchte versie van Jack1 en de laatste versie van guitarix. Als geluidskaart gebruik ik m’n good old Edirol UA-25. Systeemlatency is 256/48000×3 = 16ms. Ik kan nog wat lager (8ms) maar dan trekt de RPi de preset die ik in dit videootje gebruik niet meer.

De gepatchte versie van Jack1 en de laatste versie van guitarix kun je in mijn RPi audio repository vinden. Staan ook nog wat andere pakketjes in die of nog niet beschikbaar zijn in de standaard repositories van Raspbian of die wat meer up to date zijn dan de  Raspbian pakketten. Hoe je die repository kunt toevoegen kun je terugvinden in mijn Wiki artikel Raspberry Pi and real-time, low-latency audio op linuxaudio.org.

Ben erachter gekomen dat ik niet de enige ben die hier mee bezig is, er is zelfs iemand die er een complete site aan het wijden is: Amp Brownie – Building a Raspberry Pi Guitar Rig

Raspberry Pi als virtuele gitaarversterker