At work we use VS Code but if possible I would prefer not to use that on my work station at home. Since I’ve been apt purging nano for ages I started looking for a way to do this with Vim. In the end it turned out to be quite simple on my Debian Bookworm install.
Prerequisites
You will need the following packages:
vim
flake8
python3-pylsp
vim-ale
Install them with sudo apt install vim flake8 python3-pylsp vim-ale.
Configuration
Add the following lines to your .vimrc and you should be good to go!
packadd! ale
let g:ale_completion_enabled = 1
let g:ale_linters = {'python': ['pylsp']}
On Ubuntu the situation is a bit different, the linter to add for autocompletion is called pyls but the executable is called pylsp. So to have ALE load the correct executable some extra configuration is needed.
packadd! ale
let g:ale_completion_enabled = 1
let g:ale_linters = {'python': ['pyls']}
let g:ale_python_pyls_executable = 'pylsp'
Todo: Check if flake8 dependency is really needed.
copy .env.production.sample .env.production
docker compose run --rm web rake mastodon:setup
Fill in the necessary details but leave the Redis password blank. Make sure the (sub)domain you want to use has a proper DNS record. The setup outputs a set of variables, copy and paste those into .env.production after having deleted the old content. Since this file contains credentials you could chmod 400 it so only the user firing up the Docker setup has read access.
Start the Mastodon stack.
docker compose up -d
And verify all containers come up healthy. Now you can put your Mastodon instance behind a reverse proxy. I’m running Apache myself and the configuration below works for me. Bear in mind it relies on a working Let’s Encrypt certificate, you will have to create one yourself.
<VirtualHost *:80>
ServerName mastodon.yoursite.net
ServerAdmin yourname@yoursite.net
AssignUserID mastodon mastodon # Only applicable when using MPM-ITK
DocumentRoot /srv/mastodon
<Directory />
Options FollowSymLinks
AllowOverride None
</Directory>
Redirect permanent / https://mastodon.yoursite.net/
ErrorLog ${APACHE_LOG_DIR}/mastodon.yoursite.net.error.log
# Possible values include: debug, info, notice, warn, error, crit,
# alert, emerg.
LogLevel warn
CustomLog ${APACHE_LOG_DIR}/mastodon.yoursite.net.access.log combined
</VirtualHost>
<VirtualHost *:443>
ServerName mastodon.yoursite.net
ServerAdmin yourname@yoursite.net
AssignUserID mastodon mastodon # Only applicable when using MPM-ITK
ProxyPreserveHost On
ProxyPass /api/v1/streaming http://localhost:4000/
ProxyPass / http://localhost:3000/
ProxyPassReverse / http://localhost:3000/
RequestHeader set X-Forwarded-Proto "https"
SSLEngine on
SSLProxyEngine on
SSLCertificateFile /etc/letsencrypt/live/mastodon.yoursite.net/cert.pem
SSLCertificateKeyFile /etc/letsencrypt/live/mastodon.yoursite.net/privkey.pem
SSLCertificateChainFile /etc/letsencrypt/live/mastodon.yoursite.net/chain.pem
# intermediate configuration, tweak to your needs
SSLProtocol all -SSLv3 -TLSv1 -TLSv1.1
SSLCipherSuite ECDHE-ECDSA-AES128-GCM-SHA256:ECDHE-RSA-AES128-GCM-SHA256:ECDHE-ECDSA-AES256-GCM-SHA384:ECDHE-RSA-AES256-GCM-SHA384:ECDHE-ECDSA-CHACHA20-POLY1305:ECDHE-RSA-CHACHA20-POLY1305
SSLHonorCipherOrder off
SSLCompression off
# HSTS (mod_headers is required) (15768000 seconds = 6 months)
Header always set Strict-Transport-Security "max-age=15768000"
ErrorLog ${APACHE_LOG_DIR}/mastodon.yoursite.net.error.log
CustomLog ${APACHE_LOG_DIR}/mastodon.yoursite.net.access.log combined
</VirtualHost>
Reload Apache and visit your Mastodon instance with the admin account you created. The result of these steps can be found here: https://mastodon.autostatic.net
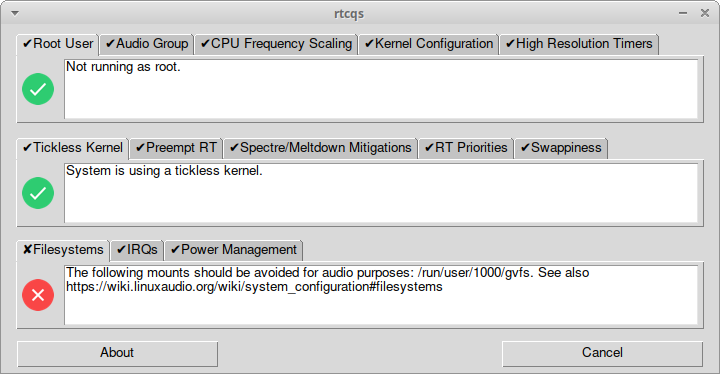
A new version of rtcqs, a Linux audio performance analyzer, is now available. Most notable changes include:
Fixed inconsistent use of single and double quotes
Replaced audio group check with a group agnostic check (fixes #4)
Governor check can now deal with systems that have SMT disabled
Tickless check now deals with all CONFIG_NO_HZ* variants and with nohz being set on the kernel command line (fixes #8)
File systems check has been expanded
IRQ check now loops through /sys/kernel/irq instead of parsing /proc/interrupts
rtprio check now checks if a SCHED_FIFO priority can be set instead of a SCHED_RR priority
Improved preempt RT check, check if “preempt=full” is part of the kernel command line (fixes #7)
Refactoring, created separate classes for main app, resources and GUI
Moved all packaging directives into pyprojects.toml
While working on this release I found out PySimpleGUI is not open source anymore so rtcqs’ GUI has become a bit of a moving target. I’m looking at alternatives like pygubu or even popsicle but that will be something for in the long run. In the short run there are more improvements in the pipeline. The swappiness check needs some attention and same goes for the IRQ check. I’ve been working on a different project to automate prioritizing IRQs and I’m planning to to reuse some parts of that project for the IRQ check in rtcqs. The idea is to have rtcqs not only list the status of all audio related IRQs but also any audio devices attached to those IRQs.
rtcqs is available on Codeberg, PyPI and is also included in the AUR.
At the moment everything seems a bit like a balancing act. First on a physical level, as I’m currently recovering from surgery one of the things I have to learn again is to find my balance, literally. While recovering I can’t do very much hobby stuff in the analogue domain so I swayed a bit to the digital domain again.
About 6 years ago I bought a Mixbus 32C license but found myself using Ardour more and more. During the pandemic I took a subscription and from then on I basically started using Ardour exclusively. Still remember the first time I opened up Ardour back in the 00’s, to me it was intimidating, daunting, what did all those buttons and sliders do? But like with more things in life, sometimes you just fathom the seeming complexity of something, call it an eye opener, and then you’re like, why didn’t I start using Ardour right from the beginning?
Now Ardour is my DAW of choice. It’s running on Debian 12 with a Liquorix kernel on my old, trusted BTO and I’ve never had such a stable setup before. Yes, Debian, after 14 years of Ubuntu that has become a balancing act too. The more applications are moved into Snap the more it alienates me from the OS. While I understand the concept of self-contained applications, it’s part of my job, I don’t think this concept has a real purpose on a desktop OS. It adds another layer of complexity and makes communication between applications harder. Whole different story for another time.
Ardour 8.0 has just been released and I can wholeheartedly recommend it. Installing and setting it up is a breeze and even on my old BTO it runs like a charm. The only restriction is that I can’t use too many Dragonfly Reverb plugins within a project but once I give in to my GAS to get a Framework notebook that will be resolved too.
This release comes with a new Power Management check which checks if the audio group has read/write permissions on /dev/cpu_dma_latency. If your user is a member of the audio group and permissions are set for this group then DAW’s like Ardour and Reaper can open this file as your user, keep it open and control power management this way. This allows a user to prevent CPU sleep states for example so your CPUs are always on and instantly available which could lower the chance running into xruns.
This release also introduces a new basic and simple tkinter-based GUI. The Qt GUI does look fancy but to use it it also needs a fancy amount of dependencies. When building binaries with PyInstaller the result of the Qt GUI is a whopping 130MB package while the tkinter version stays below 12MB.
Future plans are to get rid of some checks:
Max user watches as it’s not related to the overall performance of your system
System timer as it’s not relevant anymore, rtcqs already checks for the more relevant stuff (high res timers and tickless kernel)
Background processes as it’s merely a placeholder which checks for two processes that don’t exist anymore on modern systems
I’m having my doubts about swappiness too as it’s not really applicable anymore for modern machines. But I’m curious if it still applies for smaller systems like RPi’s for example. I’d like to add a filesystem mount option check, for Ext it would check if the filesystem is mounted at least with the relatime option or even noatime for example. And maybe a disk scheduler check but I’m not conviced yet that it really makes a difference.
When my stereo amplifier stopped working I could’ve bought a new one but after a quick look inside I was pretty sure the damage was minor so I brought it to a repair service. When I could pick it up again not only were the costs way below the price of a new amplifier but the repair service basically did a full recap with good quality capacitors so not only will it last another decade or two it also still sounds great.
But since this is a pre smart era device it only came with a bulky IR remote, so no possibility to control it via Wi-Fi. I bought a cheap Wi-Fi remote control device that could be flashed with Tasmota and integrated it with my Domoticz setup. Then we got a new thermostat that worked with Domoticz initially but after a firmware update it stopped working. With Home Assistant everything worked except for the IR remote control so for a while I used both solutions.
Not ideal so I dug a bit deeper to get the IR remote control to work with Home Assistant. Since user stories on this matter are pretty much non-existent here are the steps to get a similar solution going on your Home Assistant setup. Be warned that this is not a step-by-step walkthrough, I’m assuming you know how to flash ESP devices, that you know your way around Home Assistant and Tasmota and that you have your own MQTT server running.
First you will have to acquire a Wi-Fi remote control device that can be flashed with Tasmota. I got one from Amazon similar to this unit. Flashed it over the air with tuya-convert. Next step was to add the Pyscript HACS integration to Home Assistant. Then I added the following Python script wich I named irsend.py to the pyscripts directory.
What this script does is sending a message over MQTT to the IR remote control, the IR remote control then converts this message to an IR signal and transmits this signal. The script needs two input parameters, action and id. These parameters are made available to the script through pyscript. The Python @service decorator makes the script available as a Service in Home Assistant.
With this Service working I can add it to a View. I used a Grid card for this and added Buttons cards to this Grid.
The Grid Card Configuration looks like this.
Added a Name, an Icon and set the Tap Action to Call Service. As a Service I could select Pyscript Python scripting: send_ir_code and as Service data I entered an id and an action as a dictionary, so {id: stereo, action: on}. Did this for all the other actions and now I can control my pre smart age stereo in a smart way.
rtcqs v0.3.1 is now available on Codeberg and Github. rtcqs is the continuation of the realtimeconfigquickscan project but then rewritten in Python. It comes with a Qt GUI and a few extra checks.
Dear all,
I’d like to announce rtcqs, the continuation of the realtimeconfigquickscan project. It’s a port to Python with some added extra’s, like a Spectre/Meltdown mitigations check and a Qt GUI. It has the approval of the original author of realtimeconfigquickscan to whom I owe a debt of gratitude, not only for the original code but also for his helpfulness with the continuation, or maybe even evolution of the project.
So check it out, indulge me with bugs, issues, improvements or any other useful feedback on the Codeberg repo which you can find at at https://codeberg.org/rtcqs/rtcqs
Happy system tuning and happy holidays!
Jeremy
While setting up a solution to fully automate the deployment of SSL certificates at work I piggybacked on the flow and focus to rewrite the realtimeconfigquickscan Perl code in Python. As part of the certificate deployment project I wrote an application to decrypt, re-encrypt and base64 encode PFX files so they can be uploaded to a vault solution. This way I ran into PySimpleGUI which enabled me to quickly put together a nice looking Qt GUI.
rtcqs main window
The code could be more terse and probably contains some typical non-programmer idiosyncracies. First improvement will be to make the code more dynamic so the GUI gets generated instead of using hardcoded values like it does now. And I’d like to add a power management check but then I first need to read up on that subject. There are also some checks that might need some more scrutiny like the swappiness and max_user_watches checks to verify if those checks are really needed for a real-time audio environment.
As a beta tester for MOD I thought it would be cool to play around with netJACK which is supported on the MOD Duo. The MOD Duo can run as a JACK master and you can connect any JACK slave to it as long as it runs a recent version of JACK2. This opens a plethora of possibilities of course. I’m thinking about building a kind of sidecar device to offload some stuff to using netJACK, think of synths like ZynAddSubFX or other CPU greedy plugins like fat1.lv2. But more on that in a later blog post.
So first I need to set up a sidecar device and I sacrificed one of my RPi’s for that, an RPi 3. Flashed an SD card with Raspbian Jessie Lite and started to do some research on the status of real time kernels and the Raspberry Pi because I’d like to use a real time kernel to get sub 5ms system latency. I compiled real time kernels for the RPi before but you had to jump through some hoops to get those running so I hoped things would have improved somewhat. Well, that’s not the case so after having compiled a first real time kernel the RPi froze as soon as I tried to runapt-get install rt-tests. After having applied a patch to fix how the RPi folks implemented the FIQ system the kernel compiled without issues:
Linux raspberrypi 4.9.33-rt23-v7+ #2 SMP PREEMPT RT Sun Jun 25 09:45:58 CEST 2017 armv7l GNU/Linux
And the RPi seems to run stable with acceptable latencies:
So that’s a maximum latency of 75 µs, not bad. I also spotted some higher values around 100 but that’s still okay for this project. The histogram was created with mklatencyplot.bash. I used a different invocation of cyclictest though:
cyclictest -Sm -p 80 -n -i 500 -l 300000
And I ran hackbench in the background to create some load on the RPi:
(while true; do hackbench > /dev/null; done) &
Compiling a real time kernel for the RPi is still not a trivial thing to do and it doesn’t help that the few howto’s on the interwebs are mostly copy-paste work, incomplete and contain routines that are unclear or even unnecessary. One thing that struck me too is that the howto’s about building kernels for RPi’s running Raspbian don’t mention the make deb-pkg routine to build a real time kernel. This will create deb packages that are just so much easier to transfer and install then rsync’ing the kernel image and modules. Let’s break down how I built a real time kernel for the RPi 3.
First you’ll need to git clone the Raspberry Pi kernel repository:
This will only clone the rpi-4.9.y branch into a directory called linux without any history so you’re not pulling in hundreds of megs of data. You will also need to clone the tools repository which contains the compiler we need to build a kernel for the Raspberry Pi:
The KERNEL variable is needed to create the initial kernel config. The ARCH variable is to indicate which architecture should be used. The CROSS_COMPILE variable indicates where the compiler can be found. The CONCURRENCY_LEVEL variable is set to the number of cores to speed up certain make routines like cleaning up or installing the modules (not the number of jobs, that is done with the -j option of make).
Now that the environment variables are set we can create the initial kernel config:
cd linux
make bcm2709_defconfig
This will create a .config inside the linux directory that holds the initial kernel configuration. Now download the real time patch set and apply it:
cd ..
wget https://www.kernel.org/pub/linux/kernel/projects/rt/4.9/patch-4.9.33-rt23.patch.xz
cd linux
xzcat ../patch-4.9.33-rt23.patch.xz | patch -p1
Most howto’s now continue with building the kernel but that will result in a kernel that will freeze your RPi because of the FIQ system implementation that causes lock ups of the RPi when using threaded interrupts which is the case with real time kernels. That part needs to be patched so download the patch and dry-run it:
cd ..
wget https://www.osadl.org/monitoring/patches/rbs3s/usb-dwc_otg-fix-system-lockup-when-interrupts-are-threaded.patch
cd linux
patch -i ../usb-dwc_otg-fix-system-lockup-when-interrupts-are-threaded.patch -p1 --dry-run
You will notice one hunk will fail, you will have to add that stanza manually so note which hunk it is for which file and at which line it should be added. Now apply the patch:
And add the failed hunk manually with your favorite editor. With the FIQ patch in place we’re almost set for compiling the kernel but before we can move on to that step we need to modify the kernel configuration to enable the real time patch set. I prefer doing that with make menuconfig. You will need the libncurses5-dev package to run this commando so install that with apt-get install libncurses5-dev. Then select Kernel Features - Preemption Model - Fully Preemptible Kernel (RT) and select Exit twice. If you’re asked if you want to save your config then confirm. In the Kernel features menu you could also set the the timer frequency to 1000 Hz if you wish, apparently this could improve USB throughput on the RPi (unconfirmed, needs reference). For real time audio and MIDI this setting is irrelevant nowadays though as almost all audio and MIDI applications use the hr-timer module which has a way higher resolution.
With our configuration saved we can start compiling. Clean up first, then disable some debugging options which could cause some overhead, compile the kernel and finally create ready to install deb packages:
make clean
scripts/config --disable DEBUG_INFO
make -j$(nproc) deb-pkg
Sit back, enjoy a cuppa and when building has finished without errors deb packages should be created in the directory above the linux one. Copy the deb packages to your RPi and install them on the RPi with dpkg -i. Open up /boot/config.txt and add the following line to it:
kernel=vmlinuz-4.9.33-rt23-v7+
Now reboot your RPi and it should boot with the realtime kernel. You can check with uname -a:
Linux raspberrypi 4.9.33-rt23-v7+ #2 SMP PREEMPT RT Sun Jun 25 09:45:58 CEST 2017 armv7l GNU/Linux
Since Rasbian uses almost the same kernel source as the one we just built it is not necessary to copy any dtb files. Also running mkknlimg is not necessary anymore, the RPi boot process can handle vmlinuz files just fine.
The basis of the sidecar unit is now done. Next up is tweaking the OS and setting up netJACK.
Edit: there’s a thread on LinuxMusicians referring to this article which already contains some very useful additional information.
And a few minutes later I had a working VPS again. While converting and uploading I made the necessary DNS changes and by the time my VPS was running happily on Fuga all DNS entries pointed to the new IP address.
Basically Qtractor only does either MIDI or audio. The MIDI tracks are for processing MIDI and the audio tracks for processing audio. But a MIDI track in Qtractor can also post-process the audio coming out of a synth plug-in with FX plug-ins so it’s a bit more than just a MIDI track.
But what about plug-ins that do both audio and MIDI, like the LV2 version of the autotuner application zita-at1? If you put it in an audio track it will happily autotune all the audio but it won’t accept any incoming MIDI to pitch only to the MIDI notes it is being fed. And no way you can get MIDI into a Qtractor audio track. There’s no MIDI insert plug-in or the possibility to somehow expose MIDI IN ports of a plug-in in an audio track to Jack MIDI or ALSA.
But Qtractor does have a built-in Insert plug-in that can be fed audio from an audio bus and since a Qtractor MIDI track does know how to handle audio would it also know how to deal with such an insert? Well, yes it can which allows you to use a plug-in like the LV2 version of zita-at1 inside a MIDI track.
Setting up buses and tracks
You will need at least one bus and two tracks (of course you can use different bus and track names):
AutoTuneMix bus, input only and 2 channels
AutoTune MIDI track with dedicated audio outputs (this will create an audio bus called AutoTune)
AutoTuneMix audio track with the AutoTuneMix as input bus
Alternatively you could also skip the use of dedicated audio outputs and have the MIDI track output to the Master bus. This way you avoid the risk of introducing extra latency and the need to set up extra connections. You do lose the flexibility then to do basic stuff on the outcoming audio like panning or adjusting the gain. Which you can also workaround of course by using additional panning and/or gain plug-ins.
Once you’ve created the bus and the tracks insert the following plug-ins into the AutoTune MIDI track:
Insert
Any pre-processing effects plug-ins (like a compressor) – optional
LV2 version of zita-at1 autotuner
Any post-processing effects plug-ins (like a reverb) – optional
Insert them into this specific order. It is also possible to do the post-processing in the AutoTuneMix audio track. Now open the Properties window of the Insert plug-in and then open the Returns window. Connect the mic input of your audio device to the Insert/in ports as shown below.
Connect the AutoTune bus outputs to the AutoTuneMix inputs:
Create a MIDI clip with notes to autotune
Create a MIDI clip with the notes you would like to get autotuned in the AutoTune MIDI track, put the play-head on the right position and press play. Now incoming audio from the mic input of your audio device should get autotuned to the MIDI notes you entered in the MIDI clip:
As you can see both MIDI and audio goes through the AT1 autotuner plug-in and the outcoming audio is being fed into the AutoTuneMix track where you can do the rest of your post-processing if you wish.