New notebook – The day after

Everything seems to work, network, audio, external monitor, display brightness. And this is the first notebook I’ve ever come across to that has a touch pad with an actual real middle click! Love it! Keyboard is nice too, backlight works fine and it has a nice array of function keys that are almost all mapped now. Overall feel of this machine is really nice, aluminum housing and the chiclet keyboard feels stable and solid. Startup time is twice as fast as the BTO. Compared to my new notebook the old one feels strangely completely outdated.

Now what is in there? CPU is an AMD Ryzen 7 7840HS, an 8-core CPU with SMT. Disabled SMT though, Ardour seems to run slightly better on 8 real cores. 32GB of RAM which should be more than enough, my old notebook had 16GB and never had any issues with that. Storage is a 1TB SK hynix BC901 NVMe drive with more than decent throughput. Almost all USB ports sit on their own bus which is quite nice. The only bus that shares its IRQ with something else (the WiFi module) is bus 001. USB ports that use this bus are both the USB-C and USB Type-A connectors closest to the screen. So better not use those.

The only thing that is a bit flaky is the WiFi connection but came across more mentions about that. The connection sometimes randomly reconnects. Can live with it, when making music I often completely disable WiFi. Did have to use systemd automount instead of an fstab entry to mount my NAS as the WiFi connection apparently takes a bit too long to come up.

Didn’t have to tweak a lot so far. As I already mentioned I did disable SMT (Simultaneous Multi-Threading) and I’ve prioritized the IRQ of the USB bus my audio interface sits on. Not with rtirq or udev-rtirq (which doesn’t work properly on this machine, the wrong IRQ seems to get prioritized) but with a small script to fetch the IRQ number that seems to change on every boot and feeding the outcome to chrt. Installed a liquorix kernel on it and enabled threaded IRQ’s, disabled mitigations and USB autosuspend. Also allowed my user to set CPU DMA latency.
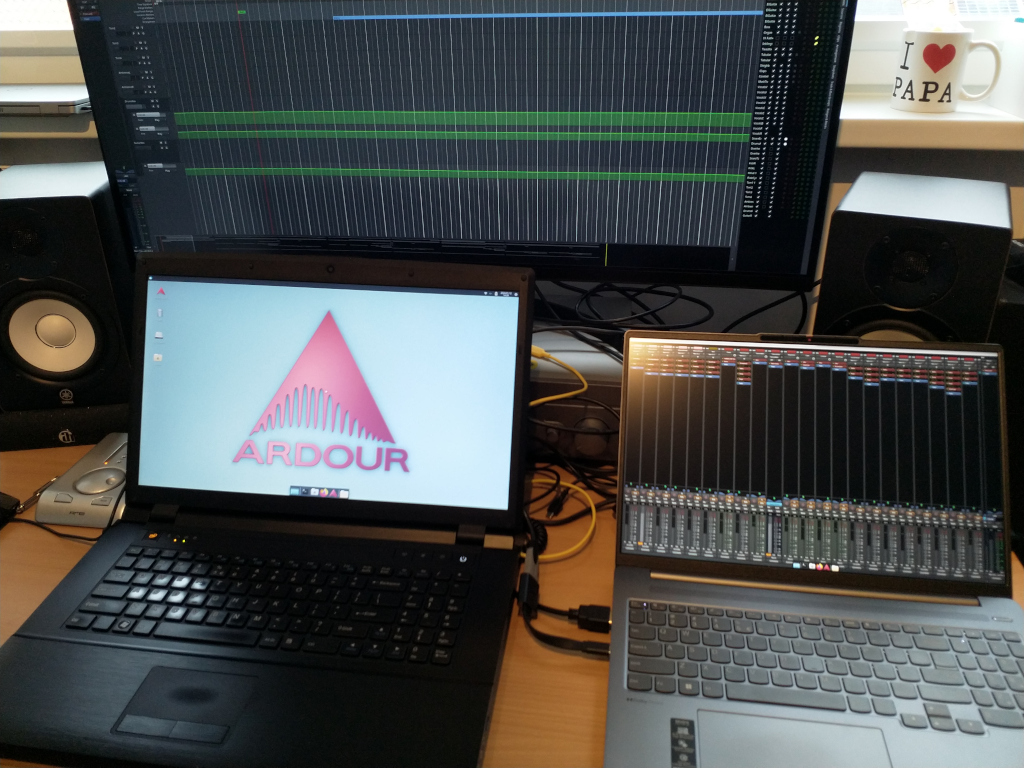
BTO vs Lenovo

It’s running Debian 12 with XFCE again. Simple, fast and looks good enough to me with the Greybird theme and elementary icons. And no more notebook that takes off into orbit, the new one is way more quiet.

On with making music!

Edit: the script I threw together could be useful for others too with USB audio interfaces connected to a machine that uses MSI (Message-Signaled Interrupts) enabled USB controllers. You can find the snd_dev_id of your interface with aplay -l.

#!/bin/bash

prio=90
prio_step=5
proc_path=/proc/asound
sys_pci_bus_path=/sys/class/pci_bus
snd_dev_ids=( Babyface2359686 UA25 )

for snd_dev_id in ${snd_dev_ids[@]}; do
  snd_dev_card_number=$(awk '/'$snd_dev_id'/ {print $1}' $proc_path/cards)

  if [ -n "$snd_dev_card_number" ]; then
    snd_dev_card=card$snd_dev_card_number
    snd_dev_pci_bus_ref=$(grep -Eo "usb-[^[:space:],-]+" $proc_path/$snd_dev_card/stream0 | sed "s/usb-\(.*\)/\1/")
    snd_dev_pci_bus_ref_short=$(awk -F ':' '{print $1":"$2}' <<<$snd_dev_pci_bus_ref)
    snd_dev_irq=$(cat $sys_pci_bus_path/$snd_dev_pci_bus_ref_short/device/$snd_dev_pci_bus_ref/irq)
    snd_dev_irq_pid=$(pgrep $snd_dev_irq-xhci)

    chrt -f -p $prio $snd_dev_irq_pid
    
    prio=$((prio-prio_step))
  fi

done
New notebook – The day after

New notebook – Lenovo IdeaPad Pro 5

After long consideration I ended up with a Lenovo IdeaPad Pro 5 16APH8 (83AR0045MH). For a while I was eying a BTO P•BOOK 16P1390 that got a good review from an old colleague of mine from the UvA. That’s actually a TongFang ID6H2 but by the time I made up my mind the version I actually wanted with an i7-13700H CPU was already sold out. Why BTO? And why replace it? Well, my current audio workstation is a BTO from 2013 and it has served me well, actually, it still runs amazingly well but it’s showing its age here and there. No support for bigger external monitors for instance, and I’m also hitting full DSP load in Ardour a bit too early.

So I did some more research and concluded that it might be a good thing to switch to AMD. Not only because Linus is on AMD now but I just want 8 cores that perform the same. Add to that that quite some Linux music producers favor AMD too and that the Ryzen 7 7840HS I went for doesn’t differ that much performance wise from its Intel i7-13700H equivalent. But it’s cheaper in the configuration I chose compared to a BTO alternative. I also looked at other vendors like Laptop With Linux and Tuxedo but the Clevo’s from Laptop With Linux are too bulky for my taste and are a bit behind spec wise and Tuxedo only offers keyboards with ISO layouts and they’re also quite pricey. I quickly let go of the idea of getting a Framework notebook, that would easily get twice as expensive as the notebook I have now and despite how much I love their sustainability approach that is simply too much. And not buying a new notebook every two or three years is pretty sustainable too I guess.

I verified beforehand if Linux would run on my Lenovo and found some references that confirmed Linux would run well on it. Given the track record Lenovo has with Linux on its notebooks this was no surprise. Just picked it up from a local store which I find more convenient and safer than having it sent over from an online vendor or even Lenovo itself. Lenovo does offer an option without an OS though but a dual boot option can come in handy, especially when having to update firmware of external devices or the firmware of the notebook itself.

Installing Debian 12 on it as we speak and the initial setup went very smoothly. I’m surprised at how small and light it is. And I’ll have to get used to the resolution, but the WQXGA resolution was a conscious decision. I work with two screens, Ardour editor on my main screen and the mixer on my notebook screen and coming from 1920×1080 @ 60Hz the Lenovo with its 2560×1600 @ 120 Hz screen will definitely be an improvement.

On with setting up my new machine!

New notebook – Lenovo IdeaPad Pro 5

Balancing act

At the moment everything seems a bit like a balancing act. First on a physical level, as I’m currently recovering from surgery one of the things I have to learn again is to find my balance, literally. While recovering I can’t do very much hobby stuff in the analogue domain so I swayed a bit to the digital domain again.

About 6 years ago I bought a Mixbus 32C license but found myself using Ardour more and more. During the pandemic I took a subscription and from then on I basically started using Ardour exclusively. Still remember the first time I opened up Ardour back in the 00’s, to me it was intimidating, daunting, what did all those buttons and sliders do? But like with more things in life, sometimes you just fathom the seeming complexity of something, call it an eye opener, and then you’re like, why didn’t I start using Ardour right from the beginning?

Now Ardour is my DAW of choice. It’s running on Debian 12 with a Liquorix kernel on my old, trusted BTO and I’ve never had such a stable setup before. Yes, Debian, after 14 years of Ubuntu that has become a balancing act too. The more applications are moved into Snap the more it alienates me from the OS. While I understand the concept of self-contained applications, it’s part of my job, I don’t think this concept has a real purpose on a desktop OS. It adds another layer of complexity and makes communication between applications harder. Whole different story for another time.

Ardour 8.0 has just been released and I can wholeheartedly recommend it. Installing and setting it up is a breeze and even on my old BTO it runs like a charm. The only restriction is that I can’t use too many Dragonfly Reverb plugins within a project but once I give in to my GAS to get a Framework notebook that will be resolved too.

Balancing act

CarPC v1.0

As our collection of MP3 CD’s was wearing out I thought why not put a small embedded board with a big drive in our car? I dug up a Cubieboard2 that was gathering dust and started hacking. The goal:

  • Small system based on Debian Jessie
  • MPD to serve the audio files
  • Remote control via WiFi
  • Big drive
  • Acceptable boot time
  • Basic protection against file system corruption

Putting a bog standard Debian Jessie on the Cubieboard2 was quite straightforward with the help of the linux-sunxi.org wiki. The board booted with the standard kernel but unfortunately no sound. Luckily I had just received some ultra-cheap PCM2704 USB audio interfaces and these worked and sounded great too. WiFi worked out of the box but the rtl8192cu driver of the 3.16 kernel for the Realtek RTL8192CU chipset has the tendency to quickly go into suspension and as this driver doesn’t have any power management options I ended up with a hacky for loop in /etc/rc.local that pings all IP’s in the DHCP range. I quickly dropped this iffy set-up as it just didn’t work out that well and ended up using a DKMS based solution that made it possible to control power management of the WiFi dongle. Next hurdle was hostapd that stopped working with this alternative driver. But with the help of the hostapd-rtl871xdrv GitHub repo I managed to cook up a fully working hostapd Debian package.

Next up was the hard drive. I first tried a USB drive but the Cubieboard2 just couldn’t provide enough juice to power the drive properly together with the WiFi dongle. I also tried with my Raspberry Pi’s but those had the same issues. So I had to resort to a SATA drive. Of course I bought a 3.5″ drive first because those are cheaper. But you can’t power a 3.5″ drive with the SATA cable that comes with the Cubieboard2 and as I had a bit of a deadline I returned it for a 2.5″ drive and that works like a charm. I installed MPD, copied my music collection to the hard drive, fired up MPD and was greeted with a segmentation fault. Apparently the Jessie MPD package has issues with the sticker database file so I installed MPD from the backports repo and that version runs without any complaints so far.

For some basic protection against corruption by sudden power loss I created separate partitions for /home and /var on the SD card that are mounted rw with a couple of options to reduce corruption (sync,commit=1,data=journal) and / is mounted ro, just like the big hard drive with the audio files. /tmp is being mounted as tmpfs in RAM. Boot time is about 15 seconds and I’m OK with that. To remotely shut down the CarPC via WiFi I use a JuiceSSH homescreen shortcut of a connection that runs a simple shutdown -h now snippet.

After I had mounted everything in our car the thing wouldn’t boot though. Swapped the 1A USB car adapter for a 2.1A version and then the CarPC came up properly. Installed MPDroid on my Nexus 5 to control MPD via WiFi and so far, so good!


Cubieboard2 based CarPC


Addendum

Sometimes the CarPC became unreachable via WiFi. The culprit was that the DHCP service (udhcpd) didn’t always come up because it was sometimes started before hostapd. I fixed this by copying /var/run/systemd/generator.late/udhcpd.service to /etc/systemd/system/udhcpd-custom.service and adding hostapd.service to the After line and adding a Requires=hostapd.service line. I also added a [Install] stanza with the line WantedBy=multi-user.target. I then disabled udhcpd.service and enabled udhcpd-custom.service.

Addendum 2

Hostapd didn’t always start flawlessly either so I copied /var/run/systemd/generator.late/hostapd.service to /etc/systemd/system/hostapd-custom.service and added sys-subsystem-net-devices-wlan0.device to the After and Wants lines. Also added an [Install] stanza, disabled hostapd.service and enabled hostapd-custom.service.

CarPC v1.0

Exit BeagleBone Black, hello Cubieboard2!

Put up my BeagleBone Black for sale. It was gathering dust, somehow this board doesn’t appeal to me. Biggest drawback is that it seems to be very picky with power adapters. If you don’t use a linear power adapter USB devices might not work properly. And that was exactly the issue I was facing, I just couldn’t get my USB audio interfaces to work on the BBB. So I lost interest because well, that’s what I bought the device for, to get sound out of it with the help of an USB audio interface. Add to this that there is no realtime kernel or RT patchset available for the BBB and that the BBB is quite a complex little device (it’s actually a REAL dev board). It would’ve cost me too much time to completely fathom it. No bad feelings though, the BBB is a very nice product and it sure has the slickest looks of all ARM SoC dev boards around.

Also I got a Cubieboard2 in recently. And that board has absorbed me for the last week and a half. It’s quite easy to set up (not as easy as the RPi though), has a lot of IO (yes, it has audio in and out!) and it blows both the RPi and BBB away when it comes to performance with its dual core A20 Allwinner SoC that can easily be overclocked to 1.2 GHz. Alas, no realtime kernel or RT patchset either but hey, I managed to get a RT kernel running on a Rockchip RK3066 based device so I could at least give it a try. And it worked out well. I’m now running a 3.4.61-rt77 kernel on it with a custom Debian Wheezy installation. This time I used git to keep track of the modifications I made so it was a lot easier to create a usable diff. I also patched the driver for the onboard audio codec because the hardcoded defaults were just unusable for realtime audio. Minimum number of periods was 4 and minimum buffer size was 1024. Don’t ask me why. So I’ve changed these to 2 and 16 respectively and managed to get JACK running at a respectable -p64 -n2 -r44100. Fired up some JACK clients and this little monster keeps up very well. USB audio interfaces are no problem either, I can run my Edirol UA25 in Advanced mode with -p64 -n3 -r48000 without any hitch. This is probably because the Cubieboard2 doesn’t use a Synopsys DesignWare OTG controller with out-of-tree dwc_otg drivers like the RPi but a better supported USB controller. At the moment the Cubieboard2 is the nicest ARM dev board I have laid my hands on so far.


text-align: center;

Cubieboard2

RT patchset 3.4.61-rt77 for linux-sunxi, sunxi-3.4 branch

Low latency defaults patch for sunxi-codec driver

Exit BeagleBone Black, hello Cubieboard2!

More ARM goodies II

Received the BeagleBone Black (BBB) and the MK808 with a RK3066 SoC. My first impressions are really positive. Especially the BBB is quite an awesome device that I’m probably going to use a lot in favor of the Raspberry Pi. At first glance I had something like, the BBB blows the RPi away, but as soon as I started looking for documentation on how to put Debian on it for instance it became clear that the RPi is still the device to beat. The RPi community is huge, documentation for it is well laid out and working with the RPi is just so easy. The BBB on the other hand lacks a vivid community, is $10 more expensive and a lot more difficult to work with. Take the Debian install for example, seems quite some work to get that going.

The MK808 is surely an improvement over the UG80X I already own. It comes with a HDMI port instead of a HDMI plug, has an extra USB OTG port, a heatsink, hardware serial console access, a reset button and a power indicator LED. The pre-installed Android version looks better too. I flashed my RT kernel recovery image on it, inserted the Micro SD from my UG80X and it booted without any issues. So I’m going to pursue my goal to get a real-time, low-latency environment running on a RK3066 based device on the MK808 and find another purpose for the UG80X.

Edit: Getting Debian to work on the BBB is actually quite easy: http://elinux.org/BeagleBoardDebian#Demo_Image
Next time I’ll promise to make better use of my Google skills.

More ARM goodies II

Workshops Music Production with Open Source Software

Starting September 7th I’m going to conduct a series of 6 workshops on music production with open source software at De Bakkerij in Castricum. With software I also mean the operating system so the OS I’m going to use will be an open source based one (probably Ubuntu or Debian). So basically it’s a series of workshops on music production with Linux Audio.

Last week I had something like, what the heck, I’m just going to mail De Bakkerij to ask if they’re interested since they host more DIY initiatives like the workshops inititiative I proposed. I didn’t expect much of it but I immediately got an enthusiastic e-mail back from the promotor of De Bakkerij. So after a few mails back and forth it was a done deal.

Rough outline of the workshops:

  1. Introduction and base principles of open source software and using it for music production. What is open source, why use it, how does the open source audio ecosystem look like and will my hardware work?
  2. Recording with open source software. What software is available (DAW), how to use it during the recording process, base principles of recording instruments and vocals (I’ll be focusing on home recording and not recording complete bands).
  3. Making music with open source software. Softsynths, samplers, drum machines, amp/cabinet modeling, sequencers, trackers, DAWs, MIDI/OSC, plugin frameworks etc.
  4. Mixing and mastering with open source software. What software is available, what kind of hardware do I need, base principles of mixing and mastering.
  5. Showcasing the possibilities of the usage of open source software with the focus on low-cost solutions like the Raspberry Pi and RockChip based devices.
  6. Concluding workshop: listen to and discuss the musical projects made by the attendees, discussion on music production with open source software.

There’s no fee for attending the workshops but you do need a notebook or netbook and an empty USB memory stick of at least 4GB.

Workshops Music Production with Open Source Software

Asterisk op ARM (SheevaPlug)

De Digium repository heeft geen armel (ARM) pakketjes maar wel de benodigde bronbestandjes zodat je toch op een makkelijke manier de nieuwe releases kunt packagen en installeren. De snelste manier om dat te doen is door de repository van Digium toe te voegen aan je Apt sources:

# echo -e "# Asterisk sourcesn deb-src http://packages.asterisk.org/deb squeeze main"
| tee -a /etc/apt/sources.list

En even iniesniejalieseren:

# apt-get update

En vervolgens kun je met één simpel commando de bronbestanden downloaden, uitpakken en packagen:

apt-get source -b asterisk

Even laten pruttelen en daarna kun je de benodigde pakketten installeren of updaten:

dpkg -i asterisk-config_1.8.11.1-1digium1~squeeze_all.deb
asterisk_1.8.11.1-1digium1~squeeze_armel.deb

Asterisk op ARM (SheevaPlug)

Asterisk geüpdatet

Draai nu Asterisk 1.8.9.0 en terwijl ik 1.8.8.x niet werkende kreeg met Budgetphone werkt het nu wel goed. Helaas kon ik geen pakketjes vinden voor Squeeze op de Asterisk site dus heb het bronpakketje voor Natty maar gedownload, uitgepakt en dpkg-buildpackage erop losgelaten. Heb nou eenmaal de voorkeur voor pakketjes. Ging nog best snel op m’n SheevaPlug.

Kreeg wel een melding bij het opstarten:

WARNING[17830]: chan_sip.c:28490 reload_config: No valid transports available, falling back to 'udp'.

Maar na het toevoegen van de volgende regel was die melding weg:

transport=udp

Asterisk geüpdatet

Asterisk configuratie

We bellen nu thuis via Voipbuster aangezien dat gewoon de goedkoopste aanbieder is. Tientje ex. BTW en dan kun je vier maanden gratis bellen naar een aantal landen (waaronder Nederland en Frankrijk waar mijn ouders wonen). Na die vier maanden ga je de normale tarieven betalen maar die zijn nog steeds zeer aantrekkelijk. Neem Frankrijk, bij Ziggo kost dat €0,08 per minuut met een starttarief van eveneens €0,08. Bij Voipbuster €0,015 en géén starttarief! Ok, bij Voipbuster ronden ze af op de minuut en bij Ziggo rekenen ze per seconde maar dan nog scheelt bellen met Voipbuster aanzienlijk. Bij Voipbuster kun je echter géén lokaal telefoonnummer aanvragen dus dat heb ik bij Budgetphone gedaan. Niet dat dat echt nodig is maar het prepaid abbo van Budgetphone met een lokaal nummer is zo goedkoop (ook een tientje per jaar) dat ik het maar heb aangeschaft, op deze manier kan ik ook thuis lekker klooien met Asterisk en meerdere trunks van verschillende VoIP aanbieders.

Ik gebruik het Asterisk pakketje van Debian Squeeze (1.6.2.9). Heb wel 1.8.8.x geïnstalleerd gehad maar dat werkte niet met Budgetphone aangezien Budgetphone de “From:” SIP headers van deze versie van Asterisk niet accepteerde. Volgens mij werkt het met 1.8.9.2 inmiddels weer wel als ik het Budgetphone forum mag geloven dus wellicht dat ik Asterisk binnenkort ga proberen te updaten. Dus vooralsnog Asterisk 1.6.2.9 met onderstaande configuratie.

/etc/asterisk/sip.conf

[general]
context=default
allowoverlap=no
externip=www.xxx.yyy.zzz
localnet=192.168.1.0/255.255.255.0
bindport=5060
nat=yes
srvlookup=yes
useragent=AutoStatic PBX
disallow=all
allow=alaw
allow=ulaw
allow=g726
allow=ilbc
allow=gsm
allow=g723
allow=g722
allow=g729
language=nl
dtmfmode=auto

;###########################
;## Register    ############
;###########################

#include "/etc/asterisk/register/*.conf"

;###########################
;##  Templates  ############
;###########################

#include "/etc/asterisk/templates/*.conf"

;###########################
;##  Trunks     ############
;###########################

#include "/etc/asterisk/trunks/*.conf"

;###########################
;##  Accounts   ###########
;###########################

#include "/etc/asterisk/accounts/*.conf"

/etc/asterisk/register/budgetphone.conf

register => budgetphonegebruikersnaam:budgetphonewachtwoord@sip1.budgetphone.nl/budgetphonegebruikersnaam

Je Budgetphone gebruikersnaam is tevens je telefoonnummer. Vandaar de schuine streep op het einde met daarachter nog een keer de gebruikersnaam. Op deze manier worden binnenkomende telefoontjes op dat nummer doorgezet naar de gelijknamige context.

/etc/asterisk/trunks/budgetphone.conf

[budgetphone]
disallow=all
allow=ulaw
allow=alaw
allow=g726
allow=g723
allow=gsm
allow=g722
allow=g729
context=pstn-in
dtmfmode=rfc2833
host=sip1.budgetphone.nl
insecure=port,invite
qualify=yes
type=user

De context voor inkomende telefoontjes op het Budgetphone nummer heet dus pstn-in.

/etc/asterisk/trunks/voipbuster.conf

[voipbuster]
disallow=all
allow=ulaw
allow=alaw
allow=g726
allow=g723
allow=gsm
context=pstn-out
dtmfmode=rfc2833
host=sip.voipbuster.com
qualify=yes
type=peer
defaultuser=voipbustergebruikersnaam
secret=voipbusterwachtwoord
fromuser=voipbustergebruikersnaam
fromdomain=sip.voipbuster.com

Met Voipbuster bellen we naar buiten, de context heet dan ook pstn-out en we moeten onze gebruikersgegevens opgeven anders accepteert Voipbuster onze telefoontjes niet. Voor Budgetphone is dit niet nodig aangezien we daar alleen telefoontjes mee ontvangen.

/etc/asterisk/templates/phones.conf

[phones](!)
type=friend
qualify=yes
nat=yes
context=phones
host=dynamic
canreinvite=no
dtmfmode=rfc2833
allowtransfer=yes
disallow=all
allow=ulaw
allow=alaw
allow=g726
allow=g723
allow=gsm
allow=g722
allow=g729

Dit sjabloon gebruik ik voor mijn accounts, dan hoef ik dat niet voor iedere account toe te voegen.

/etc/asterisk/extensions.conf

;###########################
;## Contexts    ############
;###########################

#include "/etc/asterisk/contexts/*.conf"

/etc/asterisk/contexts/pstn-in.conf

[pstn-in]
exten => budgetphonetelefoonnummer,1,Dial(SIP/10,25,tT)
 same => n,Hangup()

Oftewel, stuur alles wat binnenkomt op het Budgetphone nummer door naar toestel met extensie 10 (onze Gigaset C610 IP huistelefoon).

/etc/asterisk/contexts/pstn-out.conf

[pstn-out]
exten => _00X.,1,Set(CALLERID(num)=budgetphonetelefoonnummer-internationaalformaat)
 same => n,Dial(SIP/${EXTEN}@voipbuster)
 same => n,Hangup()

exten => _0XXXXXXXXX,1,Set(CALLERID(num)=budgetphonetelefoonnummer-nationaalformaat)
 same => n,Dial(SIP/${EXTEN}@voipbuster)
 same => n,Hangup()

/etc/asterisk/contexts/internal.conf

[internal]
exten => 10,1,Dial(SIP/10,25,tT)
 same => n,Hangup()

exten => 20,1,Dial(SIP/20,25,tT)
 same => n,Hangup()

exten => 30,1,Dial(SIP/30,25,tT)
 same => n,Hangup()

exten => 40,1,Dial(SIP/40,25,tT)
 same => n,Hangup()

De interne extensies zodat er ook intern gebeld kan worden. Extensie 10 wordt gebruikt voor binnenkomende telefoontjes die van Budgetphone vandaan komen.

/etc/asterisk/contexts/phones.conf

[phones]
include => internal
include => pstn-in
include => pstn-out

De phones context die alle andere contexts ‘include’.

/etc/asterisk/accounts/10.conf

[10](phones)
callerid=Thuis <10>
secret=***

(phones) geeft aan dat voor dit account het phones sjabloon gebruikt moet worden. In de /etc/asterisk/accounts directory staan verder nog configuratiebestandjes voor mijn mobiele telefoon, mijn werktelefoon en mijn softphone applicatie.

Er kunnen nog wat fouten zitten in bovenstaande configuratie. En ik moet nog even goed kijken naar de codecs, volgens mij is dat nu nog een rommeltje.

Asterisk configuratie