CarPC v1.0

As our collection of MP3 CD’s was wearing out I thought why not put a small embedded board with a big drive in our car? I dug up a Cubieboard2 that was gathering dust and started hacking. The goal:

  • Small system based on Debian Jessie
  • MPD to serve the audio files
  • Remote control via WiFi
  • Big drive
  • Acceptable boot time
  • Basic protection against file system corruption

Putting a bog standard Debian Jessie on the Cubieboard2 was quite straightforward with the help of the linux-sunxi.org wiki. The board booted with the standard kernel but unfortunately no sound. Luckily I had just received some ultra-cheap PCM2704 USB audio interfaces and these worked and sounded great too. WiFi worked out of the box but the rtl8192cu driver of the 3.16 kernel for the Realtek RTL8192CU chipset has the tendency to quickly go into suspension and as this driver doesn’t have any power management options I ended up with a hacky for loop in /etc/rc.local that pings all IP’s in the DHCP range. I quickly dropped this iffy set-up as it just didn’t work out that well and ended up using a DKMS based solution that made it possible to control power management of the WiFi dongle. Next hurdle was hostapd that stopped working with this alternative driver. But with the help of the hostapd-rtl871xdrv GitHub repo I managed to cook up a fully working hostapd Debian package.

Next up was the hard drive. I first tried a USB drive but the Cubieboard2 just couldn’t provide enough juice to power the drive properly together with the WiFi dongle. I also tried with my Raspberry Pi’s but those had the same issues. So I had to resort to a SATA drive. Of course I bought a 3.5″ drive first because those are cheaper. But you can’t power a 3.5″ drive with the SATA cable that comes with the Cubieboard2 and as I had a bit of a deadline I returned it for a 2.5″ drive and that works like a charm. I installed MPD, copied my music collection to the hard drive, fired up MPD and was greeted with a segmentation fault. Apparently the Jessie MPD package has issues with the sticker database file so I installed MPD from the backports repo and that version runs without any complaints so far.

For some basic protection against corruption by sudden power loss I created separate partitions for /home and /var on the SD card that are mounted rw with a couple of options to reduce corruption (sync,commit=1,data=journal) and / is mounted ro, just like the big hard drive with the audio files. /tmp is being mounted as tmpfs in RAM. Boot time is about 15 seconds and I’m OK with that. To remotely shut down the CarPC via WiFi I use a JuiceSSH homescreen shortcut of a connection that runs a simple shutdown -h now snippet.

After I had mounted everything in our car the thing wouldn’t boot though. Swapped the 1A USB car adapter for a 2.1A version and then the CarPC came up properly. Installed MPDroid on my Nexus 5 to control MPD via WiFi and so far, so good!


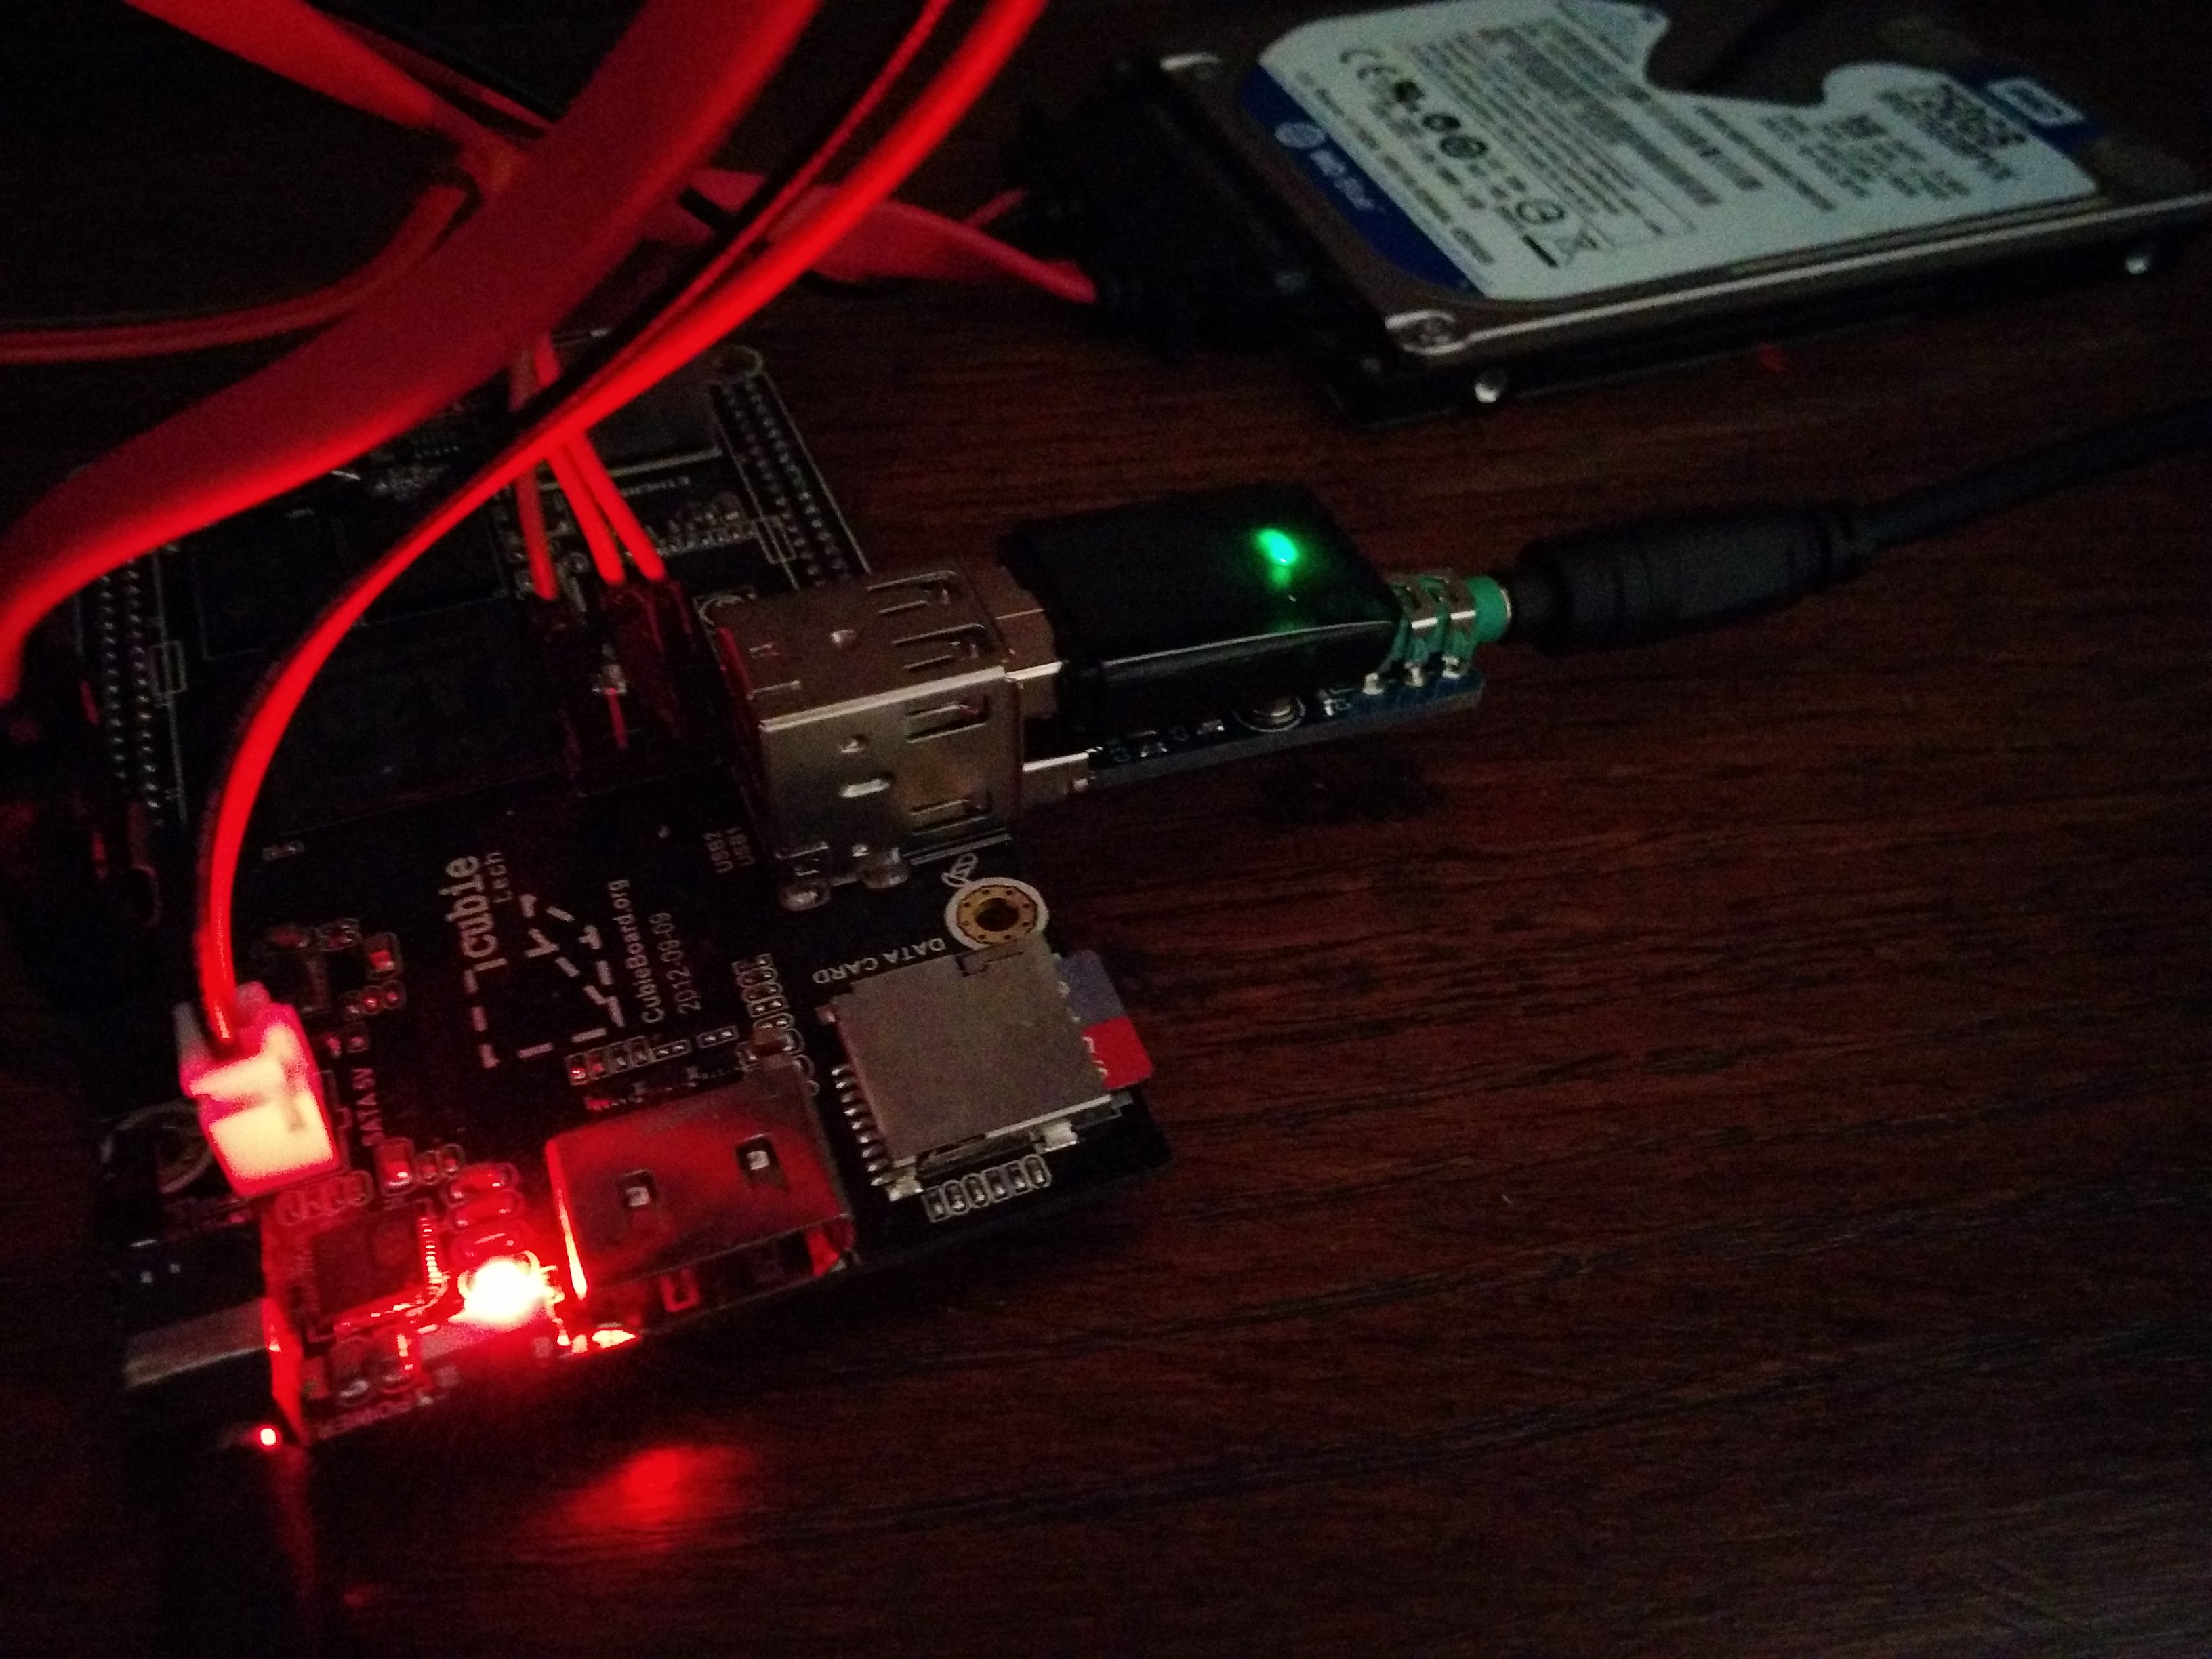
Cubieboard2 based CarPC


Addendum

Sometimes the CarPC became unreachable via WiFi. The culprit was that the DHCP service (udhcpd) didn’t always come up because it was sometimes started before hostapd. I fixed this by copying /var/run/systemd/generator.late/udhcpd.service to /etc/systemd/system/udhcpd-custom.service and adding hostapd.service to the After line and adding a Requires=hostapd.service line. I also added a [Install] stanza with the line WantedBy=multi-user.target. I then disabled udhcpd.service and enabled udhcpd-custom.service.

Addendum 2

Hostapd didn’t always start flawlessly either so I copied /var/run/systemd/generator.late/hostapd.service to /etc/systemd/system/hostapd-custom.service and added sys-subsystem-net-devices-wlan0.device to the After and Wants lines. Also added an [Install] stanza, disabled hostapd.service and enabled hostapd-custom.service.

CarPC v1.0

Resolved JACK issues on notebook

Finally got around troubleshooting the issues I was facing with JACK on my notebook, a BTO that is actually a Clevo W170ER. Somehow I couldn’t go lower than -p128 with USB audio interfaces. When I thought I had tried every option, even disabling hyperthreading, I noticed two unidentified entries in my lsusb output:

Bus 001 Device 003: ID 8087:07da Intel Corp. 
Bus 002 Device 003: ID 5986:0401 Acer, Inc

The first entry is a Bluetooth adapter and the second entry is a webcam. Both devices are unnecessary when making music so I thought, why not unbind them. First I had to figure out their respective bus ID’s:

$ tree /sys/bus/usb/drivers/usb
/sys/bus/usb/drivers/usb
??? 1-1 -> ../../../../devices/pci0000:00/0000:00:1a.0/usb1/1-1
??? 1-1.3 -> ../../../../devices/pci0000:00/0000:00:1a.0/usb1/1-1/1-1.3
??? 2-1 -> ../../../../devices/pci0000:00/0000:00:1d.0/usb2/2-1
??? 2-1.6 -> ../../../../devices/pci0000:00/0000:00:1d.0/usb2/2-1/2-1.6
??? bind
??? uevent
??? unbind
??? usb1 -> ../../../../devices/pci0000:00/0000:00:1a.0/usb1
??? usb2 -> ../../../../devices/pci0000:00/0000:00:1d.0/usb2
??? usb3 -> ../../../../devices/pci0000:00/0000:00:14.0/usb3
??? usb4 -> ../../../../devices/pci0000:00/0000:00:14.0/usb4

Since the Bluetooth adapter sits on bus 1 and the webcam on bus two their respective ID’s should be 1-1 and 2-1. So I echoed the ID’s to the unbind file in the same directory:

$ echo -n "1-1" | sudo tee /sys/bus/usb/drivers/usb/unbind
$ echo -n "2-1" | sudo tee /sys/bus/usb/drivers/usb/unbind

Good riddance:

$ lsusb
Bus 001 Device 002: ID 8087:0024 Intel Corp. Integrated Rate Matching Hub
Bus 002 Device 002: ID 8087:0024 Intel Corp. Integrated Rate Matching Hub
Bus 001 Device 001: ID 1d6b:0002 Linux Foundation 2.0 root hub
Bus 002 Device 001: ID 1d6b:0002 Linux Foundation 2.0 root hub
Bus 003 Device 001: ID 1d6b:0002 Linux Foundation 2.0 root hub
Bus 004 Device 001: ID 1d6b:0003 Linux Foundation 3.0 root hub

Then I started JACK again with -p64 using an USB audio interface connected to bus 3 (so no rate matching hub in between) and no more xruns, not even with a generic kernel and using WiFi and all. Next hurdle is the onboard sound. Below -p128 I get bursts of massive xruns and so far I didn’t manage to pinpoint the culprit.

Edit #1: I’ve found out that the Bluetooth adapter is the main bottleneck. Also, by echoing the aformentioned ID’s (1-1 and 2-1) you disable the whole USB bus apparently. To disable just the USB device echo the last ID in the respective path names, so for the Bluetooth adapter that’s 1-1.3 and for the webcam 2-1.6. This way you can still use the USB bus on which these devices are residing. In my case disabling the whole bus is not an option, this would mean I’d have to connect all my USB interfaces to bus 3 (bus 4 doesn’t have any external inputs) which could result in these devices getting in each other’s way with regard to bandwidth. After echoing the ID’s the output of the tree command looks like this:

$ tree /sys/bus/usb/drivers/usb
/sys/bus/usb/drivers/usb
??? 1-1 -> ../../../../devices/pci0000:00/0000:00:1a.0/usb1/1-1
??? 2-1 -> ../../../../devices/pci0000:00/0000:00:1d.0/usb2/2-1
??? bind
??? uevent
??? unbind
??? usb1 -> ../../../../devices/pci0000:00/0000:00:1a.0/usb1
??? usb2 -> ../../../../devices/pci0000:00/0000:00:1d.0/usb2
??? usb3 -> ../../../../devices/pci0000:00/0000:00:14.0/usb3
??? usb4 -> ../../../../devices/pci0000:00/0000:00:14.0/usb4

The lsusb command still shows the devices though.

Edit #2: unbinding drivers like described above won’t persist across reboots. If you’d like to make the unbinding persistent you could add the unbind command to /etc/rc.local or create a script that runs at login. There are other options of course like blacklisting the Bluetooth drivers.

Resolved JACK issues on notebook

Icidu Wireless Nano Router 150N

We hebben sinds kort een nieuwe Blu-Ray speler met een ethernetaansluiting en de mogelijkheid om draadloos netwerk te kunnen gebruiken mbv. een speciale Wi-Fi adapter. Probleem is alleen dat de netwerkkabel die voorheen in mijn KiSS DP-1500 zat nu in onze Gigaset telefoon zit dus kan de Blu-Ray speler alleen via Wi-Fi in ons netwerk hangen. Die speciale Wi-Fi adapter kost echter een vermogen (meer dan de helft van de oorspronkelijke aanschafprijs!) en uiteraard zijn er geen goedkopere Wi-Fi adapters die het ook doen icm. de Blu-Ray speler. Hoe hang ik nu die Blu-Ray speler in ons netwerk zonder al te veel uit te hoeven geven?

Oplossing: een extra draadloos routertje aanschaffen, deze in het bestaande draadloze netwerk hangen en de ethernetpoort van de Blu-Ray speler verbinden met een ethernetpoort van de router. Hier zijn zelfs specifieke routertjes voor zoals de Netgear Wnce2001 en de Asus WL-330N3G. De goedkoopste is echter de Icidu Wireless Nano Router 150N. Voor een geeltje is deze verkrijgbaar bij diverse toko’s. Heb ‘m zelf bij MyCom besteld en als je de Zalando tegoedbon van een tientje meerekent in de aanschafprijs is ie bij MyCom eigenlijk maar €15,-. En naast dat dit routertje goedkoop is is ie ook superklein en superzuinig.

Goedkoopnessness komt uiteraard met een prijs. De handleiding van de Nano Router gaat uit van een oudere firmware versie en is verre van gedetailleerd en hoewel mijn specifieke usercase genoemd wordt in de handleiding staat nergens uitgelegd hoe je dit in moet regelen. Hieronder dan ook een stappenplan om van de Nano Router een Wi-Fi adapter te maken voor je Blu-Ray/Media- of whateverplayer.

  1. Sluit de LAN poort van de Nano Router met een ethernetkabeltje aan op je PC en voorzie de router van voeding met de bijgeleverde Micro USB kabel
  2. Surf naar de configuratiepagina van de router (192.168.2.1)
  3. Ga naar General SetupWirelessBasic Settings en zet Mode op Station (Infrastructure) en SSID op de SSID van je bestaande Wi-Fi netwerk
  4. Ga vervolgens naar Security Settings en geef hier de authenticatiegegevens van je bestaande Wi-Fi netwerk op
  5. In General SetupLAN vul je bij LAN IP een IP adres in die binnen de range van je bestaande Wi-Fi netwerk valt (en bij voorkeur buiten de DHCP scope van je netwerk) en schakel DHCP uit
  6. Druk op APPLY en in het Save settings succesfully! scherm druk je nog een keer op APPLY
  7. De router herstart nu en zou daarna in het bestaande Wi-Fi netwerk moeten hangen met het LAN IP wat je hebt opgegeven
  8. Sluit nu je Blu-Ray speler aan op het LAN poortje van de router en je speler zou nu via DHCP een IP adress van je hoofdrouter moeten krijgen en het interwebs op moeten kunnen

Edit: waarom trek je gewoon niet nog een kabel? Nou, de router staat op de 1e verdieping en heb de kabels destijds tijdens de verbouwing getrokken. Nu alles verbouwd is wordt het een heidens karwei om een extra kabel te trekken. Een extra routertje is dan een veel snellere oplossing.

Icidu Wireless Nano Router 150N

De gemakkelijkste manier om draadloos te tetheren met je LG GW620

Heb al een tijdje een LG GW620 en ben er tot nu toe erg over te spreken, ook al staat er een oude Android versie op, is het scherm capacitief wat sommigen als hopeloos ouderwets beschouwen en is het geen snelheidswonder. Maar juist één van de belangrijkste redenen waarom ik een dergelijke telefoon heb gekocht, tetheren via Bluetooth of Wifi, werkt dus niet vanwege de wat oudere Android versie (Cupcake 1.5). Tetheren via USB lukt wel met behulp van AziLink maar ten eerste zit je dan toch nog met een draadje, ten tweede gaat de telefoon zich dan opladen waardoor de batterij van m’n netbook in no time leeg wordt getrokken en ten derde is het opzetten van de connectie vanaf mijn netbook best wel een gedoe.

En toen stuitte ik op Barnacle Wifi Tether en nu kan het USB kabeltje in de tas blijven zitten. Het grote voordeel van Barnacle is dat het geen Netfilter gebruikt dus het werkt ook met Android versies die een kernel hebben zonder Netfilter (zoals het geval is met de LG GW620). En het is super simpel op te zetten op je telefoon en ook het verbinden vanuit Ubuntu gaat makkelijk. Enige hobbel wellicht is dat je een geroote telefoon moet hebben.

Op de GW620 kun je Barnacle Wifi Tether installeren via de Market. Barnacle is FLOSS dus het kost je niks. Open vervolgens de Barnacle applicatie op je telefoon en druk op ‘Start’. In het ‘log’ tabje zie je nu wat meldingen voorbij komen en de eerste keer dat je dit doet zal Barnacle vragen of de applicatie root access mag hebben. Vervolgens zou Barnacle goed op moeten starten, waarschijnlijk komt wel de melding ‘shell init: error retrieving current directory: getcwd: cannot access parent directories: Permission denied’ voorbij maar dat heeft geen invloed op de verdere werking van Barnacle.

Om vanaf je Ubuntu 10.04 installatie connectie te maken heb  je helaas niet veel aan NetworkManager. NetworkManager gaat namelijk om de haverklap access points scannen en allerlei andere dingen doen waar Barnacle Wifi Tether niks mee kan waardoor de verbinding gelijk weer verbroken wordt. Dus zul je het handmatig met een scriptje moeten doen:

#!/bin/bash
service network-manager stop
ifconfig wlan0 down
iwconfig wlan0 mode ad-hoc
iwconfig wlan0 essid barnacle
iwconfig wlan0 channel 1
ifconfig wlan0 up
sleep 2
dhclient wlan0

Noem dit scriptje bijv. ‘barnacle’ en voer het uit met sudo ./barnacle nadat je Barnacle Wifi Tether op je GW620 hebt geactiveerd. Je telefoon zou nu een bericht toontje moeten laten horen en in het log schermpje zou moeten komen te staan dat je verbonden bent.

De gemakkelijkste manier om draadloos te tetheren met je LG GW620