Using the Tascam US-144MKII with Linux

Today I got a Tascam US-144MKII from a colleague because he couldn’t use it anymore with Mac OSX. Apparently this USB2.0 audio interface stopped working on El Capitan. Tascam claims they’re working on a driver but they’re only generating bad publicity with that announcement it seems. So he gave it to me, maybe it would work on Linux.
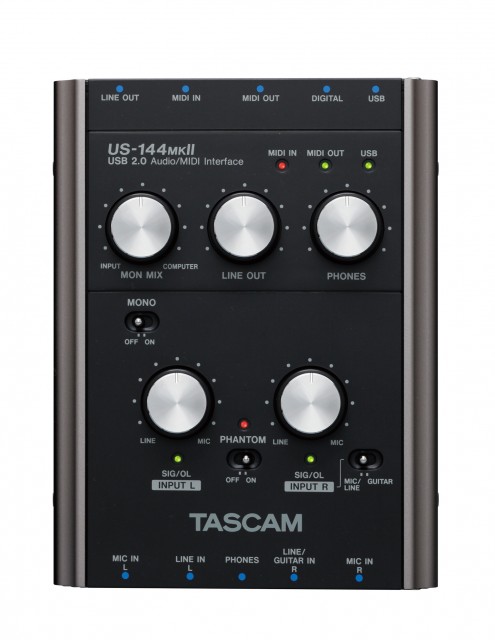
Tascam US-144MKII
Tascam US-144MKII

First thing I did was plugging it in. The snd_usb_122l module got loaded but that was about it. So much for plug and play. There are reports though that this interface should work so when I got home I started digging a bit deeper. Apparently you have to disable the ehci_hcd USB driver, which is actually the USB2.0 controller driver, and force the US-144MKII to use the uhci_hcd USB1.1 driver instead so that it thinks it’s in USB1.1 mode. This limits the capabilities of the device but my goal for today was to get sound out of this interface, not getting the most out of it.

I quickly found out that on my trusty XPS13 forcing USB1.1 was probably not going to work because it only has USB3.0 ports. So I can disable the ehci_hcd driver but then it seems the xhci_hcd USB3.0 driver takes over. And disabling that driver effectively disables all USB ports. So I grabbed an older notebook with USB2.0 ports and disabled the ehci_hcd driver by unbinding it since it’s not compiled as a module. Unbinding a driver is done by writing the system ID of a device to a so-called unbind file of the driver that is bound to this device. In this case we’re interested in the system ID’s of the devices that use the ehci_hcd driver which can be found in /sys/bus/drivers/ehci-pci/:

# ls /sys/bus/pci/drivers/ehci-pci/
0000:00:1a.7  bind  new_id  remove_id  uevent  unbind
# echo -n "0000:00:1a.7" > /sys/bus/pci/drivers/ehci-pci/unbind

This will unbind the ehci_hcd driver from the device with system ID 0000:00:1a.7 which in this case is an USB2.0 controller.When plugging in the USB interface it now got properly picked up by the system and I was greeted with an active green USB led on the interface as proof.

$ cat /proc/asound/cards
 0 [Intel          ]: HDA-Intel - HDA Intel
                      HDA Intel at 0xf4800000 irq 46
 1 [US122L         ]: USB US-122L - TASCAM US-122L
                      TASCAM US-122L (644:8020 if 0 at 006/002

So ALSA picked it up as a device but it doesn’t show up in the list of sound cards when issuing aplay -l. This is because you have to tell ALSA to talk to the device in a different way then to a normal audio interface. Normally an audio interface can be addressed by using the hw plugin which is the most low-level ALSA plugin that does nothing more than talking to the driver and this is what most applications use, including JACK. The US-144MKII works differently though, its driver snd_usb_122l has to be accessed with the use of the usb_stream plugin which is part of the libasound2-plugins package and that allows you to set a PCM device name that can be used with JACK for instance. This can be done with the following .asoundrc file that you have to create in the root of your home directory:

pcm.us-144mkii {
        type usb_stream
        card "US122L"
}

ctl.us-144mkii {
        type hw
        card "US122L"
}

What we do here is creating a PCM device called us-144mkii and coupling that to the card name we got from cat /proc/asound/cards which is US122L. Of course you can name the PCM device anything you want. Almost all other examples name it usb_stream but that’s a bit confusing because that is the name of the plugin and you’d rather have a name that has some relation to the device you’re using. Also practically all examples use card numbers. But who says that the USB audio interface will always be card 0, or 1. It could also be 2, or 10 if you have 9 other audio interfaces. Other examples work around this by fixing the order of the numbers that get assigned to each available audio interface by adjusting the index parameter for the snd_usb_122l driver. But why do that when ALSA also accepts the name of the card? This also makes thing a lot easier to read, it’s now clear that we are coupling the PCM name us-144mkii to the card named US122L. And we’re avoiding having to edit system-wide settings. The ctl stanza is not strictly necessary but it prevents the following warning when starting JACK:

ALSA lib control.c:953:(snd_ctl_open_noupdate) Invalid CTL us-144mkii
control open "us-144mkii" (No such file or directory)

So with the .asoundrc in place you can try starting JACK:

$ jackd -P85 -t2000 -dalsa -r48000 -p512 -n2 -Cus-144mkii -Pus-144mkii
jackd 0.124.2
Copyright 2001-2009 Paul Davis, Stephane Letz, Jack O'Quinn, Torben Hohn and others.
jackd comes with ABSOLUTELY NO WARRANTY
This is free software, and you are welcome to redistribute it
under certain conditions; see the file COPYING for details

no message buffer overruns
JACK compiled with System V SHM support.
loading driver ..
apparent rate = 48000
creating alsa driver ... us-144mkii|us-144mkii|512|2|48000|0|0|nomon|swmeter|-|32bit
configuring for 48000Hz, period = 512 frames (10.7 ms), buffer = 2 periods
ALSA: final selected sample format for capture: 24bit little-endian in 3bytes format
ALSA: use 2 periods for capture
ALSA: final selected sample format for playback: 24bit little-endian in 3bytes format
ALSA: use 2 periods for playback

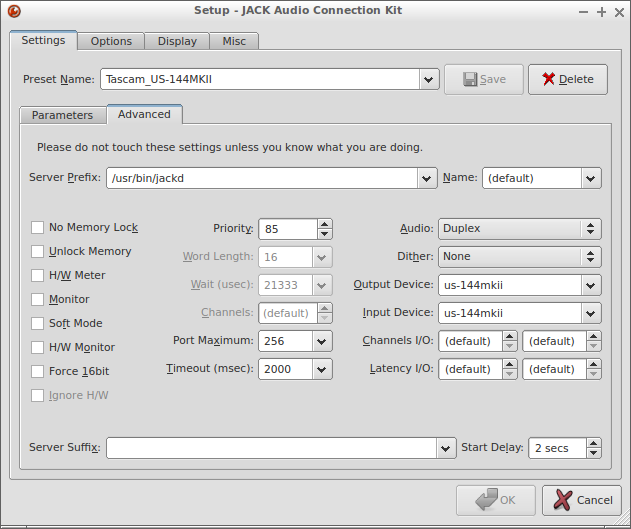
This translates to the following settings in QjackCtl:
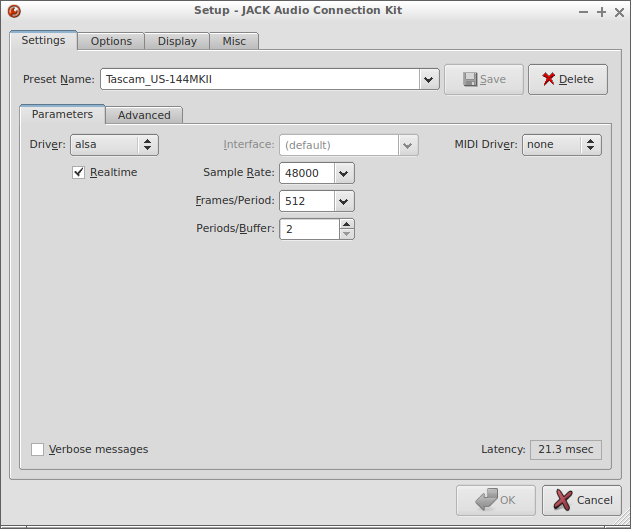
QjackCtl Settings – Parameters
QjackCtl Settings – Advanced

Don’t expect miracles of this setup. You won’t be able to achieve super low-latencies but at least you can still use your Tascam US-144MKII instead of having to give it away to a colleague.
Using the Tascam US-144MKII with Linux

Using a Qtractor MIDI track for both MIDI and audio

Basically Qtractor only does either MIDI or audio. The MIDI tracks are for processing MIDI and the audio tracks for processing audio. But a MIDI track in Qtractor can also post-process the audio coming out of a synth plug-in with FX plug-ins so it’s a bit more than just a MIDI track.

But what about plug-ins that do both audio and MIDI, like the LV2 version of the autotuner application zita-at1? If you put it in an audio track it will happily autotune all the audio but it won’t accept any incoming MIDI to pitch only to the MIDI notes it is being fed. And no way you can get MIDI into a Qtractor audio track. There’s no MIDI insert plug-in or the possibility to somehow expose MIDI IN ports of a plug-in in an audio track to Jack MIDI or ALSA.

But Qtractor does have a built-in Insert plug-in that can be fed audio from an audio bus and since a Qtractor MIDI track does know how to handle audio would it also know how to deal with such an insert? Well, yes it can which allows you to use a plug-in like the LV2 version of zita-at1 inside a MIDI track.

Setting up buses and tracks

You will need at least one bus and two tracks (of course you can use different bus and track names):

  • AutoTuneMix bus, input only and 2 channels
  • AutoTune MIDI track with dedicated audio outputs (this will create an audio bus called AutoTune)
  • AutoTuneMix audio track with the AutoTuneMix as input bus

Alternatively you could also skip the use of dedicated audio outputs and have the MIDI track output to the Master bus. This way you avoid the risk of introducing extra latency and the need to set up extra connections. You do lose the flexibility then to do basic stuff on the outcoming audio like panning or adjusting the gain. Which you can also workaround of course by using additional panning and/or gain plug-ins.

Once you’ve created the bus and the tracks insert the following plug-ins into the AutoTune MIDI track:

  • Insert
  • Any pre-processing effects plug-ins (like a compressor) – optional
  • LV2 version of zita-at1 autotuner
  • Any post-processing effects plug-ins (like a reverb) – optional

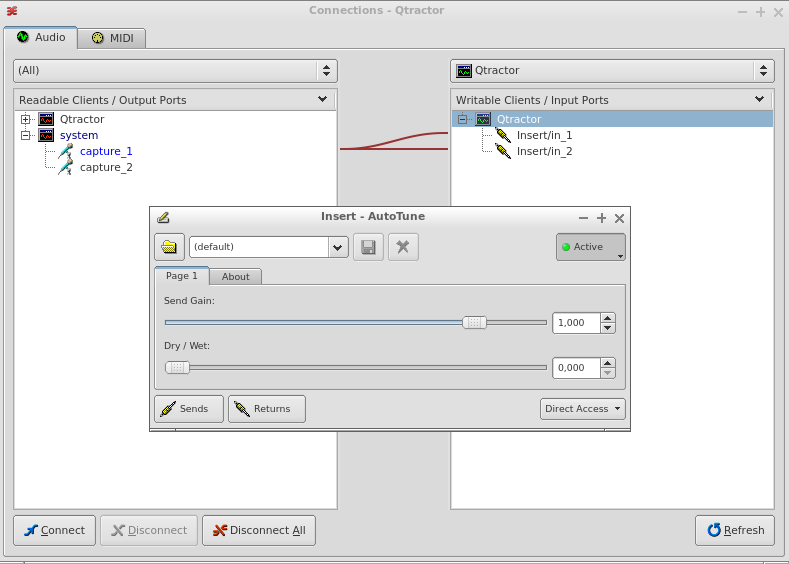
Insert them into this specific order. It is also possible to do the post-processing in the AutoTuneMix audio track. Now open the Properties window of the Insert plug-in and then open the Returns window. Connect the mic input of your audio device to the Insert/in ports as shown below.

Qtractor AutoTune Insert

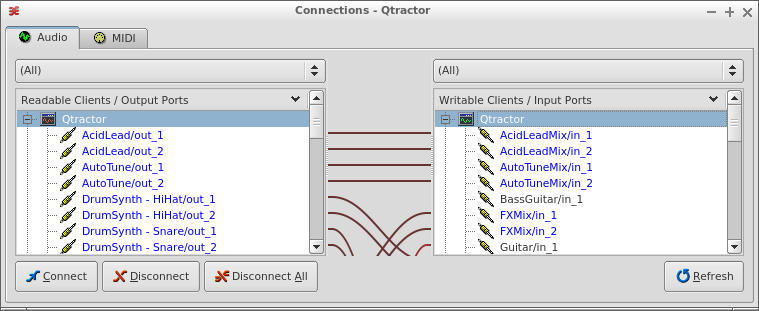
Connect the AutoTune bus outputs to the AutoTuneMix inputs:

Qtractor Connections

Create a MIDI clip with notes to autotune

Create a MIDI clip with the notes you would like to get autotuned in the AutoTune MIDI track, put the play-head on the right position and press play. Now incoming audio from the mic input of your audio device should get autotuned to the MIDI notes you entered in the MIDI clip:

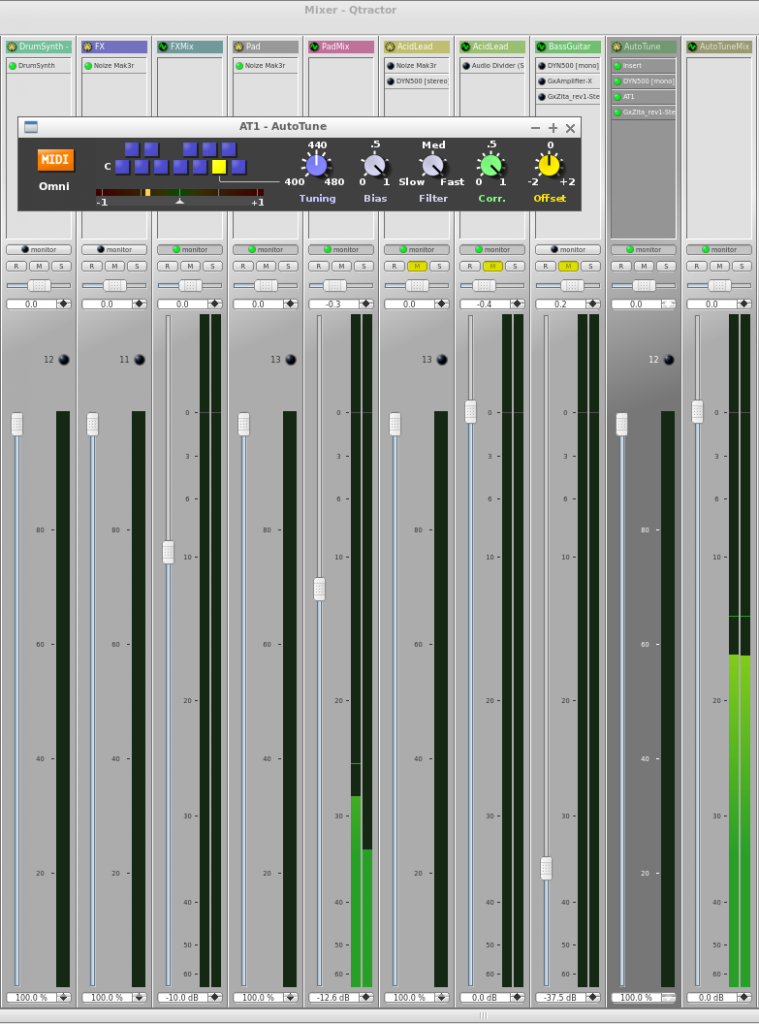
Qtractor Mixer with LV2 version of zita-at1 autotuner

As you can see both MIDI and audio goes through the AT1 autotuner plug-in and the outcoming audio is being fed into the AutoTuneMix track where you can do the rest of your post-processing if you wish.

Using a Qtractor MIDI track for both MIDI and audio

Working on a stable setup

Next step for the synth module project was to get the Raspberry Pi 2 to run in a stable manner. It seems like I’m getting close or that I’m already there. First I built a new RT kernel based on the 4.1.7 release of the RPi kernel. Therefore I had to checkout an older git commit because the RPi kernel is already at 4.1.8. The 4.1.7-rt8 patchset applied cleanly and the kernel booted right away:

pi@rpi-jessie:~$ uname -a
 Linux rpi-jessie 4.1.7-rt8-v7 #1 SMP PREEMPT RT Sun Sep 27 19:41:20 CEST 2015 armv7l GNU/Linux

After cleaning up my cmdline.txt it seems to run fine without any hiccups so far. My cmdline.txt now looks like this:

dwc_otg.lpm_enable=0 dwc_otg.speed=1 console=ttyAMA0,115200 console=tty1 root=/dev/mmcblk0p2 rootfstype=ext4 rootflags=data=writeback elevator=deadline rootwait

Setting USB speed to Full Speed (so USB1.1) by using dwc_otg.speed=1 is necessary otherwise the audio coming out of my USB DAC sounds distorted.

I’m starting ZynAddSubFX as follows:

zynaddsubfx -r 48000 -b 64 -I alsa -O alsa -P 7777 -L /usr/share/zynaddsubfx/banks/SynthPiano/0040-BinaryPiano2.xiz

With a buffer of 64 frames latency is very low and so far I haven’t run into instruments that cause a lot of xruns with this buffer size. Not even the multi-layered ones from Will Godfrey.

So I guess it’s time for the next step, creating a systemd startup unit so that ZynAddSubFX starts at boot. And it would be nice if USB MIDI devices would get connected automatically. And if you could see somehow which instrument is loaded, an LCD display would be great for this. Also I’d like to have the state of the synth saved, maybe by saving an .xmz file whenever there’s a state change or on regular intervals. And the synth module will need a housing or casing. Well, let’s get the software stuff down first.

Working on a stable setup

Using a Raspberry Pi as a piano

Recently I posted about my successful attempt to get LinuxSampler running on the Raspberry Pi. I’ve taken this a bit further and produced a script that turns the Raspberry Pi into a fully fledged piano. Don’t expect miracles, the sample library I used is good quality so the RPi might choke on it every now and then with regard to disk IO. But it’s usable if you don’t play too many notes at once or make extensive use of a sustain pedal. I’ve tested the script with a Class 4 SD though so a faster SD card could improve stability.

Edit: finally got around buying a better SD card and the difference is huge! I bought a SanDisk Extreme Class 10 SD card and with this SD card I can run LinuxSampler at lower latencies and I can play more notes at once.

Before you can run the script on your Raspberry Pi you will need to tweak your Raspbian installation so you can do low latency audio. How to achieve this is all described in the Raspberry Pi wiki article I’ve put up on wiki.linuxaudio.org. After you’ve set up your RPi you will need to install JACK and LinuxSampler with sudo apt-get install jackd1 linuxsampler. Next step is to get the Salamander Grand Piano sample pack on your RPi:

cd
mkdir LinuxSampler
cd LinuxSampler
wget -c http://download.linuxaudio.org/lau/SalamanderGrandPianoV2
/SalamanderGrandPianoV2_44.1khz16bit.tar.bz2
wget -c http://dl.dropbox.com/u/16547648/sgp44.1khz_V2toV3.tar.bz2
tar jxvf SalamanderGrandPianoV2/SalamanderGrandPianoV2_44.1khz16bit.tar.bz2
tar jxvf sgp44.1khz_V2toV3.tar.bz2 -C SalamanderGrandPianoV2_44.1khz16bit
--strip-components=1

Please note that decompressing the tarballs on the RPi could take some time. Now that you’ve set up the Salamander Grand Piano sample library you can download the script and the LinuxSampler config file:

cd
mkdir bin
wget -c https://raw.github.com/AutoStatic/scripts/rpi/piano -O /home/pi/bin/piano
chmod +x bin/piano
wget -c https://raw.github.com/AutoStatic/configs/rpi/home/pi/LinuxSampler
/SalamanderGrandPianoV3.lscp -O
/home/pi/LinuxSampler/SalamanderGrandPianoV3.lscp

Almost there. We’ve installed the necessary software and downloaded the sample library, LinuxSampler config and piano script. Now we need to dot the i’s and cross the t’s because the script assumes some defaults that might be different in your setup. Let’s dissect the script:

#!/bin/bash

if ! pidof jackd &> /dev/null
then
  sudo killall ifplugd &> /dev/null
  sudo killall dhclient-bin &> /dev/null
  sudo service ntp stop &> /dev/null
  sudo service triggerhappy stop &> /dev/null
  sudo service ifplugd stop &> /dev/null
  sudo service dbus stop &> /dev/null
  sudo killall console-kit-daemon &> /dev/null
  sudo killall polkitd &> /dev/null
  killall gvfsd &> /dev/null
  killall dbus-daemon &> /dev/null
  killall dbus-launch &> /dev/null
  sudo mount -o remount,size=128M /dev/shm &> /dev/null
  echo -n performance
| sudo tee /sys/devices/system/cpu/cpu0/cpufreq/scaling_governor &> /dev/null
  if ip addr | grep wlan &> /dev/null
  then
    echo -n "1-1.1:1.0" | sudo tee /sys/bus/usb/drivers/smsc95xx/unbind &> /dev/null
  fi
  jackd -P84 -p128 -t2000 -d alsa -dhw:UA25 -p512 -n2 -r44100 -s -P -Xseq
&> /dev/null &
fi

This is the first section of the script. An if clause that checks if JACK is already running and if that’s not the case the system gets set up for low latency use, a simple check is done if there is an active WiFi adapter and if so the ethernet interface is disabled and then on the last line JACK is invoked. Notice the ALSA name used, hw:UA25, this could be different on your RPi, you can check with aplay -l.

jack_wait -w &> /dev/null

jack_wait is a simple app that does nothing else but checking if JACK is active, the -w option means to wait for JACK to become active.

if ! pidof linuxsampler &> /dev/null
then
  linuxsampler --instruments-db-location $HOME/LinuxSampler/instruments.db
&> /dev/null &
  sleep 5
netcat -q 3 localhost 8888
< $HOME/LinuxSampler/SalamanderGrandPianoV3.lscp &> /dev/null &
fi

This stanza checks if LinuxSampler is running, if not LinuxSampler is started and 5 seconds later the config file is pushed to the LinuxSampler backend with the help of netcat.

while [ "$STATUS" != "100" ]
do
  STATUS=$(echo "GET CHANNEL INFO 0" | netcat -q 3 localhost 8888
| grep INSTRUMENT_STATUS | cut -d " " -f 2 | tr -d 'rn')
done

A simple while loop that checks the load status of LinuxSampler. When the load status has reached 100% the script will move on.

jack_connect LinuxSampler:0 system:playback_1 &> /dev/null
jack_connect LinuxSampler:1 system:playback_2 &> /dev/null
#jack_connect alsa_pcm:MPK-mini/midi_capture_1 LinuxSampler:midi_in_0 &> /dev/null
jack_connect alsa_pcm:USB-Keystation-61es/midi_capture_1 LinuxSampler:midi_in_0
&> /dev/null

This part sets up the necessary JACK connections. The portnames of the MIDI devices can be different on your system, you can look them up with jack_lsp which will list all available JACK ports.

jack_midiseq Sequencer 176400 0 69 20000 22050 57 20000 44100 64 20000 66150 67 20000 &
sleep 4
jack_connect Sequencer:out LinuxSampler:midi_in_0
sleep 3.5
jack_disconnect Sequencer:out LinuxSampler:midi_in_0
killall jack_midiseq

This is the notification part of the script that will play four notes. It’s based on jack_midiseq, another JACK example tool that does nothing more but looping a sequence of notes. It’s an undocumented utility so I’ll explain how it is invoked:

jack_midiseq

<command> <JACK port name> <loop length> <start value> <MIDI note value> <length value>

Example:
jack_midiseq Sequencer 176400 0 69 20000 22050 57 20000 44100 64 20000 66150 67 20000

JACK port name: Sequencer
Loop length: 4 seconds at 44.1 KHz (176400/44100)
Start value of first note: 0
MIDI note value of first note: 69 (A4)
Length value: 20000 samples, so that's almost half a second
Start value of second note: 22050 (so half a second after the first note)
MIDI note value of second note: 57 (A3)
Length value: 20000 samples
Start value of third note: 44100 (so a second after the first note)
MIDI note value of second note: 64 (E4)
Length value: 20000 samples
Start value of third note: 66150 (so one second and a half after the first note)
MIDI note value of second note: 67 (G4)
Length value: 20000 samples

Now the script is finished, the last line calls exit with a status value of 0 which means the script was run successfully.

exit 0

After making the script executable with chmod +x ~/bin/piano and running it you can start playing piano with your Raspberry Pi! Again, bear in mind that the RPi is not made for this specific purpose so it could happen that audio starts to stutter every now and then, especially when you play busy parts or play more than 4 notes at once.


Using a Raspberry Pi as a piano: quick demo

Using a Raspberry Pi as a piano

Workshops Music Production with Open Source Software: Introduction and Basic Principles

This Saturday my series of workshops about music production with open source software will kick off. The first workshop will be an introduction to the open source ecosystem and attendees will get acquainted with some basic Linux audio principles; different work-flows (monolithic vs modular), ALSA/JACK/PulseAudio, most used and most useful applications and maybe a bit about plug-in frameworks (LADSPA/DSSI/LV2/VST). I will also outline the content of the following workshops and this workshop is a gauge to see if there is enough interest. So people should show up in considerate numbers because I’m not going to invest another 5 Saturday afternoons for just a few people. After all, I’m doing this for free (as in beer).

Announcement on the site of De Bakkerij

Facebook event

Workshops Music Production with Open Source Software: Introduction and Basic Principles

De beer is los

En hij heet KLANG – Kernel Level Audio Next Generation. Een medewerker van een universiteit In München vindt de hele Linux audio stack maar niks, al dat user space gedoe, dat moet allemaal in kernel space gebeuren. En op basis van OSS want ook de ALSA driver stack is natuurlijk helemaal crap. En omdat het allemaal fundamenteel verkeerd is gaat hij van de grond af iets nieuws bouwen. Dus hij legt een websiteje aan, doet een aankondiginkje en verwondert zich er vervolgens over dat het wordt opgepikt.

En als vervolgens Phoronix en zelfs Paul Davis (de belangrijkste man achter Ardour en JACK) er aandacht aan gaan besteden heeft datenwolf heel wat uit te leggen. Ik wens hem heel veel succes, zowel met KLANG als met het uitleggen waar hij nou mee bezig denkt te zijn.

De beer is los

Gaat FFADO eruit?

Als het echt wat gaat worden met de ALSA firewire-kernel-streaming driver (aka Fireworks driver) dan kun je straks wellicht zonder extra drivers te hoeven installeren je FireWire geluidskaart gebruiken. Aan het FFADO front gebeurt niet zo gek veel, op wat echt grote bugs na, dus het zou me niet verbazen als deze ALSA driver het stokje op de lange termijn over gaat nemen. De oorspronkelijke git branch is recentelijk al gemerged met een ‘private’ ALSA git branch dus wie weet wordt de driver wel onderdeel van de ALSA driver stack.

Gaat FFADO eruit?

JACK en Flash

Op mijn muziek PC gebruik ik geen PulseAudio en alleen JACK. Flash kan niks met JACK dus ik kan wel Flash filmpjes bekijken maar dan alleen zonder geluid. Onhandig natuurlijk. Dus een oplossing voor proberen te vinden. Uiteindelijk op drie mogelijke opties uitgekomen:

  1. De PulseAudio modules laden die met JACK kunnen praten.
  2. Libflashsupport-jack compileren en installeren.
  3. De JACK ALSA plugin installeren.

Optie 1 viel af, ik gebruik immers geen PulseAudio. Optie 2 ook want kennelijk is libflashsupport niet echt heel stabiel en bovendien heel beperkt. Dus ben voor optie 3 gegaan, wat me zelf ook wel de elegantste oplossing leek. Het libasound2-plugins pakketje van Ubuntu mist weliswaar de JACK plugin maar een versie met de JACK plugin staat in de PPA van Motin. Deze geïnstalleerd, een werkend .asoundrc bestand gefabriekt  en in mijn homedirectory gezet. Browser herstart, Youtube filmpje aangezet en nu dus mooi wel met geluid via mijn Firewire kaart.

JACK en Flash

JACK en meerdere geluidskaarten

JACK kan meerdere geluidskaarten aan, als ze maar dezelfde backend gebruiken (ALSA, FFADO, OSS). Je kan verschillende kaarten instellen voor de in- en output devices maar mocht je meerdere input en/of output devices willen gebruiken, bijvoorbeeld twee verschillende geluidskaarten voor de output tbv monitoring, dan is er de mogelijkheid om dat met de tooltjes alsa_in en alsa_out te doen.

Op mijn Fedora 12 installatie werkt dat prima maar op mijn Ubuntu machines kon ik deze tooltjes niet vinden. Even Googlen en snel de oorzaak achterhaald, kennelijk vergeten ze bij Ubuntu iedere keer JACK te compileren met libsamplerate. Mocht er behoefte aan zijn dan kan ik JACK packagen met de tooltjes die afhankelijk zijn van libsamplerate, zoals alsa_in en alsa_out. Heb wel al Karmic 64-bits pakketjes geüpload.

Een programma waar het tooltje alsa_out van pas zou kunnen komen is Mixxx met JACK als Sound API. Als je Mixxx samen met JACK gebruikt kun je voor je Master en je Headphones kanalen geen verschillende geluidskaarten instellen. Maar als je nadat je JACK hebt opgestart en voordat je Mixxx opstart het volgende terminal commando opgeeft kan dat wel:

alsa_out -j cmedia -d hw:1 -c 2 &

Dit commando is uiteraard wel afhankelijk van de configuratie van je geluidskaarten. Hoe dat ingesteld is kun je oproepen met het terminal commando aplay -l:

[jeremy@werkpc ~]$ aplay -l
**** List of PLAYBACK Hardware Devices ****
card 0: Intel [HDA Intel], device 0: AD198x Analog [AD198x Analog]
  Subdevices: 1/1
  Subdevice #0: subdevice #0
card 0: Intel [HDA Intel], device 1: AD198x Digital [AD198x Digital]
  Subdevices: 0/1
  Subdevice #0: subdevice #0
card 1: default [C-Media USB Headphone Set  ], device 0: USB Audio [USB Audio]
  Subdevices: 1/1
  Subdevice #0: subdevice #0

ALSA ziet de onboard HDA Intel kaart dus als card 0 (oftewel hw:0) en het ingeplugde C-Media USB geluidskaartje als card 1 (hw:1). Nu wordt het alsa_out commando hierboven ook gelijk duidelijker, als ik dat even snel ontleed staat er eigenlijk het volgende: gebruik device (-d) hw:1 (de C-Media USB geluidskaart) met 2 kanalen (-c 2) en geef deze ‘cmedia’ als naam voor JACK (-j cmedia). Je kunt nog meer instellingen meegeven maar voor dit voorbeeld volstaat bovengenoemd commando. Wat er nu gebeurt is dat er een nieuwe JACK ‘Writable Client/Input Port’ verschijnt in QjackCtl met de naam ‘cmedia’. Als je nu Mixxx opent kun je inderdaad via Options – Preferences – Sound Hardware de verschillende geluidskaarten instellen onder ‘Master’ en ‘Headphones’. ‘Master’ zet je dan op ‘system’ (in mijn geval de onboard HDA Intel) en ‘Headphones’ op ‘cmedia’. Koptelefoon aansluiten op de C-Media stick en stereotoren op de onboard kaart, voilà, monitoring op je koptelefoon en snoeiharde deathmetalitalodisco van Giörgiö Möröder op je stereo.

Al het bovenstaande gaat op voor wat in de wandelgangen wel jack1 wordt genoemd (versie 0.116.x), jack2 (versie 1.9.x, ook wel jackdmp genoemd, mp staat voor multiple processors) heeft deze functionaliteit al ingebakken, dus dan heb je alsa_in en alsa_out niet meer nodig.

JACK en meerdere geluidskaarten

LMMS aanzwengelen

Standaard gebruikt LMMS ALSA als backend voor het geluid. Maar ALSA kan maar één applicatie tegelijkertijd van geluid voorzien. Om ervoor te zorgen dat meerdere programma’s samen geluid kunnen produceren gebruikt Karmic Koala de PulseAudio sound server. En mocht PulseAudio nou net die ene applicatie zijn die de ALSA backend dus al geclaimd heeft. Oftewel, LMMS zal niet meer zijn dan de Linux Multi Media Silence (ipv. Studio). Nu kun je in LMMS de Audio Interface op PulseAudio zetten, maar in het desbetreffende venstertje staat al een waarschuwing: bad latency!

Setup LMMS

Er zal nu wel geluid komen uit LMMS maar echt optimaal werkt het niet. Als je bijv. met MIDI aan de slag wilt of met wat grotere samples dan zul je al snel tegen de beperking van PulseAudio aanlopen. ALSA kent die beperkingen nauwelijks dus het zou fijn zijn als je ALSA als backend zou kunnen gebruiken. Hier komt het programaatje pasuspender van pas. Met het pasuspender commando kun je PulseAudio tijdelijk uitzetten zodat een ander programma gebruik kan maken van ALSA, het ‘suspend’ pa, oftewel PulseAudio. LMMS kun je op deze manier ook geluid door laten geven aan ALSA, het volledige commando daarvoor is pasuspender — lmms
Voordat je LMMS op deze manier opstart moet je in een terminal eerst even aplay -l uitvoeren om erachter te komen wat de ALSA naam van je standaard geluidskaart is:

aplay -l
**** List of PLAYBACK Hardware Devices ****
card 0: Intel [HDA Intel], device 0: STAC92xx Analog [STAC92xx Analog]
  Subdevices: 1/1
  Subdevice #0: subdevice #0
card 0: Intel [HDA Intel], device 1: STAC92xx Digital [STAC92xx Digital]
  Subdevices: 1/1
  Subdevice #0: subdevice #0
card 0: Intel [HDA Intel], device 3: NVIDIA HDMI [NVIDIA HDMI]
  Subdevices: 1/1
  Subdevice #0: subdevice #0

Bij mij heet deze dus ‘Intel’ en als ik vervolgens in LMMS in het Audio Settings schermpje bij SETTINGS FOR ALSA ‘hw:Intel’ ingeef dan weet ALSA welk apparaat hij aan moet spreken:

Settings ALSA LMMS

Als ik nu LMMS opstart met pasuspender — lmms wordt PulseAudio tijdelijk uitgeschakeld en gebruikt LMMS ALSA als backend met de juiste geluidskaart. En dat werkt al een stuk beter. Kan nog beter natuurlijk mbv JACK maar daar wijdt ik nog wel een apart blogje aan aangezien JACK en LMMS niet zo heel goed met elkaar door één bocht kunnen. Maar met wat tweaken kun je al een heel eind komen. En LMMS 0.4.6 komt er aan, hopelijk met wat betere JACK ondersteuning.

LMMS aanzwengelen