New notebook – Doing real-time audio

Configuring this new machine took some effort but it can now run reliably with a few milliseconds of latency. First thing I did was installing a liquorix kernel as I have a good experience with those. Added the threadirqs kernel option to /etc/default/grub and updated the Grub configuration with sudo update-grub. After a reboot I was greeted with threaded IRQ’s.

Next step was to prioritize the desired IRQ’s, highest prio for the USB bus to which my audio interface is connected and also a high prio for the onboard audio. I decided to go the custom route as the tool I normally use for this, rtirq, prioritizes all USB threads and I only want the USB threads prioritized that do the audio work. Additional challenge was that these IRQ’s change on every boot. Concocted the following script snippet.

#!/bin/bash

# Prioritize USB port with sound card attached
# Since IRQ's change on every boot figure out IRQ dynamically

# Set maximum priority of the IRQ thread
prio=90

# Next IRQ thread found will get a priority
# decreased with the value set below
prio_step=5

# System paths to look for information
proc_path=/proc/asound
sys_pci_bus_path=/sys/class/pci_bus

# The logic - A for loop that does the following:
# * Iterates through all cards that are set by ALSA
# * Determines if it's an USB card
# * Sets priority on IRQ thread if this is the case,
    lowest card number gets the highest priority
for card_number in $(awk '/\[.*\]/ {print $1}' /proc/asound/cards); do

  if [ -e "$proc_path/card$card_number/usbid" -a -e "$proc_path/card$card_number/stream0" ]; then
    snd_dev_card=card$card_number
    snd_dev_pci_bus_ref=$(grep -Eo "usb-[^[:space:],-]+" $proc_path/$snd_dev_card/stream0 | sed "s/usb-\(.*\)/\1/")
    snd_dev_pci_bus_ref_short=$(awk -F ':' '{print $1":"$2}' <<<$snd_dev_pci_bus_ref)
    snd_dev_irq=$(cat $sys_pci_bus_path/$snd_dev_pci_bus_ref_short/device/$snd_dev_pci_bus_ref/irq)
    snd_dev_irq_pid=$(pgrep $snd_dev_irq-xhci)

    chrt -f -p $prio $snd_dev_irq_pid

    prio=$((prio-prio_step))
  fi

done

This snippet assumes the card numbers are set properly by assigning each card their own index value through the snd-usb-audio kernel module. This can be done with a file in /etc/modprobe.d/, i.e. /etc/modprobe.d/audio.conf. For my USB devices the relevant line in this file looks like this:

# RME Babyface, Edirol UA-25, Akai MPK Mini, Arturia BeatStep Pro, Behringer BCR2000
options snd-usb-audio index=0,1,5,6,7 vid=0x0424,0x0582,0x09e8,0x1c75,0x1397 pid=0x3fb7,0x0074,0x007c,0x0287,0x00bc

So my RME Babyface gets the lowest index (card number) and thus the highest real-time priority.

For onboard audio the situation was a bit trickier. The Lenovo comes with three different audio devices:

  • Onboard audio, speakers and TRRS jack
  • Digital audio, HDMI
  • Onboard mic

I wanted to index all properly so they don’t get in the way of my USB devices. For the onboard audio and HDMI this was no problem, adding the following line to /etc/modprobe.d/audio.conf was enough:

# Onboard audio
options snd-hda-intel index=10,11

Unfortunately you can’t discern between multiple devices with the snd-hda-intel driver and in my case both cards also have no model name so they show up as HD-Audio Generic cards with ID names Generic and Generic_1. Not very helpful. Luckily you can assign ID names dynamically after boot so I used that to give each card a proper ID name:

# Assign proper ID's to onboard devices
# Device with vendor ID 1002 is HDMI
# Device with vendor ID 1022 is onboard audio
for card in card{10,11}; do

  if grep -q 1002 /sys/class/sound/$card/device/vendor; then
    echo -n HDMI > /sys/class/sound/$card/id

  elif grep -q 1022 /sys/class/sound/$card/device/vendor; then
    echo -n ALC257 > /sys/class/sound/$card/id

    # Prioritize IRQ of onboard audio
    snd_dev_irq=$(cat /sys/class/sound/$card/device/irq)
    snd_dev_irq_pid=$(pgrep $snd_dev_irq-snd_hda_intel)

    chrt -f -p $prio $snd_dev_irq_pid
  fi

done

Now both cards can be used with their ID names (so hw:ALC257 for instance) and the onboard audio device gets prioritized with the $prio value set earlier on. Now the only culprit remaining was the onboard mic.

The onboard mic, which gets ID name acp63, is driven by a kernel module with the name of snd-soc-ps-mach. Now this module doesn’t take the index parameter so enter the slots parameter for the top level snd kernel module. With this parameter you can set which slot gets assigned to a specific driver. So added the following to /etc/modprobe.d/audio.conf:

# Onboard mic
options snd slots=,,,,,,,,,,,,snd-soc-ps-mach

And voilà, this is what arecord -l now thinks of it:

$ arecord -l
**** List of CAPTURE Hardware Devices ****
card 0: Babyface2359686 [Babyface (23596862)], device 0: USB Audio [USB Audio]
  Subdevices: 1/1
  Subdevice #0: subdevice #0
card 11: ALC257 [HD-Audio Generic], device 0: ALC257 Analog [ALC257 Analog]
  Subdevices: 1/1
  Subdevice #0: subdevice #0
card 12: acp63 [acp63], device 0: DMIC capture dmic-hifi-0 []
  Subdevices: 1/1
  Subdevice #0: subdevice #0

Awesome, full control again! Everything properly named and prioritized. But how does this perform?

With my RME Babyface I can go down to 64 frames/period and 3 periods at 48kHz, so that’s a nominal latency of 4ms. And it’s rock solid at this setting:

$ ./xruncounter -m

******************** SYSTEM CHECK *********************

    Sound Playback: USB-Audio - Babyface (23596862)
     Sound Capture: USB-Audio - Babyface (23596862)
      Graphic Card: Advanced Micro Devices, Inc. [AMD/ATI] Phoenix1 (rev c7)
Operating System: Debian GNU/Linux 12 (bookworm)
          Kernel: Linux 6.6.11-1-liquorix-amd64
    Architecture: x86-64
               CPU: AMD Ryzen 7 7840HS with Radeon 780M Graphics

***************** jackd start parameter ****************

    /usr/bin/jackd -P80 -S -dalsa -dhw:Babyface2359686 -r48000 -p64 -n3 -Xseq

********************** Pulseaudio **********************

    pulse is not active

********************** Test 8 Core *********************

Samplerate is 48000Hz 
Buffersize is 64 
Buffer/Periods  3
jack running with realtime priority 80
Xrun 1 at DSP load 83.76% use 3.56ms from 1.33ms jack cycle time
Xrun 2 at DSP load 92.76% use 3.32ms from 1.33ms jack cycle time
Xrun 3 at DSP load 87.17% use 2.48ms from 1.33ms jack cycle time
Xrun 4 at DSP load 92.11% use 1.15ms from 1.34ms jack cycle time
Xrun 5 at DSP load 95.91% use 3.29ms from 1.33ms jack cycle time
Xrun 6 at DSP load 97.95% use 1.85ms from 1.33ms jack cycle time
in complete 6 Xruns in 16809 cycles                                  
first Xrun happen at DSP load 83.76% in cycle 16112
process takes 3.56ms from total 1.34ms jack cycle time

On my old BTO I could go lower though, it would run at 32 frames/period and 3 periods at 48kHz with clean audio but the Lenovo is limited to 64 frames/period. If you try to go lower you will get distorted audio and the kernel ring buffer will fill up with messages like below:

[11883.067551] retire_capture_urb: 1338 callbacks suppressed
[11883.083397] xhci_hcd 0000:66:00.4: WARN Event TRB for slot 1 ep 5 with no TDs queued?

Eventually I’ll dive deeper into this but for now I’m OK with running at 64 frames/period. The onboard audio runs too at very low settings but provides way less room to do anything useful. But just about enough to run some soft synths and MIDI input. As a comparison, here’s the output of xruncounter for the onboard audio. In my case onboard audio likes period sizes higher than 3 best. And no full duplex at this setting, playback only.

$ ./xruncounter -m

******************** SYSTEM CHECK *********************

      Graphic Card: Advanced Micro Devices, Inc. [AMD/ATI] Phoenix1 (rev c7)
Operating System: Debian GNU/Linux 12 (bookworm)
          Kernel: Linux 6.6.11-1-liquorix-amd64
    Architecture: x86-64
               CPU: AMD Ryzen 7 7840HS with Radeon 780M Graphics

***************** jackd start parameter ****************

    /usr/bin/jackd -P80 -S -dalsa -dhw:ALC257 -r48000 -p32 -n6 -Xseq -P

********************** Pulseaudio **********************

    pulse is not active

********************** Test 8 Core *********************

Samplerate is 48000Hz 
Buffersize is 32 
Buffer/Periods  6
jack running with realtime priority 80
Xrun 1 at DSP load 97.32% use 0.40ms from 0.67ms jack cycle time
in complete 1 Xruns in 5781 cycles                                  
first Xrun happen at DSP load 97.32% in cycle 5527
process takes 0.40ms from total 0.67ms jack cycle time

So in my opinion the Lenovo performs pretty well. I do need to run these tests on my old BTO too to find out how much performance I’ve gained. And if I could find a way to work around or find a solution for those xhci_hcd warnings so that I can go even lower then that would be terrific. It could very well be a limitation of the USB implementation of this notebook but I can live with that as it runs really stable at sub 5ms latencies.

New notebook – Doing real-time audio

rtcqs v0.4.2 released

This release comes with a new Power Management check which checks if the audio group has read/write permissions on /dev/cpu_dma_latency. If your user is a member of the audio group and permissions are set for this group then DAW’s like Ardour and Reaper can open this file as your user, keep it open and control power management this way. This allows a user to prevent CPU sleep states for example so your CPUs are always on and instantly available which could lower the chance running into xruns.

Ardour CPU DMA latency setting Under Edit – Preferences – Performance

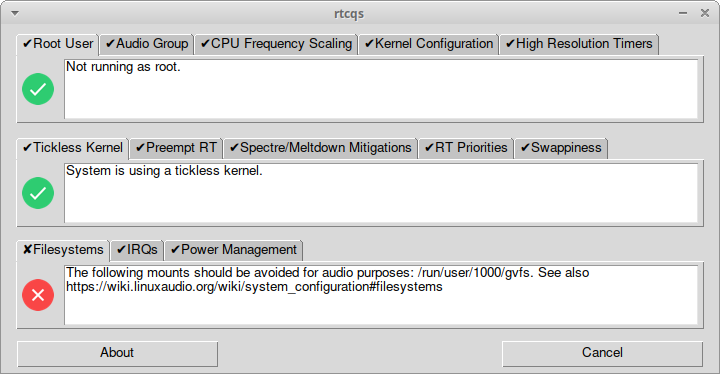
This release also introduces a new basic and simple tkinter-based GUI. The Qt GUI does look fancy but to use it it also needs a fancy amount of dependencies. When building binaries with PyInstaller the result of the Qt GUI is a whopping 130MB package while the tkinter version stays below 12MB.

rtcqs tkinter GUI

Future plans are to get rid of some checks:

  • Max user watches as it’s not related to the overall performance of your system
  • System timer as it’s not relevant anymore, rtcqs already checks for the more relevant stuff (high res timers and tickless kernel)
  • Background processes as it’s merely a placeholder which checks for two processes that don’t exist anymore on modern systems

I’m having my doubts about swappiness too as it’s not really applicable anymore for modern machines. But I’m curious if it still applies for smaller systems like RPi’s for example. I’d like to add a filesystem mount option check, for Ext it would check if the filesystem is mounted at least with the relatime option or even noatime for example. And maybe a disk scheduler check but I’m not conviced yet that it really makes a difference.

The new release and binary packages of rtcqs and rtcqs_simple_gui can be found on the Codeberg repo: https://codeberg.org/rtcqs/rtcqs/releases/tag/v0.4.2

rtcqs v0.4.2 released

rtcqs released

rtcqs v0.3.1 is now available on Codeberg and Github. rtcqs is the continuation of the realtimeconfigquickscan project but then rewritten in Python. It comes with a Qt GUI and a few extra checks.

Dear all,

I’d like to announce rtcqs, the continuation of the realtimeconfigquickscan project. It’s a port to Python with some added extra’s, like a Spectre/Meltdown mitigations check and a Qt GUI. It has the approval of the original author of realtimeconfigquickscan to whom I owe a debt of gratitude, not only for the original code but also for his helpfulness with the continuation, or maybe even evolution of the project.

So check it out, indulge me with bugs, issues, improvements or any other useful feedback on the Codeberg repo which you can find at at https://codeberg.org/rtcqs/rtcqs

Happy system tuning and happy holidays!

Jeremy

While setting up a solution to fully automate the deployment of SSL certificates at work I piggybacked on the flow and focus to rewrite the realtimeconfigquickscan Perl code in Python. As part of the certificate deployment project I wrote an application to decrypt, re-encrypt and base64 encode PFX files so they can be uploaded to a vault solution. This way I ran into PySimpleGUI which enabled me to quickly put together a nice looking Qt GUI.


rtcqs main window

The code could be more terse and probably contains some typical non-programmer idiosyncracies. First improvement will be to make the code more dynamic so the GUI gets generated instead of using hardcoded values like it does now. And I’d like to add a power management check but then I first need to read up on that subject. There are also some checks that might need some more scrutiny like the swappiness and max_user_watches checks to verify if those checks are really needed for a real-time audio environment.

rtcqs released

Building a synth module using a Raspberry Pi

Ever since I did an acid set with my brother in law at the now closed bar De Vinger I’ve been playing with the idea of creating some kind of synth module out of a Raspberry Pi. The Raspberry Pi 2 should be powerful enough to run a complex synth like ZynAddSubFX. When version  2.5.1 of that synth got released the idea resurfaced again since that version allows to remote control a running headless instance of ZynAddSubFX via OSC that is running on for instance a Raspberry Pi. I looked at this functionality before a few months ago but the developer was just starting to implement this feature so it wasn’t very usable yet.

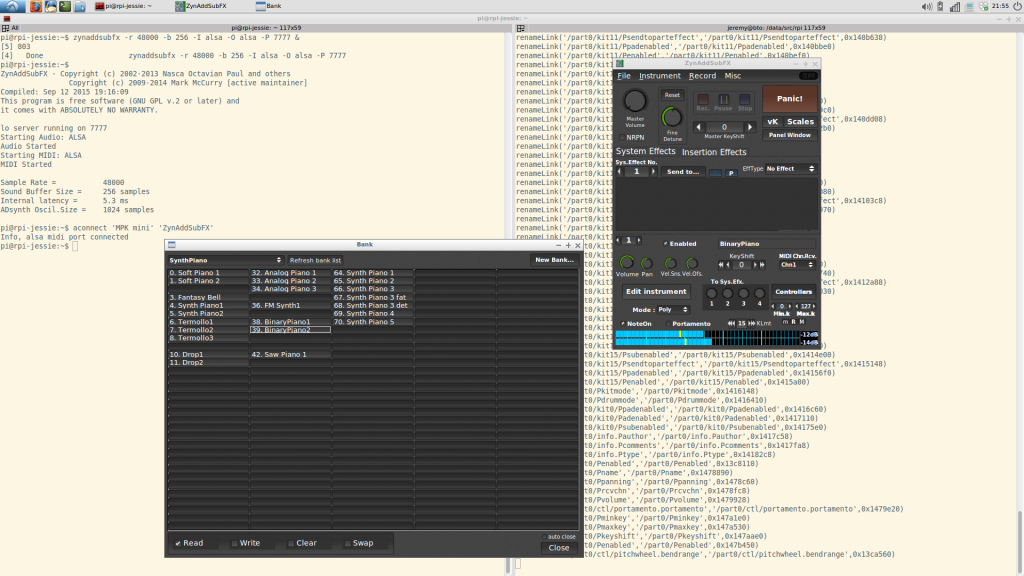
zynaddsubfx-ext-guiBut with the release of ZynAddSubFX 2.5.1 the stabilitity of the zynaddsubfx-ext-gui utility has improved to such an extent that it’s a very usable tool. In the above screenshot you can see zynaddsubfx-ext-gui running on my notebook with Ubuntu 14.04 controlling a remote instance of ZynAddSubFX running on a Raspberry Pi.

So basically all the necessary building blocks for a synth module are there. Coupled with my battered Akai MPK Mini and a cheap PCM2704 USB DAC I started setting up a test setup.

For the OS on the Raspberry Pi 2 I chose Debian Jessie as I feel Raspbian isn’t getting you the most out of your Pi. It’s running a 4.1.6 kernel with the 4.1.5-rt5 RT patch set, which applied cleanly and seems to run so far:

pi@rpi-jessie:~$ uname -a
Linux rpi-jessie 4.1.6-rt0-v7 #1 SMP PREEMPT RT Sun Sep 13 21:01:19 CEST 2015 armv7l GNU/Linux

This isn’t a very clean solution of course so let’s hope a real 4.1.6 RT patch set will happen or maybe I could give the 4.1.6 PREEMPT kernel that rpi-update installed a try. I packaged a headless ZynAddSubFX for the RPi on my notebook using pbuilder with a Jessie armhf root and installed the package for Ubuntu 14.04 from the KXStudio repos. I slightly overclocked the RPi to 1000MHz and set the CPU scaling governor to performance. The filesystem is Ext4, mounted with noatime,nobarrier,data=writeback.

To get the USB audio interface and the USB MIDI keyboard into line I had to add the following line to my /etc/modprobe.d/alsa.conf file:

options snd-usb-audio index=0,1 vid=0x08bb,0x09e8 pid=0x2704,0x007c

This makes sure the DAC gets loaded as the first audio interface, so with index 0. Before adding this line the Akai would claim index 0 and since I’m using ZynAddSubFX with ALSA it couldn’t find an audio interface. But all is fine now:

pi@rpi-jessie:~$ cat /proc/asound/cards
 0 [DAC            ]: USB-Audio - USB Audio DAC
                      Burr-Brown from TI USB Audio DAC at usb-bcm2708_usb-1.3, full speed
 1 [mini           ]: USB-Audio - MPK mini
                      AKAI PROFESSIONAL,LP MPK mini at usb-bcm2708_usb-1.5, full speed

So no JACK as the audio back-end, the output is going directly to ALSA. I’ve decided to do it this way because I will only be running one single application that uses the audio interface so basically I don’t need JACK. And JACK tends to add a bit of overhead, you barely notice this on a PC system but on small systems like the Raspberry Pi JACK can consume a noticeable amount of resources. To make ZynAddSubFX use ALSA as the back-end I’m starting it with the -O alsa option:

zynaddsubfx -r 48000 -b 256 -I alsa -O alsa -P 7777

The -r option sets the sample rate, the -b option sets the buffer size, -I is for the MIDI input and the -P option sets the UDP port on which ZynAddSubFX starts listening for OSC messages. And now that’s the cool part. If you then start zynaddsubfx-ext-gui on another machine on the network and tell it to connect to this port it starts only the GUI and sends all changes to the GUI as OSC messages to the headless instance it is connected to:

zynaddsubfx-ext-gui osc.udp://10.42.0.83:7777

Next up is stabilizing this setup and testing with other kernels or kernel configs as the kernel I’ve cooked up now isn’t a viable long-term solution. And I’d like to add a physical MIDI in and maybe a display like described on the Samplerbox site. And the project needs a casing of course.

Building a synth module using a Raspberry Pi

Raspberry Pi Revisited

When the Raspberry Pi 2 was released I certainly got curious. Would it be really better than it’s little brother? As soon as it got available in The Netherlands I bought it and sure this thing flies compared to the Raspberry Pi 1. The four cores and 1GB of memory are certainly an improvement. The biggest improvement though is the shift from ARMv6 to ARMv7. Now you can really run basically anything on it and thus I soon parted from Raspbian and I’m now running plain Debian Jessie armhf on the RPi.

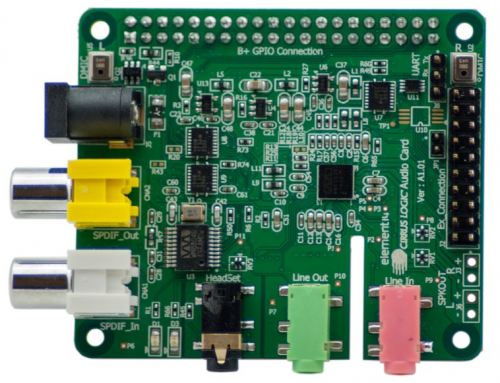
So is everything fine and dandy with the RPi2? Well, no. It still uses the poor USB implementation and audio output. And it was quite a challenge to prepare it for its intended use: a musical instrument. To my great surprise a new version of the Wolfson Audio Card was available too for the new Raspberry Pi board layout so as soon as people reported they got it to work with the RPi2 I ordered one too.


http://community.emlid.com/t/raspberry-2-realtime-kernel-image/112/12

Cirrus Logic Audio Card for Raspberry Pi

One of the first steps to make the device suitable for use as a musical device was to build a real-time kernel for it. Building the kernel itself was quite easy as the RT patchset of the kernel being used at the moment by the Raspberry Foundation (3.18) applied cleanly and it also booted without issues. But after a few minutes the RPi2 would lock up without logging anything. Fortunately there were people on the same boat as me and with the help of the info and patches provided by the Emlid community I managed to get my RPi2 stable with a RT kernel.

Next step was to get the right software running so I dusted off my RPi repositories and added a Jessie armhf repo. With the help of fundamental the latest version of ZynAddSubFX now runs like charm with very acceptable latencies, when using not all too elaborate instrument patches Zyn is happy with an internal latency of 64/48000=1.3ms. I haven’t measured the total round-trip latency but it probably stays well below 10ms. LinuxSampler with the Salamander Grand Piano sample pack also performs a lot better than on the RPi1 and when using ALSA directly I barely get any underruns with a slightly higher buffer setting.

I’d love to get Guitarix running on the RPi2 with the Cirrus Logic Audio Card so that will be the next challenge.

Raspberry Pi Revisited

First Dutch Raspberry Jam

The first Dutch Raspberry Jam will take place on Thursday September 26 at the Ordina HQ in Nieuwegein. I’ve offered to do a presentation about doing real-time audio with the Raspberry Pi which has been accepted. Internet visibility of this event is minimal at the moment though, let’s hope it caches on.

So expect a presentation/demo about using your Raspberry Pi as a sequencer, synthesizer, sampler or virtual guitar amp. I will show how to configure, tweak and tune your RPi for real-time, low-latency audio and what the possibilities of such a set-up are. I’ll probably do a live demo too of some tracks generated by one or more RPi’s

Ordina Raspberry Jam

Raspberry Pi Playlist @ AutoStatic’s YouTube channel

First Dutch Raspberry Jam

Hacking an Android TV stick, the sequel

jeremy@rk3066:~$ uname -a
Linux rk3066 3.0.36-rt58 #1 SMP PREEMPT RT Thu Jul 4 13:18:23 CEST
2013 armv7l GNU/Linux

Managed to compile and run a real-time kernel on the Android TV stick with the RK3066 SoC. Packaged the latest version of amSynth (1.4.0 which has been released recently), installed it, fired up JACK and amSynth and so far no xruns, nothing. And this is with -p64!

jackd -P84 -p32 -t2000 -dalsa -dhw:Device -n3 -p64 -r44100 -s -P

I should measure the latency of the $2 USB audio interface I’m using to find out what the total latency of this set-up is. Well, at least I got the system latency for usage with softsynths like amSynth down to 64/44100*2=3ms. Now that’s a usable situation.

jeremy@rk3066:~$ lsusb | grep -i c-media
Bus 002 Device 006: ID 0d8c:000e C-Media Electronics, Inc. Audio Adapter (Planet
UP-100, Genius G-Talk)
jeremy@rk3066:~$ cat /proc/asound/cards 0 [RK29RK1000 ]: RK29_RK1000 - RK29_RK1000 RK29_RK1000 1 [HDMI ]: ROCKCHIP_HDMI - ROCKCHIP HDMI ROCKCHIP HDMI 2 [Device ]: USB-Audio - Generic USB Audio Device Generic USB Audio Device at usb-usb20_host-1.1, full speed

A big pro of this stick is that it suffers less from SD card corruption than my RPi. Yesterday evening I wrecked up yet another SD card when testing my RPi with a real-time kernel, it’s getting a bit cumbersome. Speaking of real-time kernels, it was quite some work to apply the RT patchset to the RockChip kernel source. Had to add stuff by hand and when I finally got everything in place it wouldn’t compile. But I managed to solve all the build errors. After flashing the kernel image the TV stick wouldn’t boot of course, it hung at some point. But I quickly saw that the issue was with the SD card reader and that it was similar to the SD card reader issue on the RPi for which I found a workaround. So I added an #ifdef clause to the RockChip SD card reader driver, recompiled, reflashed and wham, it continued booting. Now I have to clean up my build directory and get a usable diff of it against the pristine RK3066 kernel sources.

Hacking an Android TV stick, the sequel

Zelf een real-time kernel bouwen voor Ubuntu 12.04

De real-time kernel uit de PPA van Alessio Bogani liep bij mij nog wel eens vast dus heb ik er zelf een gebouwd met de meest recente 3.2 kernel en bijbehorende RT patchset. En dit draait een stuk stabieler, nog geen lockups gehad.

Een eigen kernel bouwen is gelukkig nog steeds niet zo heel moeilijk, met Ubuntu kun je zelfs heel gemakkelijk pakketten maken met behulp van de make-kpkg utility. Na wat googlen kwam ik onderstaande handleiding tegen en simpeler kan het bijna niet.

Installeer de benodigde pakketten:

sudo apt-get install kernel-package fakeroot build-essential libncurses5-dev

Download de kernel sources en de RT patchset:

mkdir -p ~/tmp/linux-rt
cd ~/tmp/linux-rt
wget -c http://www.kernel.org/pub/linux/kernel/v3.x/linux-3.2.28.tar.bz2
wget -c
http://www.kernel.org/pub/linux/kernel/projects/rt/3.2/patch-3.2.28-rt42.patch.bz2

Pak de kernel sources uit en patch deze met de RT patchset:

tar xjvf linux-3.2.28.tar.bz2
cd linux-3.2.28
patch -p1 < <(bunzip2 -c ../patch-3.2.28-rt42.patch.bz2)

Nu moet je de kernel nog configureren. De gemakkelijkste manier is om een bestaande kernel config te nemen, deze staan in de /boot directory van je systeem. Kopieer een config naar je werkdirectory en gebruik deze als uitgangspunt:

cp /boot/config-$(uname -r) .config

Dit commando kopieert de kernel config van de kernel die je op dat moment gebruikt. Je kunt ook de config van een andere kernel gebruiken, bijv. die van de Ubuntu lowlatency kernel aangezien deze al geoptimaliseerd is voor Linux audio toepassingen. De volgende stap is om een kernel config aan te maken met full preemption ingeschakeld aan de hand van de gekopieerde kernel config:

make oldconfig

Je kunt alle prompts wegklikken met Enter, behalve de prompt welk Preemption Model je wilt gebruiken. Selecteer daar 5 (Fully Preemtible Kernel):

Preemption Model
> 1. No Forced Preemption (Server) (PREEMPT_NONE)
  2. Voluntary Kernel Preemption (Desktop) (PREEMPT_VOLUNTARY)
  3. Preemptible Kernel (Low-Latency Desktop) (PREEMPT__LL) (NEW)
  4. Preemptible Kernel (Basic RT) (PREEMPT_RTB) (NEW)
  5. Fully Preemptible Kernel (RT) (PREEMPT_RT_FULL) (NEW)
choice[1-5]: 5 <Enter>

Workaround voor https://bugs.launchpad.net/ubuntu/+source/kernel-package/+bug/602405:

sed -rie 's/echo "+"/#echo "+"/' scripts/setlocalversion

Nu kun je de kernel gaan bouwen:

make-kpkg clean
CONCURRENCY_LEVEL=$(getconf _NPROCESSORS_ONLN) fakeroot make-kpkg
--initrd --revision=0 kernel_image kernel_headers

Als het bouwen klaar is (kan een tijd duren) kun je de kernel pakketjes installeren:

cd ..
sudo dpkg -i linux-{headers,image}-3.2.28-rt42_0_*.deb

Rebooten, nieuwe real-time kernel selecteren in je bootloader (GRUB) en je systeem zou nu moeten booten met de net gebouwde real-time kernel.

Zelf een real-time kernel bouwen voor Ubuntu 12.04

Homestudio migratie

Migratie voorloopt voorspoedig. Bijna alles draait weer en het systeem voelt weer lekker fris en fruitig aan. Enige echte lastpost is de real-time kernel die ik heb geïnstalleerd, die wil nog wel eens vastlopen (kernel panics). Maar dat komt waarschijnlijk omdat het al een oudere versie is (zo te zien 3.2.14-rt24, recentste versie is 3.2.19-rt30). Zal dus de lowlatency kernel moeten gebruiken, nog niet uitgebreid getest maar ik denk dat dat wel goed komt. Dan kan ik ook zonder problemen de plug-ins gebruiken van het Distrho project. Die maken bijna allemaal gebuik van het Juce framework en dat framework is voor zover ik het heb begrepen niet helemaal real-time safe zoals dat heet. Oftewel, plug-ins gebaseerd op dat framework doen het niet goed met een real-time kernel en kunnen zelfs je systeem laten crashen.

Homestudio migratie

LinuxMusicians Wiki update

Ben de System Configuration pagina van de LinuxMusician Wiki wat aan het bijwerken. Paragraaf toegevoegd over rtirq en het gebruik van het setpci commando voor het instellen van de latency van PCI devices. Verder wat spul geüpdate en wat dode links aangepast of verwijderd. En wat aandacht besteed aan de nieuwe RT patchset voor de 3.0 kernel en de threadirqs boot optie voor kernels >= 2.6.39.

LinuxMusicians Wiki update