And a few minutes later I had a working VPS again. While converting and uploading I made the necessary DNS changes and by the time my VPS was running happily on Fuga all DNS entries pointed to the new IP address.
In the coming days I’m going to move the VPS on which this blog resides from VMware to the Fuga OpenStack cloud. Not because I have to but hey, if I can host my stuff on a fully open source based cloud instead of a proprietary solution the decision is simple. And Fuga has been around for a while now, it’s rock solid and as I have a lot of freedom within my OpenStack tenant I can do with my VPS whatever I want when it comes to resources.
Moving the VM will cause some downtime. I’ve opted for the solution to shut down the VM, copy it from the ESXi host on which it lives to a server with enough storage and the libguestfs-tools package so that I can do some customization and the python-openstackclient package so that I can easily upload the customized image to OpenStack. Then I need to deploy an OpenStack instance from that uploaded image, switch the DNS and my server should be back online.
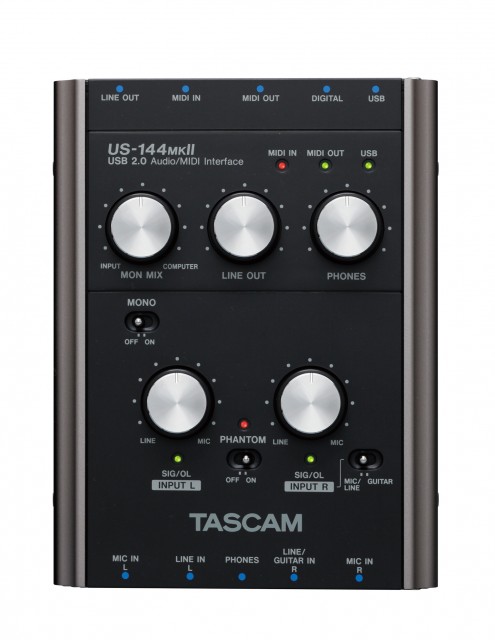
Today I got a Tascam US-144MKII from a colleague because he couldn’t use it anymore with Mac OSX. Apparently this USB2.0 audio interface stopped working on El Capitan. Tascam claims they’re working on a driver but they’re only generating bad publicity with that announcement it seems. So he gave it to me, maybe it would work on Linux.
Tascam US-144MKII
First thing I did was plugging it in. The snd_usb_122l module got loaded but that was about it. So much for plug and play. There are reports though that this interface should work so when I got home I started digging a bit deeper. Apparently you have to disable the ehci_hcd USB driver, which is actually the USB2.0 controller driver, and force the US-144MKII to use the uhci_hcd USB1.1 driver instead so that it thinks it’s in USB1.1 mode. This limits the capabilities of the device but my goal for today was to get sound out of this interface, not getting the most out of it.
I quickly found out that on my trusty XPS13 forcing USB1.1 was probably not going to work because it only has USB3.0 ports. So I can disable the ehci_hcd driver but then it seems the xhci_hcd USB3.0 driver takes over. And disabling that driver effectively disables all USB ports. So I grabbed an older notebook with USB2.0 ports and disabled the ehci_hcd driver by unbinding it since it’s not compiled as a module. Unbinding a driver is done by writing the system ID of a device to a so-called unbind file of the driver that is bound to this device. In this case we’re interested in the system ID’s of the devices that use the ehci_hcd driver which can be found in /sys/bus/drivers/ehci-pci/:
This will unbind the ehci_hcd driver from the device with system ID 0000:00:1a.7 which in this case is an USB2.0 controller.When plugging in the USB interface it now got properly picked up by the system and I was greeted with an active green USB led on the interface as proof.
$ cat /proc/asound/cards
 0 [Intel          ]: HDA-Intel - HDA Intel
                      HDA Intel at 0xf4800000 irq 46
 1 [US122L         ]: USB US-122L - TASCAM US-122L
                      TASCAM US-122L (644:8020 if 0 at 006/002
So ALSA picked it up as a device but it doesn’t show up in the list of sound cards when issuing aplay -l. This is because you have to tell ALSA to talk to the device in a different way then to a normal audio interface. Normally an audio interface can be addressed by using the hw plugin which is the most low-level ALSA plugin that does nothing more than talking to the driver and this is what most applications use, including JACK. The US-144MKII works differently though, its driver snd_usb_122l has to be accessed with the use of the usb_stream plugin which is part of the libasound2-plugins package and that allows you to set a PCM device name that can be used with JACK for instance. This can be done with the following .asoundrc file that you have to create in the root of your home directory:
pcm.us-144mkii {
        type usb_stream
        card "US122L"
}

ctl.us-144mkii {
        type hw
        card "US122L"
}
What we do here is creating a PCM device called us-144mkii and coupling that to the card name we got from cat /proc/asound/cards which is US122L. Of course you can name the PCM device anything you want. Almost all other examples name it usb_stream but that’s a bit confusing because that is the name of the plugin and you’d rather have a name that has some relation to the device you’re using. Also practically all examples use card numbers. But who says that the USB audio interface will always be card 0, or 1. It could also be 2, or 10 if you have 9 other audio interfaces. Other examples work around this by fixing the order of the numbers that get assigned to each available audio interface by adjusting the index parameter for the snd_usb_122l driver. But why do that when ALSA also accepts the name of the card? This also makes thing a lot easier to read, it’s now clear that we are coupling the PCM name us-144mkii to the card named US122L. And we’re avoiding having to edit system-wide settings. The ctl stanza is not strictly necessary but it prevents the following warning when starting JACK:
ALSA lib control.c:953:(snd_ctl_open_noupdate) Invalid CTL us-144mkii
control open "us-144mkii" (No such file or directory)
So with the .asoundrc in place you can try starting JACK:
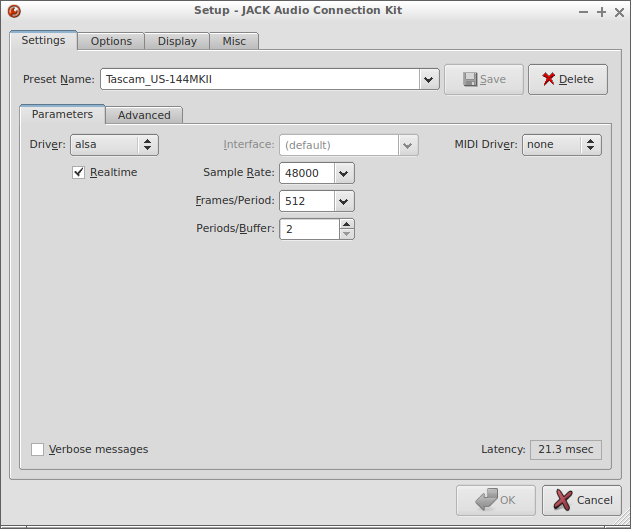
$ jackd -P85 -t2000 -dalsa -r48000 -p512 -n2 -Cus-144mkii -Pus-144mkii
jackd 0.124.2
Copyright 2001-2009 Paul Davis, Stephane Letz, Jack O'Quinn, Torben Hohn and others.
jackd comes with ABSOLUTELY NO WARRANTY
This is free software, and you are welcome to redistribute it
under certain conditions; see the file COPYING for details

no message buffer overruns
JACK compiled with System V SHM support.
loading driver ..
apparent rate = 48000
creating alsa driver ... us-144mkii|us-144mkii|512|2|48000|0|0|nomon|swmeter|-|32bit
configuring for 48000Hz, period = 512 frames (10.7 ms), buffer = 2 periods
ALSA: final selected sample format for capture: 24bit little-endian in 3bytes format
ALSA: use 2 periods for capture
ALSA: final selected sample format for playback: 24bit little-endian in 3bytes format
ALSA: use 2 periods for playback
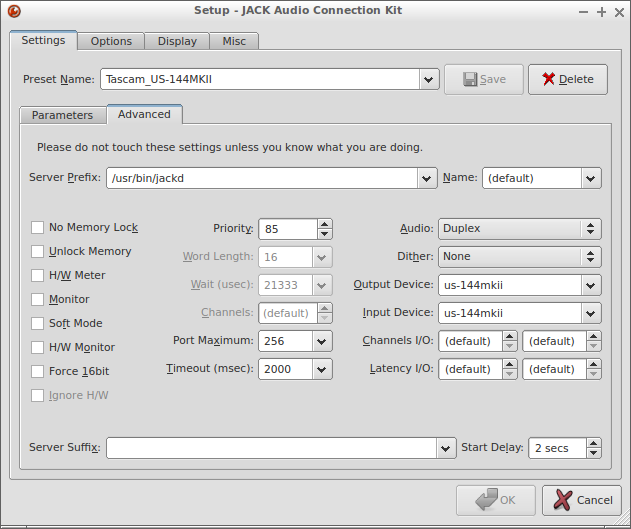
This translates to the following settings in QjackCtl:
Don’t expect miracles of this setup. You won’t be able to achieve super low-latencies but at least you can still use your Tascam US-144MKII instead of having to give it away to a colleague.
Basically Qtractor only does either MIDI or audio. The MIDI tracks are for processing MIDI and the audio tracks for processing audio. But a MIDI track in Qtractor can also post-process the audio coming out of a synth plug-in with FX plug-ins so it’s a bit more than just a MIDI track.
But what about plug-ins that do both audio and MIDI, like the LV2 version of the autotuner application zita-at1? If you put it in an audio track it will happily autotune all the audio but it won’t accept any incoming MIDI to pitch only to the MIDI notes it is being fed. And no way you can get MIDI into a Qtractor audio track. There’s no MIDI insert plug-in or the possibility to somehow expose MIDI IN ports of a plug-in in an audio track to Jack MIDI or ALSA.
But Qtractor does have a built-in Insert plug-in that can be fed audio from an audio bus and since a Qtractor MIDI track does know how to handle audio would it also know how to deal with such an insert? Well, yes it can which allows you to use a plug-in like the LV2 version of zita-at1 inside a MIDI track.
Setting up buses and tracks
You will need at least one bus and two tracks (of course you can use different bus and track names):
AutoTuneMix bus, input only and 2 channels
AutoTune MIDI track with dedicated audio outputs (this will create an audio bus called AutoTune)
AutoTuneMix audio track with the AutoTuneMix as input bus
Alternatively you could also skip the use of dedicated audio outputs and have the MIDI track output to the Master bus. This way you avoid the risk of introducing extra latency and the need to set up extra connections. You do lose the flexibility then to do basic stuff on the outcoming audio like panning or adjusting the gain. Which you can also workaround of course by using additional panning and/or gain plug-ins.
Once you’ve created the bus and the tracks insert the following plug-ins into the AutoTune MIDI track:
Insert
Any pre-processing effects plug-ins (like a compressor) – optional
LV2 version of zita-at1 autotuner
Any post-processing effects plug-ins (like a reverb) – optional
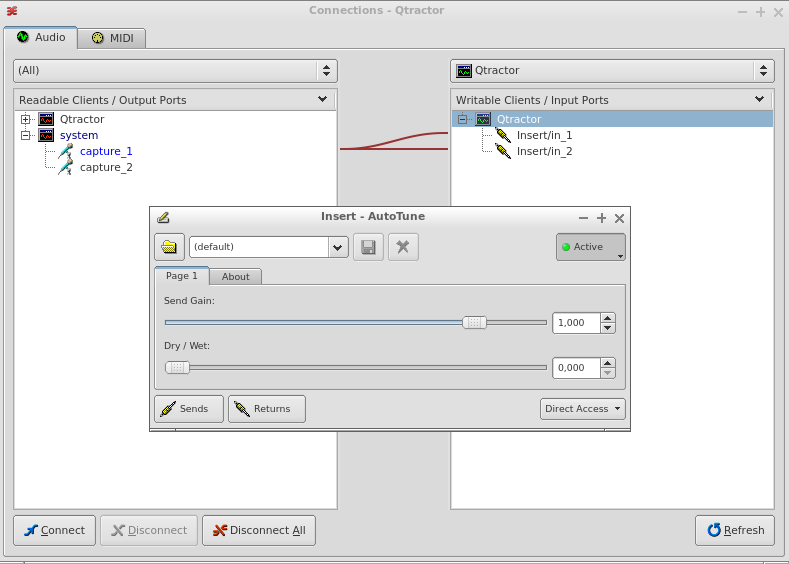
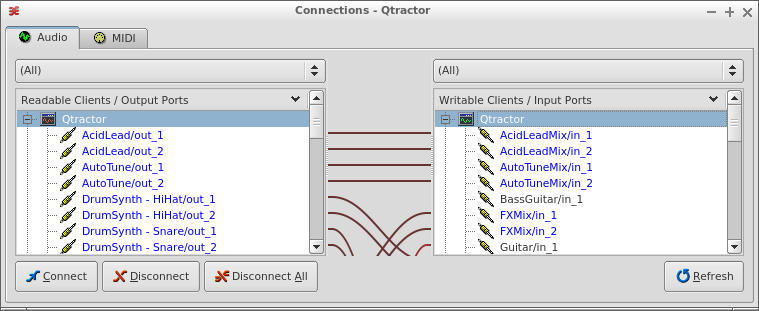
Insert them into this specific order. It is also possible to do the post-processing in the AutoTuneMix audio track. Now open the Properties window of the Insert plug-in and then open the Returns window. Connect the mic input of your audio device to the Insert/in ports as shown below.
Qtractor AutoTune Insert
Connect the AutoTune bus outputs to the AutoTuneMix inputs:
Qtractor Connections
Create a MIDI clip with notes to autotune
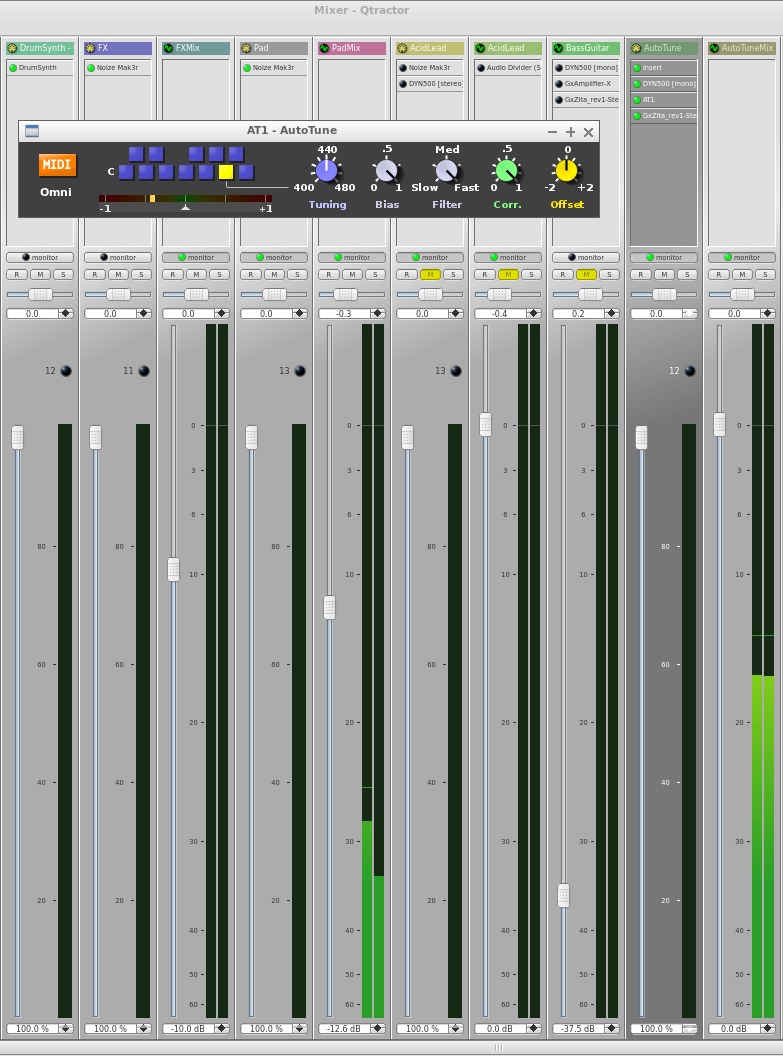
Create a MIDI clip with the notes you would like to get autotuned in the AutoTune MIDI track, put the play-head on the right position and press play. Now incoming audio from the mic input of your audio device should get autotuned to the MIDI notes you entered in the MIDI clip:
Qtractor Mixer with LV2 version of zita-at1 autotuner
As you can see both MIDI and audio goes through the AT1 autotuner plug-in and the outcoming audio is being fed into the AutoTuneMix track where you can do the rest of your post-processing if you wish.
A sysadmin is also jumping in to help with the infrastructure – mailing lists and wiki – so we can make sure there are usable tools available to us, after all, a brand new community is to be born!!!
So yes, I’m an official member of the MOD team now! I’m going to help out maintaining the current infrastructure and with the upcoming release of the MOD Duo some parts will have to be rebuilt or built up from scratch.
I will also be beta testing the MOD Duo, I’m eagerly awaiting for it to arrive in the mail. The MOD team has made some real good progress in getting the most out of the Allwinner A20 board they’re using. Also the amount of plugins that will be available for it will be staggering. This won’t be just an ordinary modelling FX unit but a complete all-in-one musical box that can also be used as a synthesizer or a loop station. And it’s going to be a rock-solid unit, the team working on making this possible contain some big names from the Linux audio community. The MOD Duo beta testing unit I will be receiving has been with Fons before for example, from what I understood he has done an in-depth analysis of the audio codec being used on the MOD Duo board.
Recently I found out that I was not the only one trying to build a synth module out of a Raspberry Pi with ZynAddSubFX. The Zynthian project is trying to achieve the exact same goal and so far it looks very promising. I contacted the project owner to ask if he would be interested in collaborating. I got a reply promptly and we both agreed it would be a good idea to join forces. The Zynthian project has all the things that I still had to set up already in place but I think I can still help out. The Zynthian set-up might benefit from some optimizations like a real-time kernel and things like boot time can be improved. Also I could help out testing, maybe do some packaging. And if there’s a need for things like a repository, web server or other hosting related stuff I could provide those.
Zynthian prototype
I’m very happy with these developments of our projects converging. Check out the Zynthian blog for more information on the current state of the project.
The title says it all. I bought a SSL certificate at Xolphin, installed it and then I had to hunt down all the things that didn’t work anymore. I even managed to render the HTTP version of autostatic.com unreachable for about a day. But now everything seems to be working so I activated a rewrite rule that redirects all HTTP traffic to HTTPS. There are some bits that might not work as expected (embedded videos not displaying, warnings about unsecure content) but most of my blog should be accessible now in a secure way. If you encounter any issues, please let me know.
At least, for me. Now I have to code something that enables me to select banks and instruments on my synth module. I’ve settled for pyliblo to talk to ZynAddSubFX but I’m just no coder. My elbow now rests on “Learning Python” from O’Reilly, I started reading it like a year ago but never got past chapter 3 or something. Time to persist, I’ve been wanting to be able to code a little bit for years now.
As a note to self, and maybe it’s helpful for others too, what follows are some of the relevant OSC messages to change banks and instruments in ZynAddSubFX.
Changing banks can be done with /loadbank. pyliblo comes with an example script send_osc.py and loading a bank with send_osc.py works as follows:
send_osc.py 7777 /loadbank ,i 3
7777 is the port ZynAddSubFX runs on. The /loadbank message wants an integer (,i) and ,i 3 loads the fourth bank (Choir and Voice) as ZynAddSubFX starts counting from 0. Bear in mind that this will only load the bank, it won’t change the instrument that is loaded. To load an instrument from a loaded bank the following send_osc.py incantation does the trick:
send_osc.py 7777 /setprogram ,c $'\x03'
So /setprogram loads an instrument from an active bank. It takes a character (,c) as an argument because the program numbers are in hex. But hex are multiple characters so you have to add some escape sequences to make it work (and I lost it there so I could be completely wrong). The above command should load the fourth instrument from the Choir and Voice bank (Voice OOH) as that bank should have been loaded by the previous /loadbank message.
It is also possible to load instrument (.xiz) files. This can be done with the /load_xiz message:
This will load the Bass 1 instrument fom the Bass bank into part 1 (remember that ZynAddSubFX starts counting from 0). So to load the Bass 2 instrument into part 2 you’d do the following:
So now I have to incorporate this stuff into Python code that gets called when I press buttons on my LCD display. These are the mappings I’d like to accomplish:
Up: toggle next bank and display first instrument from that bank
Down: toggle previous bank and display first instrument from that bank
Left: toggle previous instrument and display instrument
Right: toggle next instrument and display instrument
Select: select displayed instrument
That shouldn’t be too hard right? Well, first hurdle, pyliblo can only send or dump OSC messages, it doesn’t seem to be able to handle return messages from the OSC server (ZynAddSubFX in this case). To be continued…
Edit: of course sending just messages with pyliblo won’t handle any return messages, you will need a receiving part. But maybe I should take a look at using MIDI with mididings for instance. Thanks Georg Mill for the tip!
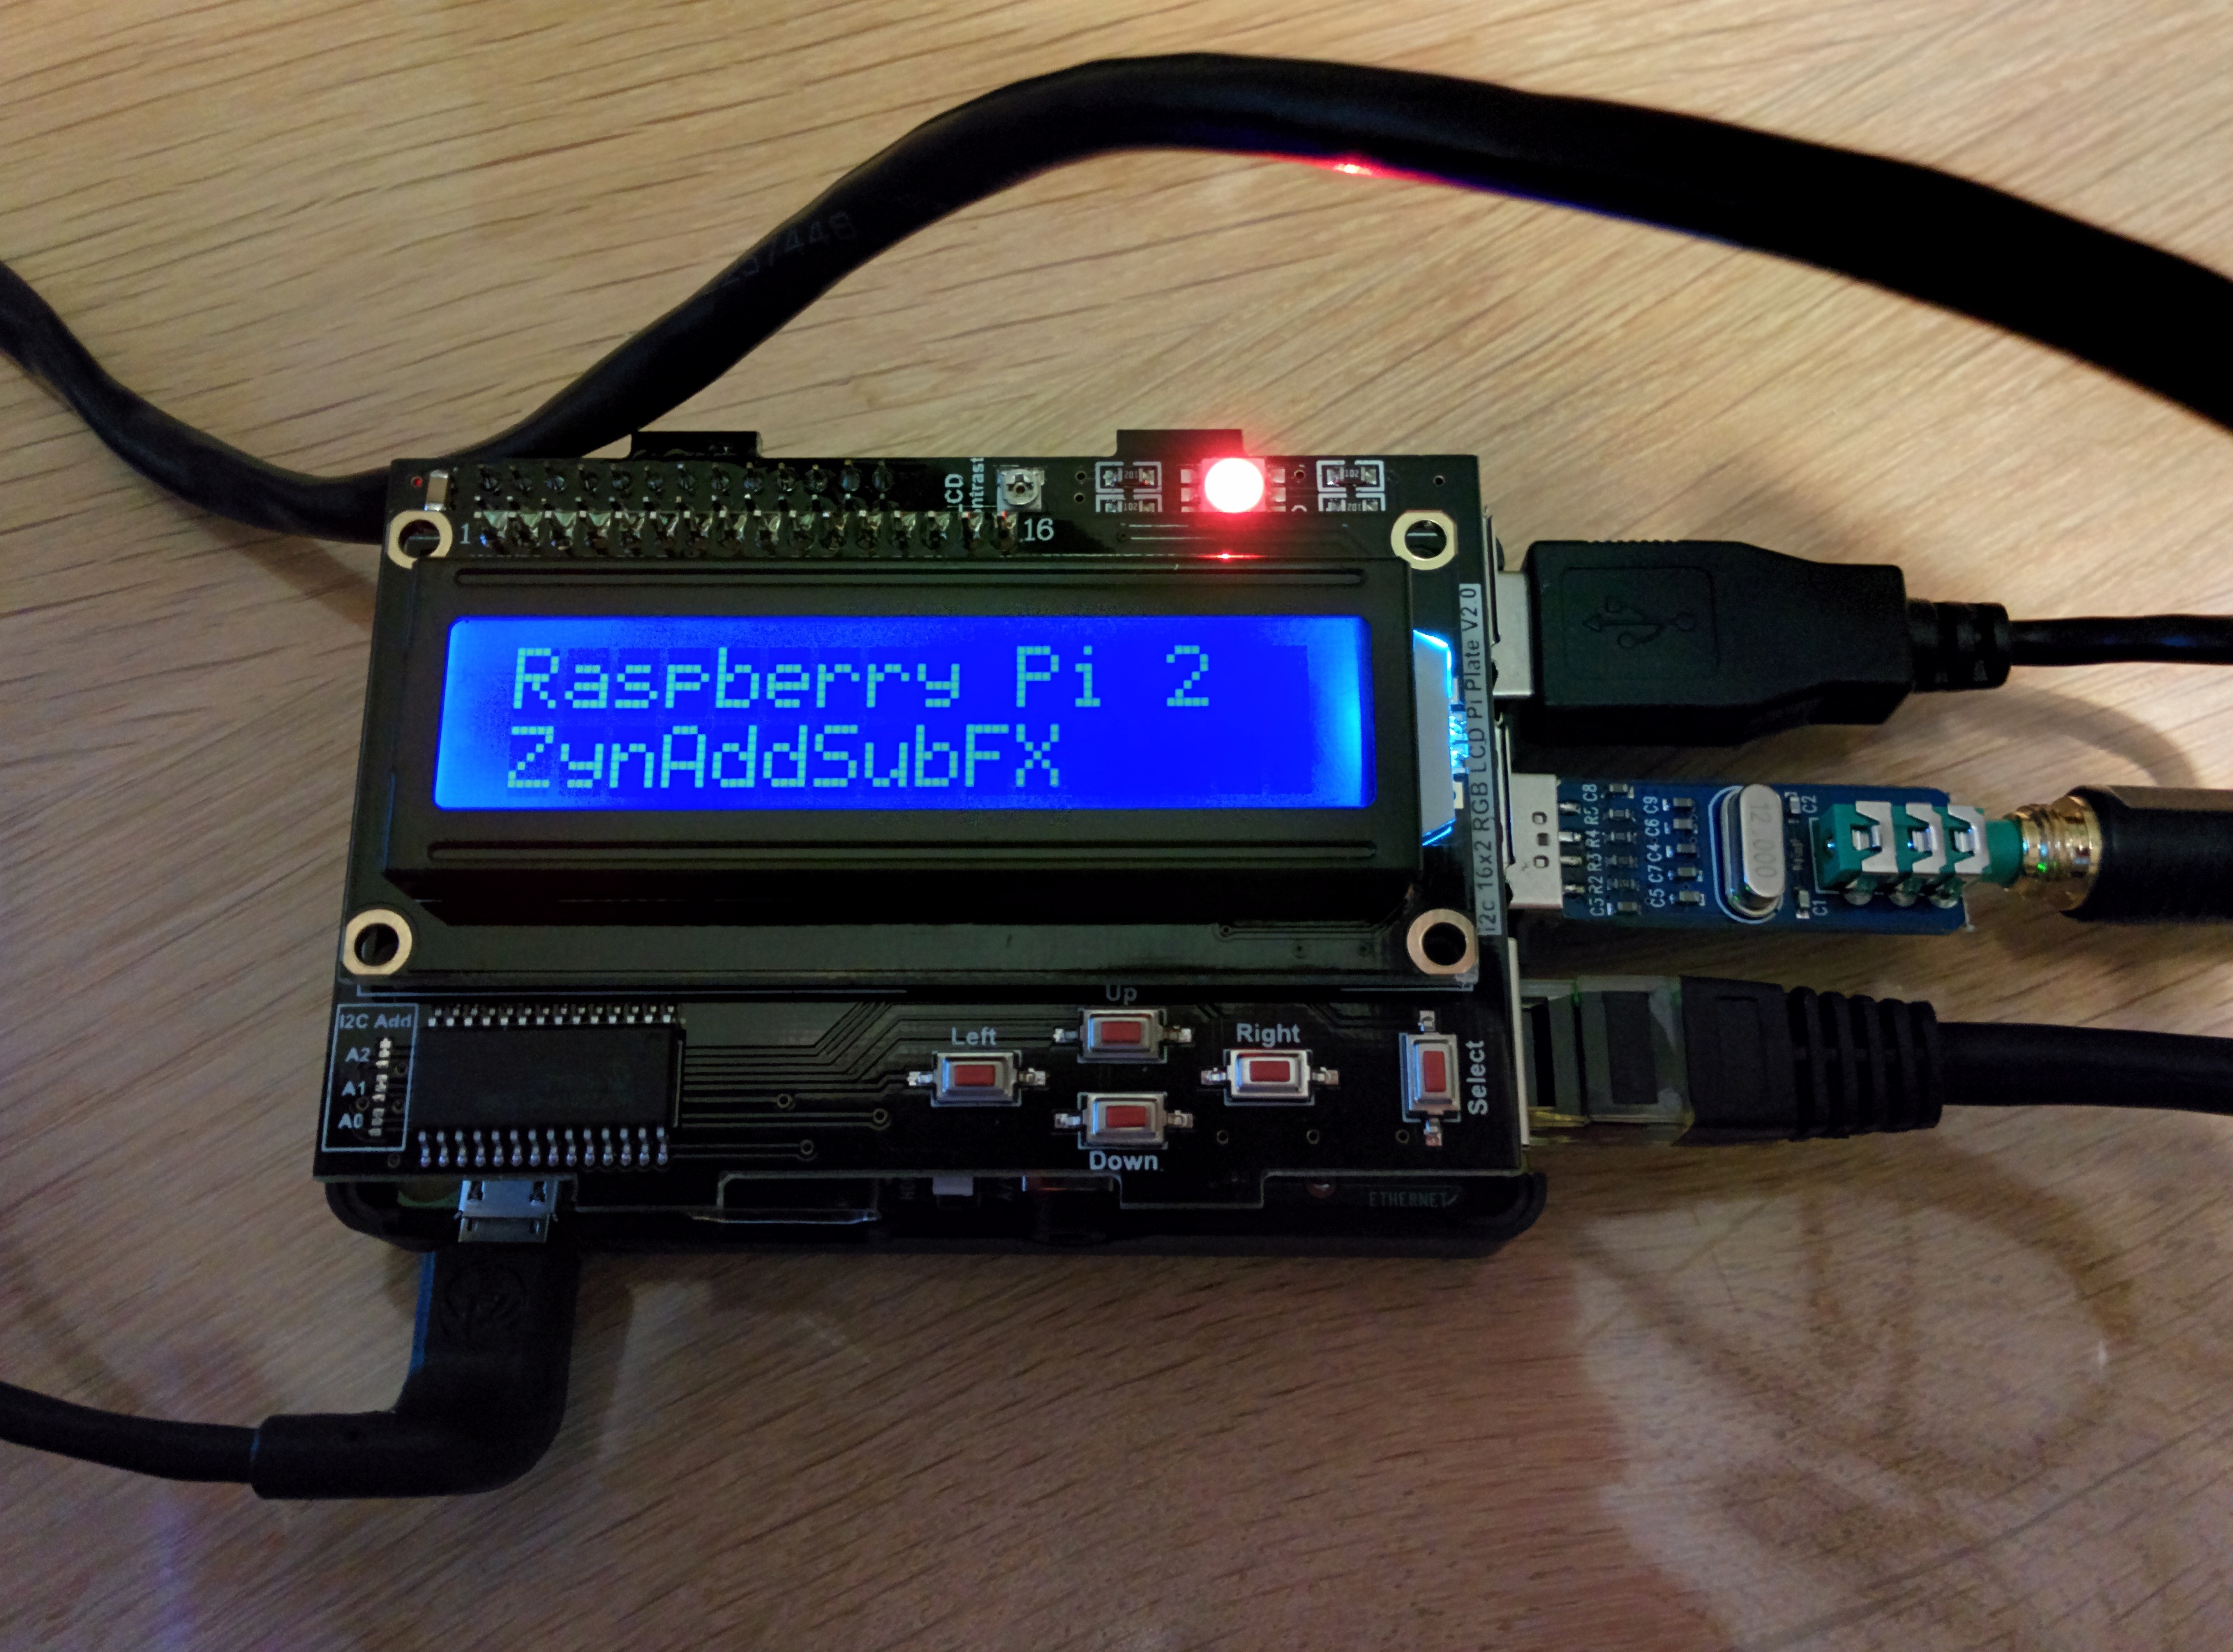
For my little synth module project I created the following systemd unit file /etc/systemd/system/zynaddsubfx.service that starts up a ZynAddSubFX proces at boot time:
/usr/local/bin/zynpi.py in its turn is a small Python script that shows a message and a red LED on a 16×2 LCD display so that I know the synth module is ready to use:
#!/usr/bin/python
# Example using a character LCD plate.
import math
import time

import Adafruit_CharLCD as LCD

# Initialize the LCD using the pins
lcd = LCD.Adafruit_CharLCDPlate()

# Show some basic colors.
lcd.set_color(1.0, 0.0, 0.0)
lcd.clear()
lcd.message('Raspberry Pi 2\nZynAddSubFX')
The LCD is not an Adafruit one though but a cheaper version I found on Dealextreme. It works fine though with the Adafruit LCD Python library. Next step is to figure out if I can use the buttons on the LCD board to change banks and presets.
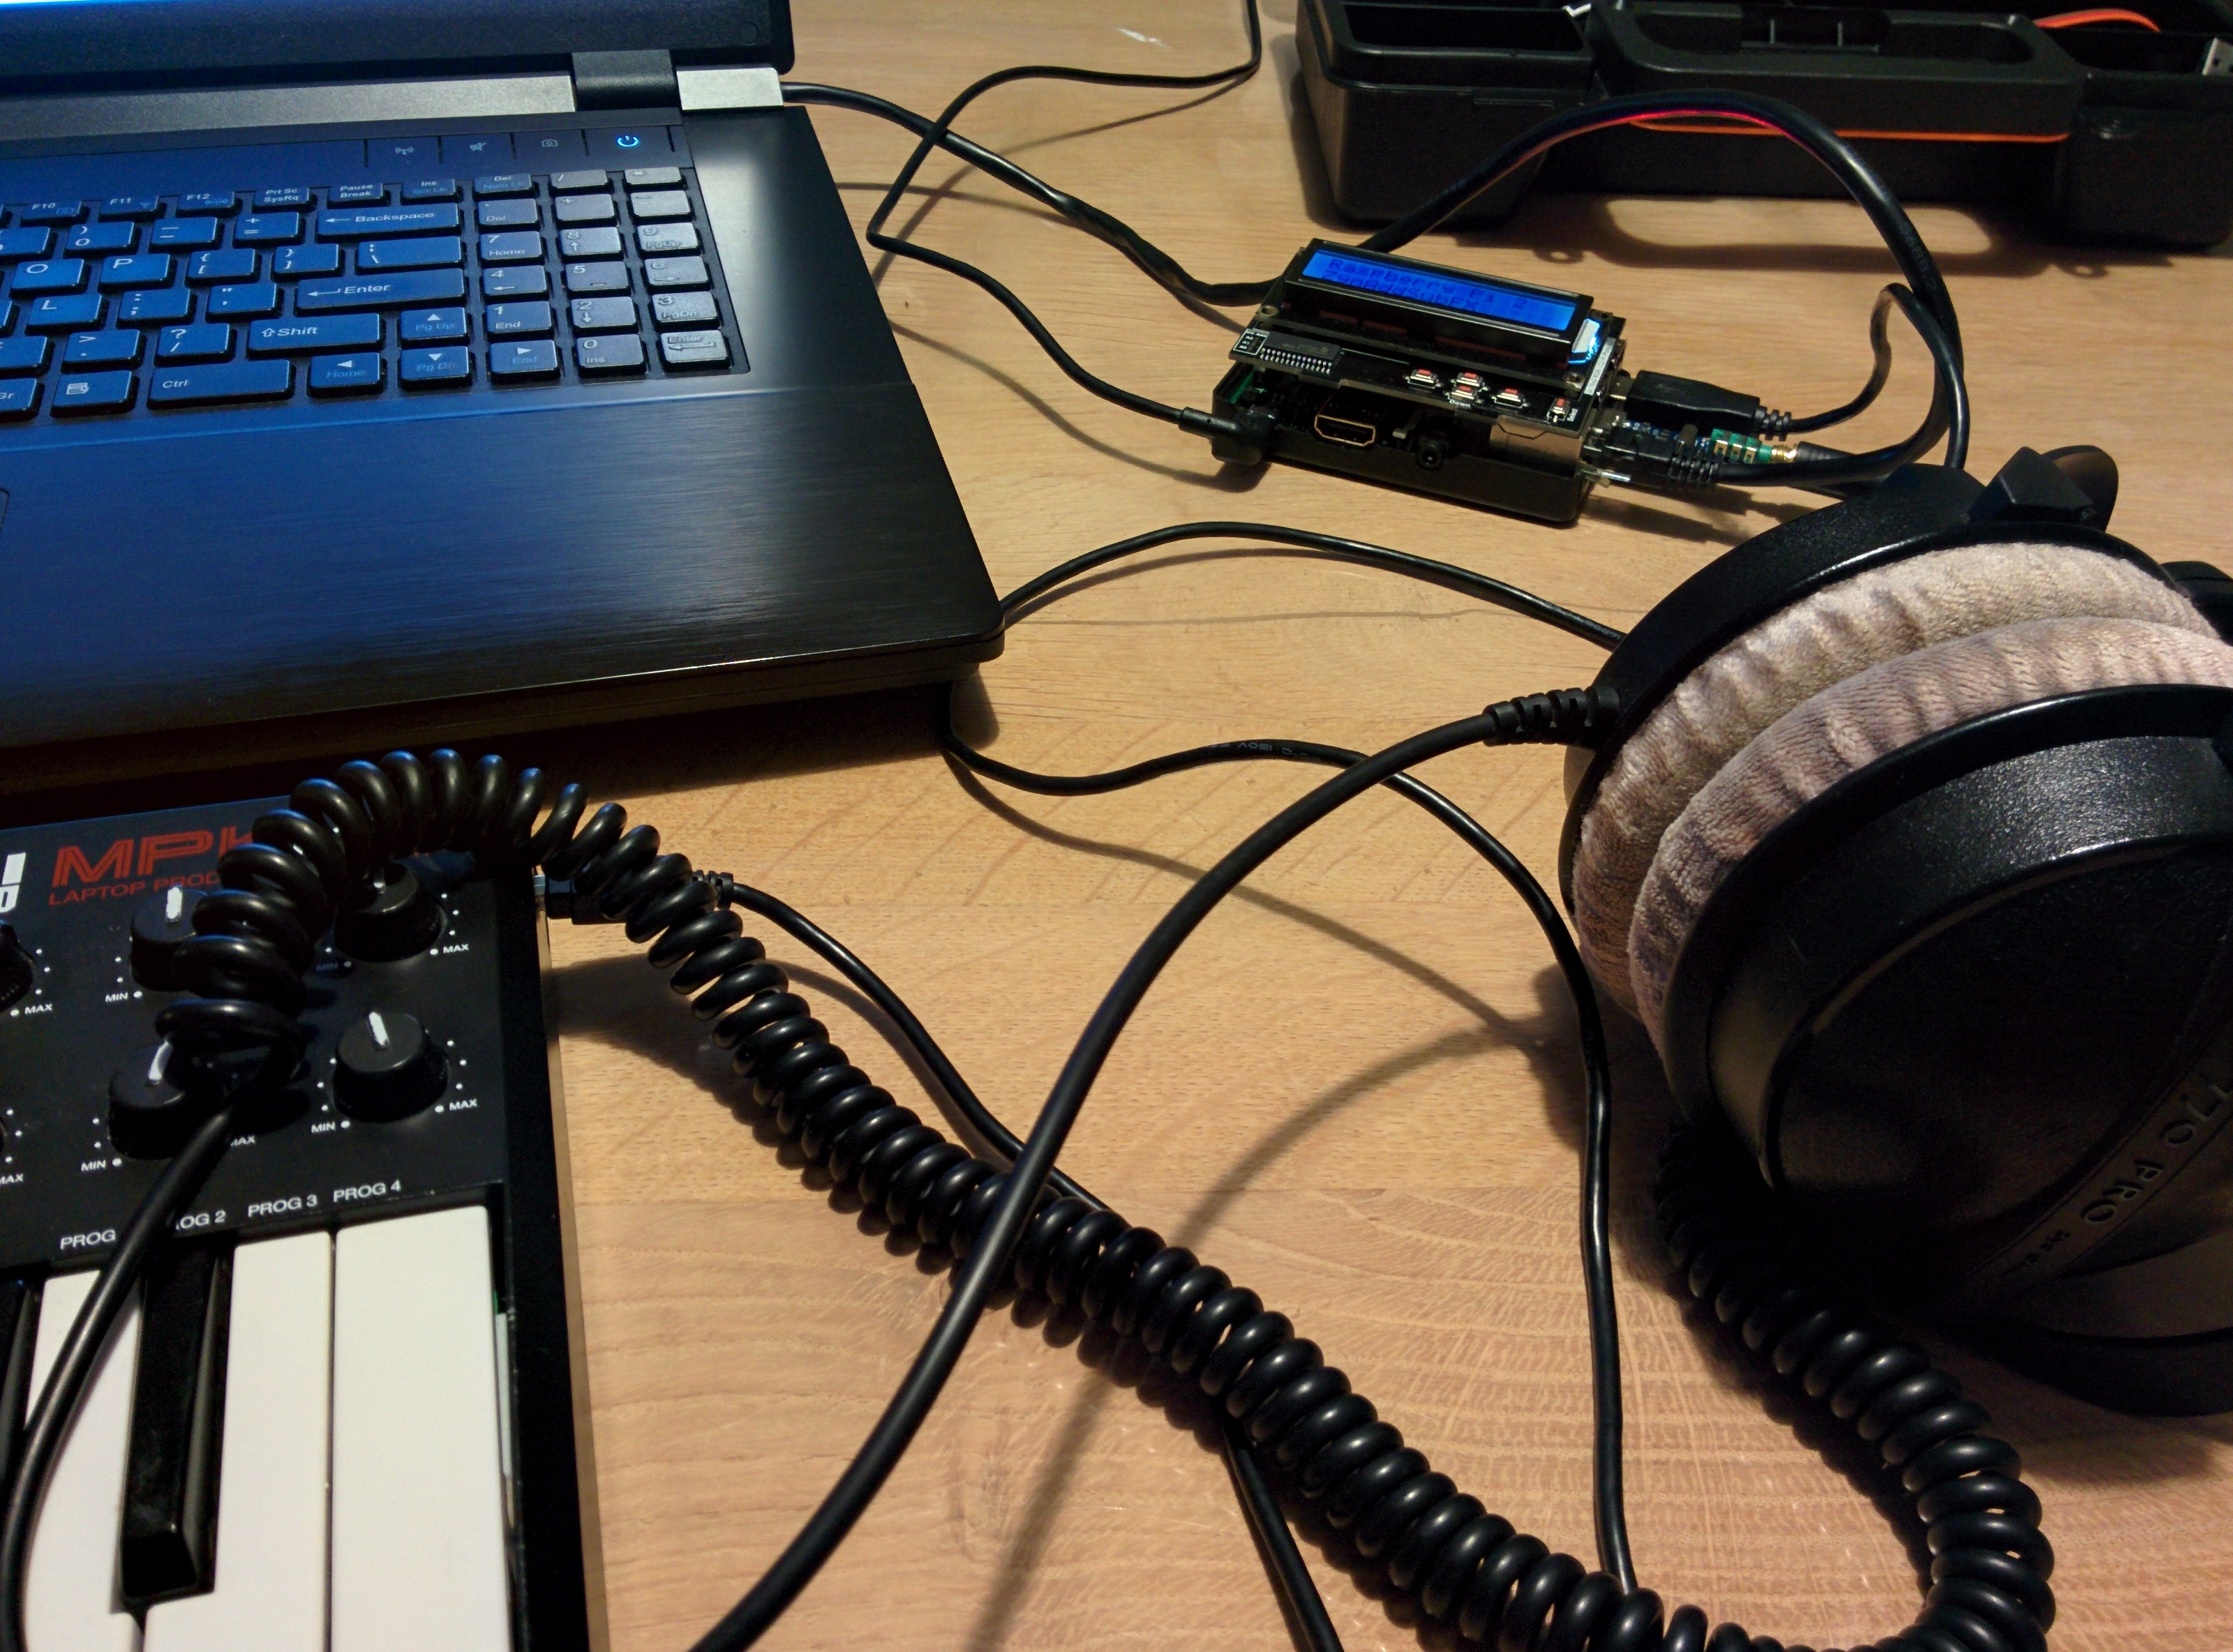
Raspberry Pi synth module with 16×2 LCD displayThe synth module test environment
Next step for the synth module project was to get the Raspberry Pi 2 to run in a stable manner. It seems like I’m getting close or that I’m already there. First I built a new RT kernel based on the 4.1.7 release of the RPi kernel. Therefore I had to checkout an older git commit because the RPi kernel is already at 4.1.8. The 4.1.7-rt8 patchset applied cleanly and the kernel booted right away:
pi@rpi-jessie:~$ uname -a
 Linux rpi-jessie 4.1.7-rt8-v7 #1 SMP PREEMPT RT Sun Sep 27 19:41:20 CEST 2015 armv7l GNU/Linux
After cleaning up my cmdline.txt it seems to run fine without any hiccups so far. My cmdline.txt now looks like this:
With a buffer of 64 frames latency is very low and so far I haven’t run into instruments that cause a lot of xruns with this buffer size. Not even the multi-layered ones from Will Godfrey.
So I guess it’s time for the next step, creating a systemd startup unit so that ZynAddSubFX starts at boot. And it would be nice if USB MIDI devices would get connected automatically. And if you could see somehow which instrument is loaded, an LCD display would be great for this. Also I’d like to have the state of the synth saved, maybe by saving an .xmz file whenever there’s a state change or on regular intervals. And the synth module will need a housing or casing. Well, let’s get the software stuff down first.