Everything seems to work, network, audio, external monitor, display brightness. And this is the first notebook I’ve ever come across to that has a touch pad with an actual real middle click! Love it! Keyboard is nice too, backlight works fine and it has a nice array of function keys that are almost all mapped now. Overall feel of this machine is really nice, aluminum housing and the chiclet keyboard feels stable and solid. Startup time is twice as fast as the BTO. Compared to my new notebook the old one feels strangely completely outdated.
Now what is in there? CPU is an AMD Ryzen 7 7840HS, an 8-core CPU with SMT. Disabled SMT though, Ardour seems to run slightly better on 8 real cores. 32GB of RAM which should be more than enough, my old notebook had 16GB and never had any issues with that. Storage is a 1TB SK hynix BC901 NVMe drive with more than decent throughput. Almost all USB ports sit on their own bus which is quite nice. The only bus that shares its IRQ with something else (the WiFi module) is bus 001. USB ports that use this bus are both the USB-C and USB Type-A connectors closest to the screen. So better not use those.
The only thing that is a bit flaky is the WiFi connection but came across more mentions about that. The connection sometimes randomly reconnects. Can live with it, when making music I often completely disable WiFi. Did have to use systemd automount instead of an fstab entry to mount my NAS as the WiFi connection apparently takes a bit too long to come up.
Didn’t have to tweak a lot so far. As I already mentioned I did disable SMT (Simultaneous Multi-Threading) and I’ve prioritized the IRQ of the USB bus my audio interface sits on. Not with rtirq or udev-rtirq (which doesn’t work properly on this machine, the wrong IRQ seems to get prioritized) but with a small script to fetch the IRQ number that seems to change on every boot and feeding the outcome to chrt. Installed a liquorix kernel on it and enabled threaded IRQ’s, disabled mitigations and USB autosuspend. Also allowed my user to set CPU DMA latency.
BTO vs Lenovo
It’s running Debian 12 with XFCE again. Simple, fast and looks good enough to me with the Greybird theme and elementary icons. And no more notebook that takes off into orbit, the new one is way more quiet.
On with making music!
Edit: the script I threw together could be useful for others too with USB audio interfaces connected to a machine that uses MSI (Message-Signaled Interrupts) enabled USB controllers. You can find the snd_dev_id of your interface with aplay -l.
#!/bin/bash

prio=90
prio_step=5
proc_path=/proc/asound
sys_pci_bus_path=/sys/class/pci_bus
snd_dev_ids=( Babyface2359686 UA25 )

for snd_dev_id in ${snd_dev_ids[@]}; do
  snd_dev_card_number=$(awk '/'$snd_dev_id'/ {print $1}' $proc_path/cards)

  if [ -n "$snd_dev_card_number" ]; then
    snd_dev_card=card$snd_dev_card_number
    snd_dev_pci_bus_ref=$(grep -Eo "usb-[^[:space:],-]+" $proc_path/$snd_dev_card/stream0 | sed "s/usb-\(.*\)/\1/")
    snd_dev_pci_bus_ref_short=$(awk -F ':' '{print $1":"$2}' <<<$snd_dev_pci_bus_ref)
    snd_dev_irq=$(cat $sys_pci_bus_path/$snd_dev_pci_bus_ref_short/device/$snd_dev_pci_bus_ref/irq)
    snd_dev_irq_pid=$(pgrep $snd_dev_irq-xhci)

    chrt -f -p $prio $snd_dev_irq_pid

    prio=$((prio-prio_step))
  fi

done
After long consideration I ended up with a Lenovo IdeaPad Pro 5 16APH8 (83AR0045MH) or actually a 83AR004CMH, which are exactly the same models. For a while I was eying a BTO P•BOOK 16P1390 that got a good review from an old colleague of mine from the UvA. That’s actually a TongFang ID6H2 but by the time I made up my mind the version I actually wanted with an i7-13700H CPU was already sold out. Why BTO? And why replace it? Well, my current audio workstation is a BTO from 2013 and it has served me well, actually, it still runs amazingly well but it’s showing its age here and there. No support for bigger external monitors for instance, and I’m also hitting full DSP load in Ardour a bit too early.
So I did some more research and concluded that it might be a good thing to switch to AMD. Not only because Linus is on AMD now but I just want 8 cores that perform the same. Add to that that quite some Linux music producers favor AMD too and that the Ryzen 7 7840HS I went for doesn’t differ that much performance wise from its Intel i7-13700H equivalent. But it’s cheaper in the configuration I chose compared to a BTO alternative. I also looked at other vendors like Laptop With Linux and Tuxedo but the Clevo’s from Laptop With Linux are too bulky for my taste and are a bit behind spec wise and Tuxedo only offers keyboards with ISO layouts and they’re also quite pricey. I quickly let go of the idea of getting a Framework notebook, that would easily get twice as expensive as the notebook I have now and despite how much I love their sustainability approach that is simply too much. And not buying a new notebook every three or four years is pretty sustainable too I guess.
I verified beforehand if Linux would run on my Lenovo and found some references that confirmed Linux would run well on it. Given the track record Lenovo has with Linux on its notebooks this was no surprise. Just picked it up from a local store which I find more convenient and safer than having it sent over from an online vendor or even Lenovo itself. Lenovo does offer an option without an OS though but a dual boot option can come in handy, especially when having to update firmware of external devices or the firmware of the notebook itself.
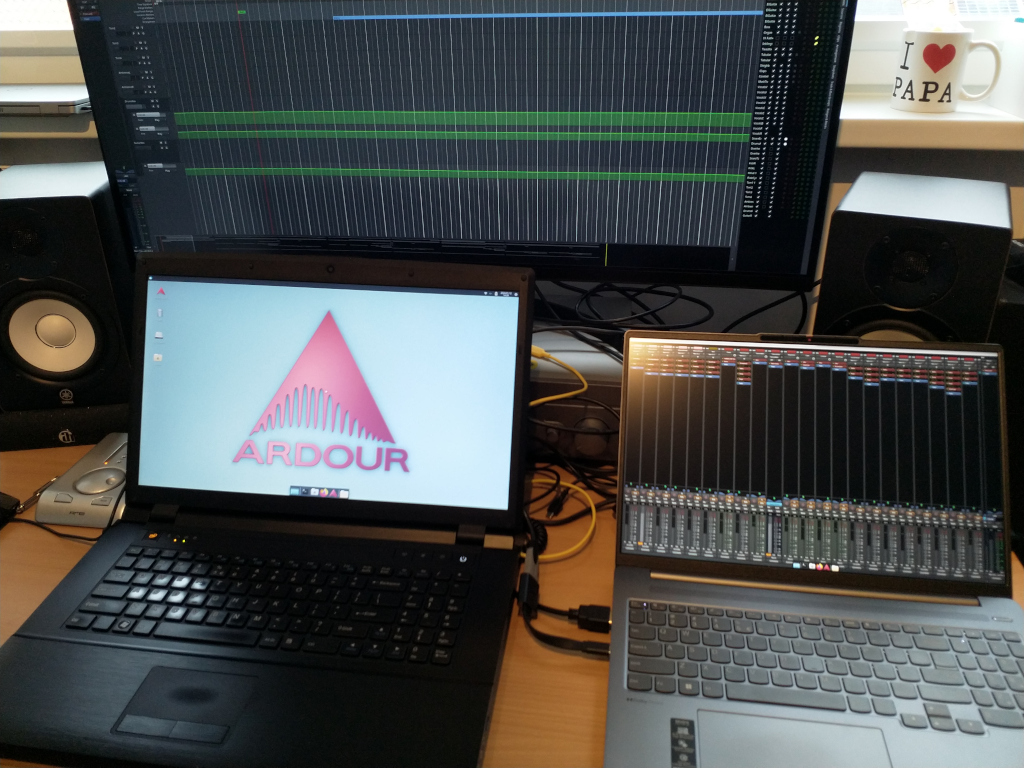
Installing Debian 12 on it as we speak and the initial setup went very smoothly. I’m surprised at how small and light it is. And I’ll have to get used to the resolution, but the WQXGA resolution was a conscious decision. I work with two screens, Ardour editor on my main screen and the mixer on my notebook screen and coming from 1920×1080 @ 60Hz the Lenovo with its 2560×1600 @ 120 Hz screen will definitely be an improvement.
A while ago I received a new modem from Ziggo since they’re switching to DOCSIS 3.1. Didn’t have the time to replace the old Ubee UVW3200 modem but this morning I was forced to do so because the lease had expired and Ziggo had decided to give me a new WAN IP address in a network segment with no internet.
After replacing the Ubee with the Sagemcom F3896LG-ZG I had no internet though. I did have a green LED lighting up our meter cupboard and apparently that indicated the modem was in bridge mode. The Ubee was also working in bridge mode so that could very well be possible. Quick search revealed I had to call Ziggo, have them disable bridge mode and then I could put it in bridge mode myself again. So I called, Ziggo disabled bridge mode and a few minutes later I still had nothing. No option to enable bridge mode. So I called again. Apparently in some regions the bridge mode option doesn’t show up so Ziggo enabled bridge mode again. Green LED reappeared after a while and tada, my router received a fresh new WAN IP address and there was internet again.
So if you run into similar issues when replacing your Ubee that was put in bridge mode by Ziggo with the new Sagemcom modem, call them. Modem works good now, it does use a bit more power (36W vs 24W for the Ubee) but a bonus is that you still have remote access to the modem which was not possible with the Ubee. And like the Ubee everything else but the modem functionality is disabled so it probably needs less than 36W at the moment. I’ll hook it up to a power monitoring smart plug to find out.
When my stereo amplifier stopped working I could’ve bought a new one but after a quick look inside I was pretty sure the damage was minor so I brought it to a repair service. When I could pick it up again not only were the costs way below the price of a new amplifier but the repair service basically did a full recap with good quality capacitors so not only will it last another decade or two it also still sounds great.
But since this is a pre smart era device it only came with a bulky IR remote, so no possibility to control it via Wi-Fi. I bought a cheap Wi-Fi remote control device that could be flashed with Tasmota and integrated it with my Domoticz setup. Then we got a new thermostat that worked with Domoticz initially but after a firmware update it stopped working. With Home Assistant everything worked except for the IR remote control so for a while I used both solutions.
Not ideal so I dug a bit deeper to get the IR remote control to work with Home Assistant. Since user stories on this matter are pretty much non-existent here are the steps to get a similar solution going on your Home Assistant setup. Be warned that this is not a step-by-step walkthrough, I’m assuming you know how to flash ESP devices, that you know your way around Home Assistant and Tasmota and that you have your own MQTT server running.
First you will have to acquire a Wi-Fi remote control device that can be flashed with Tasmota. I got one from Amazon similar to this unit. Flashed it over the air with tuya-convert. Next step was to add the Pyscript HACS integration to Home Assistant. Then I added the following Python script wich I named irsend.py to the pyscripts directory.
What this script does is sending a message over MQTT to the IR remote control, the IR remote control then converts this message to an IR signal and transmits this signal. The script needs two input parameters, action and id. These parameters are made available to the script through pyscript. The Python @service decorator makes the script available as a Service in Home Assistant.
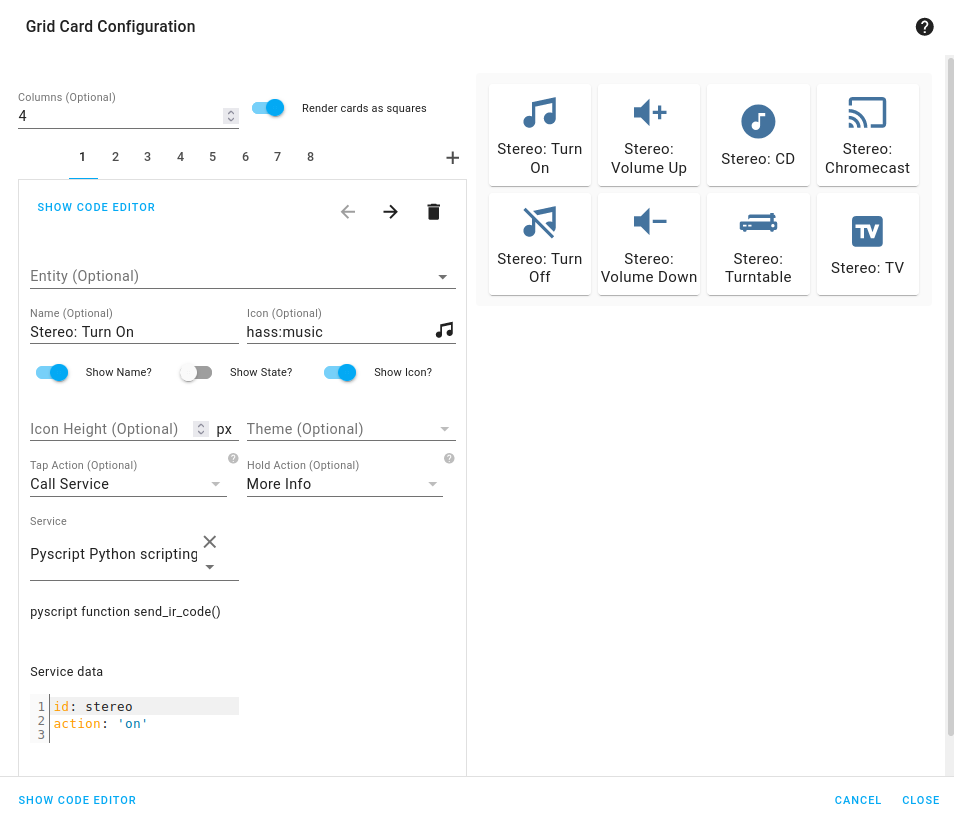
With this Service working I can add it to a View. I used a Grid card for this and added Buttons cards to this Grid.
The Grid Card Configuration looks like this.
Added a Name, an Icon and set the Tap Action to Call Service. As a Service I could select Pyscript Python scripting: send_ir_code and as Service data I entered an id and an action as a dictionary, so {id: stereo, action: on}. Did this for all the other actions and now I can control my pre smart age stereo in a smart way.
As a beta tester for MOD I thought it would be cool to play around with netJACK which is supported on the MOD Duo. The MOD Duo can run as a JACK master and you can connect any JACK slave to it as long as it runs a recent version of JACK2. This opens a plethora of possibilities of course. I’m thinking about building a kind of sidecar device to offload some stuff to using netJACK, think of synths like ZynAddSubFX or other CPU greedy plugins like fat1.lv2. But more on that in a later blog post.
So first I need to set up a sidecar device and I sacrificed one of my RPi’s for that, an RPi 3. Flashed an SD card with Raspbian Jessie Lite and started to do some research on the status of real time kernels and the Raspberry Pi because I’d like to use a real time kernel to get sub 5ms system latency. I compiled real time kernels for the RPi before but you had to jump through some hoops to get those running so I hoped things would have improved somewhat. Well, that’s not the case so after having compiled a first real time kernel the RPi froze as soon as I tried to runapt-get install rt-tests. After having applied a patch to fix how the RPi folks implemented the FIQ system the kernel compiled without issues:
Linux raspberrypi 4.9.33-rt23-v7+ #2 SMP PREEMPT RT Sun Jun 25 09:45:58 CEST 2017 armv7l GNU/Linux
And the RPi seems to run stable with acceptable latencies:
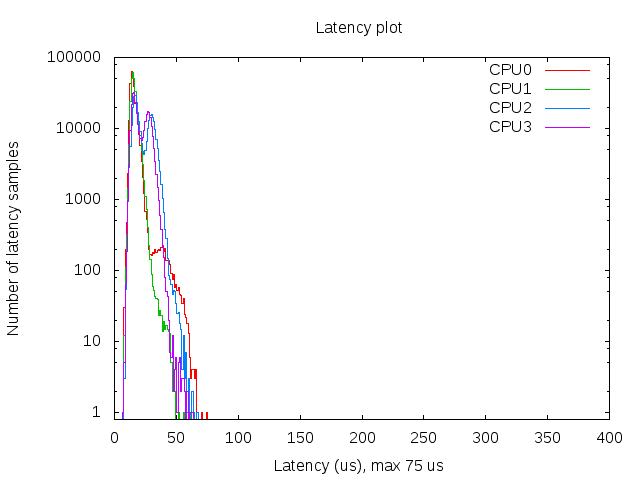
Histogram of the latency on the RPi with a real time kernel during 300000 cyclictest loops
So that’s a maximum latency of 75 µs, not bad. I also spotted some higher values around 100 but that’s still okay for this project. The histogram was created with mklatencyplot.bash. I used a different invocation of cyclictest though:
cyclictest -Sm -p 80 -n -i 500 -l 300000
And I ran hackbench in the background to create some load on the RPi:
(while true; do hackbench > /dev/null; done) &
Compiling a real time kernel for the RPi is still not a trivial thing to do and it doesn’t help that the few howto’s on the interwebs are mostly copy-paste work, incomplete and contain routines that are unclear or even unnecessary. One thing that struck me too is that the howto’s about building kernels for RPi’s running Raspbian don’t mention the make deb-pkg routine to build a real time kernel. This will create deb packages that are just so much easier to transfer and install then rsync’ing the kernel image and modules. Let’s break down how I built a real time kernel for the RPi 3.
First you’ll need to git clone the Raspberry Pi kernel repository:
This will only clone the rpi-4.9.y branch into a directory called linux without any history so you’re not pulling in hundreds of megs of data. You will also need to clone the tools repository which contains the compiler we need to build a kernel for the Raspberry Pi:
The KERNEL variable is needed to create the initial kernel config. The ARCH variable is to indicate which architecture should be used. The CROSS_COMPILE variable indicates where the compiler can be found. The CONCURRENCY_LEVEL variable is set to the number of cores to speed up certain make routines like cleaning up or installing the modules (not the number of jobs, that is done with the -j option of make).
Now that the environment variables are set we can create the initial kernel config:
cd linux
make bcm2709_defconfig
This will create a .config inside the linux directory that holds the initial kernel configuration. Now download the real time patch set and apply it:
cd ..
wget https://www.kernel.org/pub/linux/kernel/projects/rt/4.9/patch-4.9.33-rt23.patch.xz
cd linux
xzcat ../patch-4.9.33-rt23.patch.xz | patch -p1
Most howto’s now continue with building the kernel but that will result in a kernel that will freeze your RPi because of the FIQ system implementation that causes lock ups of the RPi when using threaded interrupts which is the case with real time kernels. That part needs to be patched so download the patch and dry-run it:
cd ..
wget https://www.osadl.org/monitoring/patches/rbs3s/usb-dwc_otg-fix-system-lockup-when-interrupts-are-threaded.patch
cd linux
patch -i ../usb-dwc_otg-fix-system-lockup-when-interrupts-are-threaded.patch -p1 --dry-run
You will notice one hunk will fail, you will have to add that stanza manually so note which hunk it is for which file and at which line it should be added. Now apply the patch:
And add the failed hunk manually with your favorite editor. With the FIQ patch in place we’re almost set for compiling the kernel but before we can move on to that step we need to modify the kernel configuration to enable the real time patch set. I prefer doing that with make menuconfig. You will need the libncurses5-dev package to run this commando so install that with apt-get install libncurses5-dev. Then select Kernel Features - Preemption Model - Fully Preemptible Kernel (RT) and select Exit twice. If you’re asked if you want to save your config then confirm. In the Kernel features menu you could also set the the timer frequency to 1000 Hz if you wish, apparently this could improve USB throughput on the RPi (unconfirmed, needs reference). For real time audio and MIDI this setting is irrelevant nowadays though as almost all audio and MIDI applications use the hr-timer module which has a way higher resolution.
With our configuration saved we can start compiling. Clean up first, then disable some debugging options which could cause some overhead, compile the kernel and finally create ready to install deb packages:
make clean
scripts/config --disable DEBUG_INFO
make -j$(nproc) deb-pkg
Sit back, enjoy a cuppa and when building has finished without errors deb packages should be created in the directory above the linux one. Copy the deb packages to your RPi and install them on the RPi with dpkg -i. Open up /boot/config.txt and add the following line to it:
kernel=vmlinuz-4.9.33-rt23-v7+
Now reboot your RPi and it should boot with the realtime kernel. You can check with uname -a:
Linux raspberrypi 4.9.33-rt23-v7+ #2 SMP PREEMPT RT Sun Jun 25 09:45:58 CEST 2017 armv7l GNU/Linux
Since Rasbian uses almost the same kernel source as the one we just built it is not necessary to copy any dtb files. Also running mkknlimg is not necessary anymore, the RPi boot process can handle vmlinuz files just fine.
The basis of the sidecar unit is now done. Next up is tweaking the OS and setting up netJACK.
Edit: there’s a thread on LinuxMusicians referring to this article which already contains some very useful additional information.
Today I got a Tascam US-144MKII from a colleague because he couldn’t use it anymore with Mac OSX. Apparently this USB2.0 audio interface stopped working on El Capitan. Tascam claims they’re working on a driver but they’re only generating bad publicity with that announcement it seems. So he gave it to me, maybe it would work on Linux.
Tascam US-144MKII
First thing I did was plugging it in. The snd_usb_122l module got loaded but that was about it. So much for plug and play. There are reports though that this interface should work so when I got home I started digging a bit deeper. Apparently you have to disable the ehci_hcd USB driver, which is actually the USB2.0 controller driver, and force the US-144MKII to use the uhci_hcd USB1.1 driver instead so that it thinks it’s in USB1.1 mode. This limits the capabilities of the device but my goal for today was to get sound out of this interface, not getting the most out of it.
I quickly found out that on my trusty XPS13 forcing USB1.1 was probably not going to work because it only has USB3.0 ports. So I can disable the ehci_hcd driver but then it seems the xhci_hcd USB3.0 driver takes over. And disabling that driver effectively disables all USB ports. So I grabbed an older notebook with USB2.0 ports and disabled the ehci_hcd driver by unbinding it since it’s not compiled as a module. Unbinding a driver is done by writing the system ID of a device to a so-called unbind file of the driver that is bound to this device. In this case we’re interested in the system ID’s of the devices that use the ehci_hcd driver which can be found in /sys/bus/drivers/ehci-pci/:
This will unbind the ehci_hcd driver from the device with system ID 0000:00:1a.7 which in this case is an USB2.0 controller.When plugging in the USB interface it now got properly picked up by the system and I was greeted with an active green USB led on the interface as proof.
$ cat /proc/asound/cards
 0 [Intel          ]: HDA-Intel - HDA Intel
                      HDA Intel at 0xf4800000 irq 46
 1 [US122L         ]: USB US-122L - TASCAM US-122L
                      TASCAM US-122L (644:8020 if 0 at 006/002
So ALSA picked it up as a device but it doesn’t show up in the list of sound cards when issuing aplay -l. This is because you have to tell ALSA to talk to the device in a different way then to a normal audio interface. Normally an audio interface can be addressed by using the hw plugin which is the most low-level ALSA plugin that does nothing more than talking to the driver and this is what most applications use, including JACK. The US-144MKII works differently though, its driver snd_usb_122l has to be accessed with the use of the usb_stream plugin which is part of the libasound2-plugins package and that allows you to set a PCM device name that can be used with JACK for instance. This can be done with the following .asoundrc file that you have to create in the root of your home directory:
pcm.us-144mkii {
        type usb_stream
        card "US122L"
}

ctl.us-144mkii {
        type hw
        card "US122L"
}
What we do here is creating a PCM device called us-144mkii and coupling that to the card name we got from cat /proc/asound/cards which is US122L. Of course you can name the PCM device anything you want. Almost all other examples name it usb_stream but that’s a bit confusing because that is the name of the plugin and you’d rather have a name that has some relation to the device you’re using. Also practically all examples use card numbers. But who says that the USB audio interface will always be card 0, or 1. It could also be 2, or 10 if you have 9 other audio interfaces. Other examples work around this by fixing the order of the numbers that get assigned to each available audio interface by adjusting the index parameter for the snd_usb_122l driver. But why do that when ALSA also accepts the name of the card? This also makes thing a lot easier to read, it’s now clear that we are coupling the PCM name us-144mkii to the card named US122L. And we’re avoiding having to edit system-wide settings. The ctl stanza is not strictly necessary but it prevents the following warning when starting JACK:
ALSA lib control.c:953:(snd_ctl_open_noupdate) Invalid CTL us-144mkii
control open "us-144mkii" (No such file or directory)
So with the .asoundrc in place you can try starting JACK:
$ jackd -P85 -t2000 -dalsa -r48000 -p512 -n2 -Cus-144mkii -Pus-144mkii
jackd 0.124.2
Copyright 2001-2009 Paul Davis, Stephane Letz, Jack O'Quinn, Torben Hohn and others.
jackd comes with ABSOLUTELY NO WARRANTY
This is free software, and you are welcome to redistribute it
under certain conditions; see the file COPYING for details

no message buffer overruns
JACK compiled with System V SHM support.
loading driver ..
apparent rate = 48000
creating alsa driver ... us-144mkii|us-144mkii|512|2|48000|0|0|nomon|swmeter|-|32bit
configuring for 48000Hz, period = 512 frames (10.7 ms), buffer = 2 periods
ALSA: final selected sample format for capture: 24bit little-endian in 3bytes format
ALSA: use 2 periods for capture
ALSA: final selected sample format for playback: 24bit little-endian in 3bytes format
ALSA: use 2 periods for playback
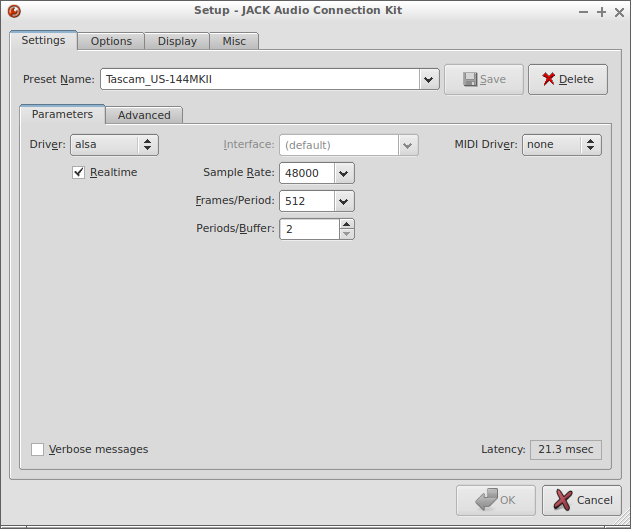
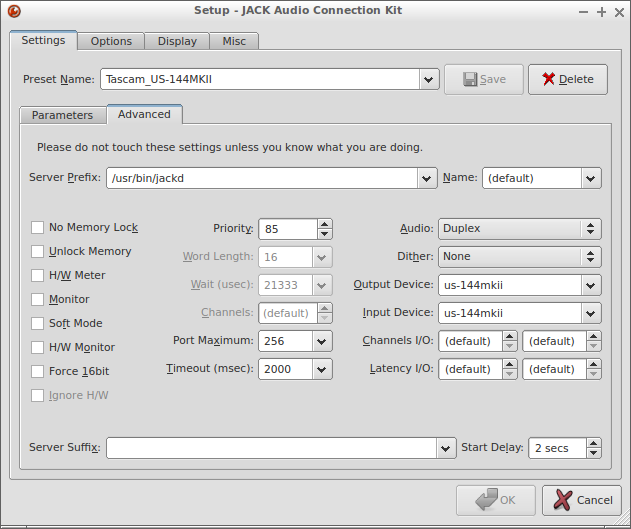
This translates to the following settings in QjackCtl:
QjackCtl Settings – Parameters
QjackCtl Settings – Advanced
Don’t expect miracles of this setup. You won’t be able to achieve super low-latencies but at least you can still use your Tascam US-144MKII instead of having to give it away to a colleague.
Recently I found out that I was not the only one trying to build a synth module out of a Raspberry Pi with ZynAddSubFX. The Zynthian project is trying to achieve the exact same goal and so far it looks very promising. I contacted the project owner to ask if he would be interested in collaborating. I got a reply promptly and we both agreed it would be a good idea to join forces. The Zynthian project has all the things that I still had to set up already in place but I think I can still help out. The Zynthian set-up might benefit from some optimizations like a real-time kernel and things like boot time can be improved. Also I could help out testing, maybe do some packaging. And if there’s a need for things like a repository, web server or other hosting related stuff I could provide those.
Zynthian prototype
I’m very happy with these developments of our projects converging. Check out the Zynthian blog for more information on the current state of the project.
Next step for the synth module project was to get the Raspberry Pi 2 to run in a stable manner. It seems like I’m getting close or that I’m already there. First I built a new RT kernel based on the 4.1.7 release of the RPi kernel. Therefore I had to checkout an older git commit because the RPi kernel is already at 4.1.8. The 4.1.7-rt8 patchset applied cleanly and the kernel booted right away:
pi@rpi-jessie:~$ uname -a
 Linux rpi-jessie 4.1.7-rt8-v7 #1 SMP PREEMPT RT Sun Sep 27 19:41:20 CEST 2015 armv7l GNU/Linux
After cleaning up my cmdline.txt it seems to run fine without any hiccups so far. My cmdline.txt now looks like this:
With a buffer of 64 frames latency is very low and so far I haven’t run into instruments that cause a lot of xruns with this buffer size. Not even the multi-layered ones from Will Godfrey.
So I guess it’s time for the next step, creating a systemd startup unit so that ZynAddSubFX starts at boot. And it would be nice if USB MIDI devices would get connected automatically. And if you could see somehow which instrument is loaded, an LCD display would be great for this. Also I’d like to have the state of the synth saved, maybe by saving an .xmz file whenever there’s a state change or on regular intervals. And the synth module will need a housing or casing. Well, let’s get the software stuff down first.
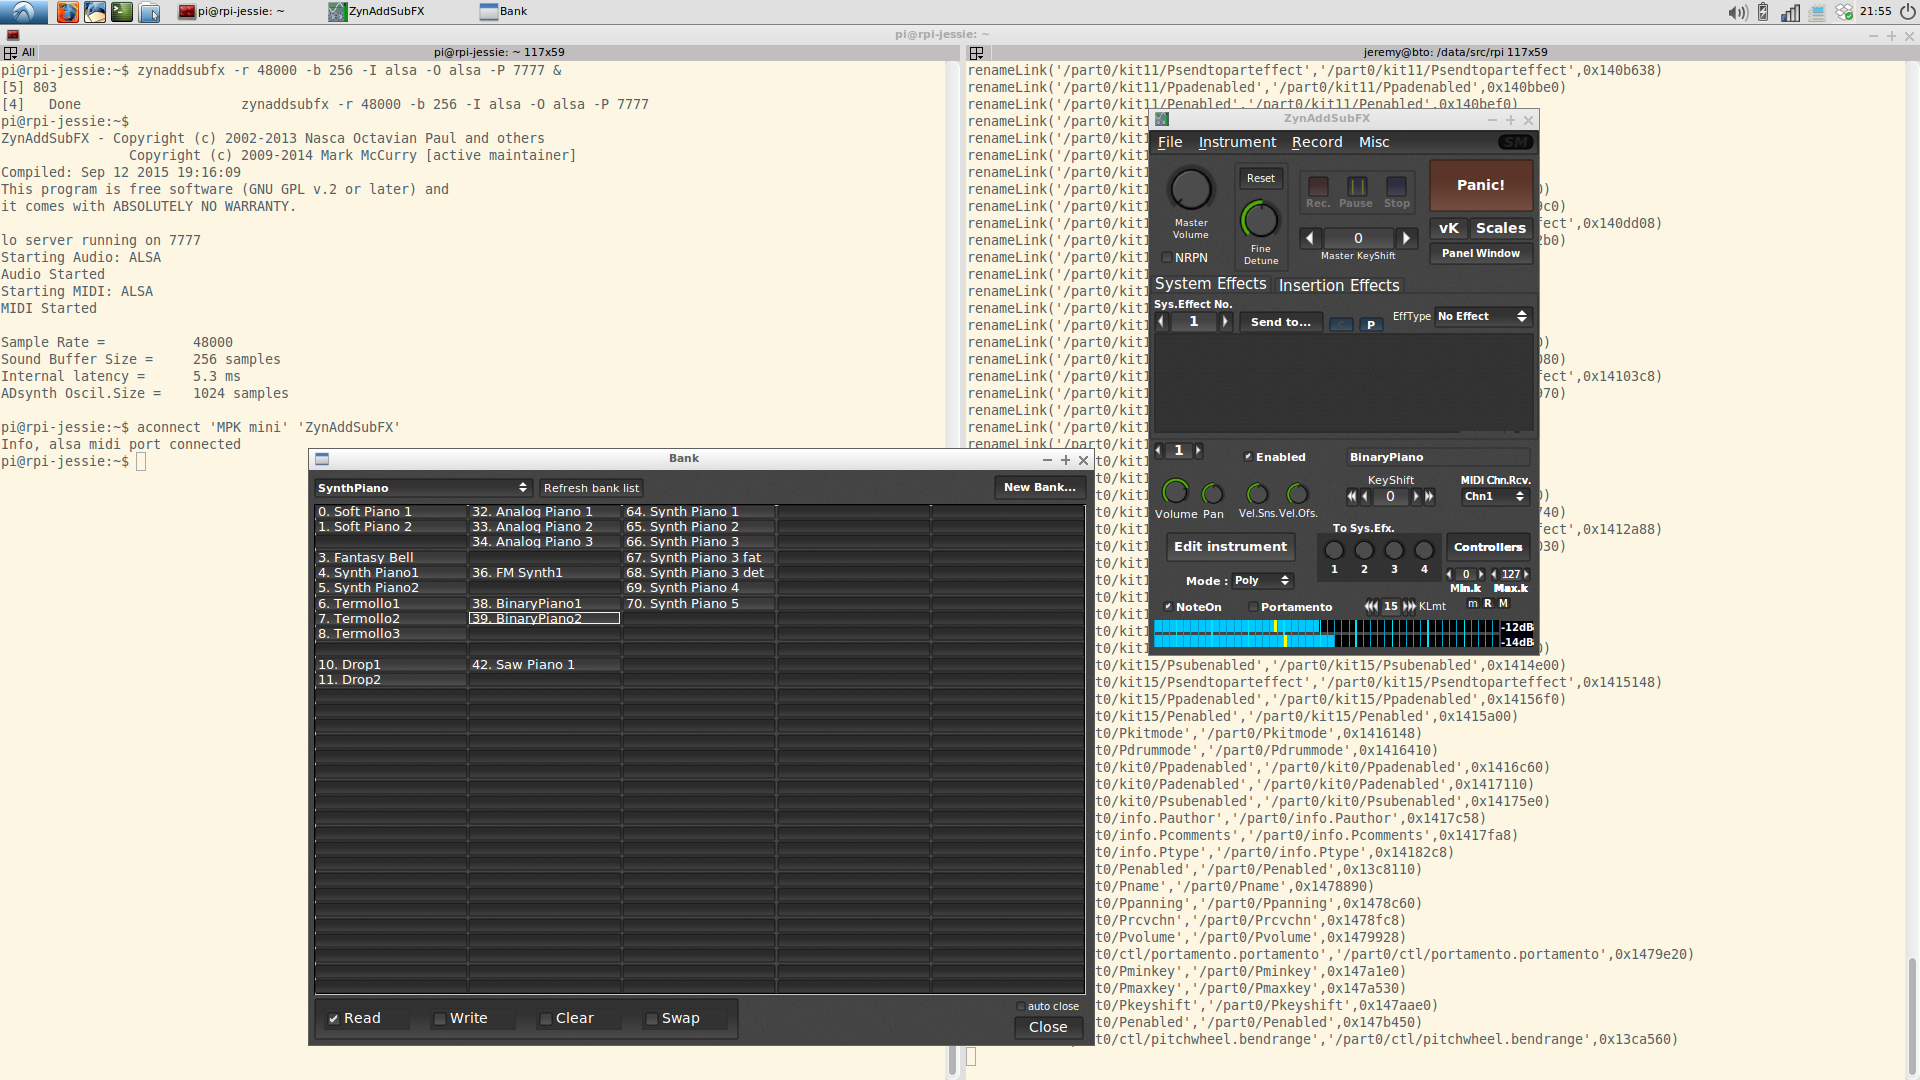
Ever since I did an acid set with my brother in law at the now closed bar De Vinger I’ve been playing with the idea of creating some kind of synth module out of a Raspberry Pi. The Raspberry Pi 2 should be powerful enough to run a complex synth like ZynAddSubFX. When version 2.5.1 of that synth got released the idea resurfaced again since that version allows to remote control a running headless instance of ZynAddSubFX via OSC that is running on for instance a Raspberry Pi. I looked at this functionality before a few months ago but the developer was just starting to implement this feature so it wasn’t very usable yet.
But with the release of ZynAddSubFX 2.5.1 the stabilitity of the zynaddsubfx-ext-gui utility has improved to such an extent that it’s a very usable tool. In the above screenshot you can see zynaddsubfx-ext-gui running on my notebook with Ubuntu 14.04 controlling a remote instance of ZynAddSubFX running on a Raspberry Pi.
So basically all the necessary building blocks for a synth module are there. Coupled with my battered Akai MPK Mini and a cheap PCM2704 USB DAC I started setting up a test setup.
For the OS on the Raspberry Pi 2 I chose Debian Jessie as I feel Raspbian isn’t getting you the most out of your Pi. It’s running a 4.1.6 kernel with the 4.1.5-rt5 RT patch set, which applied cleanly and seems to run so far:
pi@rpi-jessie:~$ uname -a
Linux rpi-jessie 4.1.6-rt0-v7 #1 SMP PREEMPT RT Sun Sep 13 21:01:19 CEST 2015 armv7l GNU/Linux
This isn’t a very clean solution of course so let’s hope a real 4.1.6 RT patch set will happen or maybe I could give the 4.1.6 PREEMPT kernel that rpi-update installed a try. I packaged a headless ZynAddSubFX for the RPi on my notebook using pbuilder with a Jessie armhf root and installed the package for Ubuntu 14.04 from the KXStudio repos. I slightly overclocked the RPi to 1000MHz and set the CPU scaling governor to performance. The filesystem is Ext4, mounted with noatime,nobarrier,data=writeback.
To get the USB audio interface and the USB MIDI keyboard into line I had to add the following line to my /etc/modprobe.d/alsa.conf file:
This makes sure the DAC gets loaded as the first audio interface, so with index 0. Before adding this line the Akai would claim index 0 and since I’m using ZynAddSubFX with ALSA it couldn’t find an audio interface. But all is fine now:
pi@rpi-jessie:~$ cat /proc/asound/cards
 0 [DAC            ]: USB-Audio - USB Audio DAC
                      Burr-Brown from TI USB Audio DAC at usb-bcm2708_usb-1.3, full speed
 1 [mini           ]: USB-Audio - MPK mini
                      AKAI PROFESSIONAL,LP MPK mini at usb-bcm2708_usb-1.5, full speed
So no JACK as the audio back-end, the output is going directly to ALSA. I’ve decided to do it this way because I will only be running one single application that uses the audio interface so basically I don’t need JACK. And JACK tends to add a bit of overhead, you barely notice this on a PC system but on small systems like the Raspberry Pi JACK can consume a noticeable amount of resources. To make ZynAddSubFX use ALSA as the back-end I’m starting it with the -O alsa option:
The -r option sets the sample rate, the -b option sets the buffer size, -I is for the MIDI input and the -P option sets the UDP port on which ZynAddSubFX starts listening for OSC messages. And now that’s the cool part. If you then start zynaddsubfx-ext-gui on another machine on the network and tell it to connect to this port it starts only the GUI and sends all changes to the GUI as OSC messages to the headless instance it is connected to:
zynaddsubfx-ext-gui osc.udp://10.42.0.83:7777
Next up is stabilizing this setup and testing with other kernels or kernel configs as the kernel I’ve cooked up now isn’t a viable long-term solution. And I’d like to add a physical MIDI in and maybe a display like described on the Samplerbox site. And the project needs a casing of course.
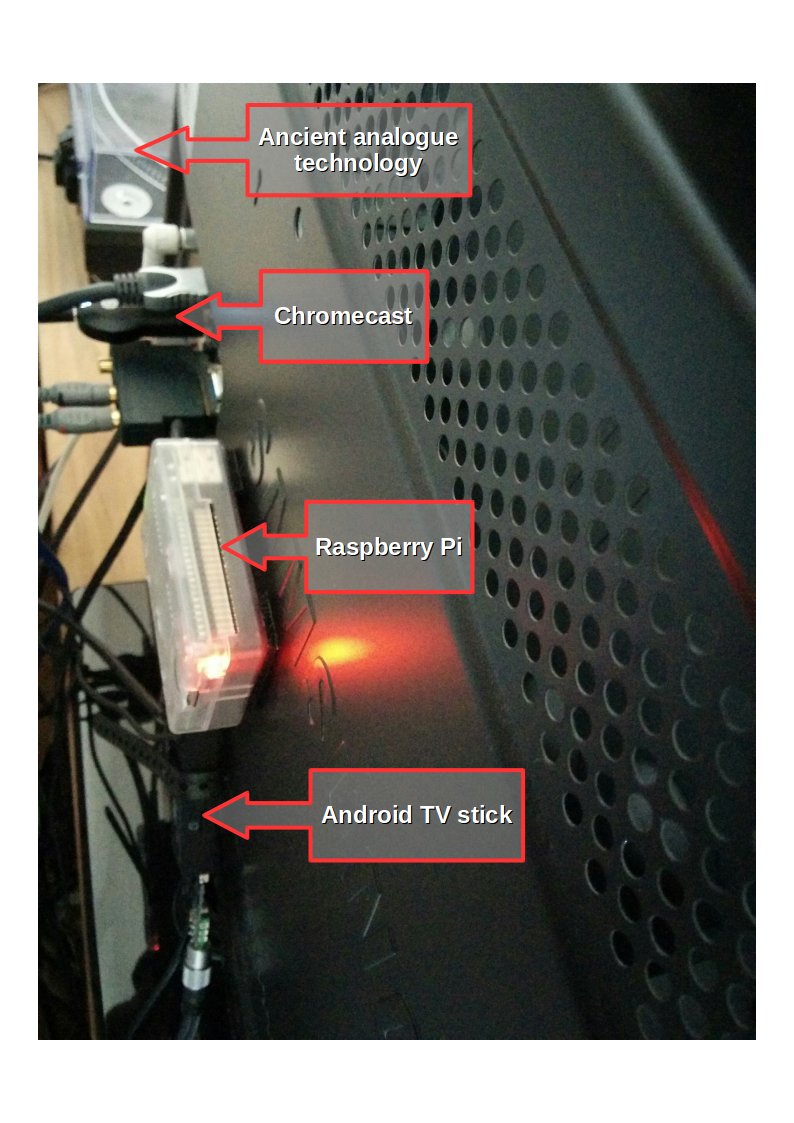
The MK808 Android TV stick with a PCM2704 USB audio interface runs Debian Jessie with MPD and serves as our mediaplayer for audio files. It draws its power from the USB port of our cable modem so it’s always on. Most of the time Indie Pop Rocks is playing. It’s hooked up to the network via WiFi. We use MPDroid to control it.
The Raspberry Pi runs OpenELEC with Kodi. We use this for watching all kinds of video files that we stream from our NAS (an aging WD My Book Live that runs Debian Lenny) via an NFS share. It is connected to the network via ethernet.
The Chromecast is for watching Netflix. When we just got it we had some issues with connecting it to the network but after replacing our old router with an ASUS RT-AC68U it worked flawlessly.
The Technics SL-1210MK2 with Ortofon headshell and cartridge is for listening music on vinyl, you know those round black plastic units from the past with grooves in them. It doesn’t have any network connections and doesn’t run an OS. It does send electrical current to a NAD C 325BEE Stereo Integrated Amplifier with Dali Concept 2 speakers. Yeah, I’m a 2.0 guy.
The TV is an old pre Smart TV Samsung but as it still works we probably won’t replace it for the time being. It does have CEC so we can control the TV, RPi and Chromecast with a single remote.