rtcqs released

rtcqs v0.3.1 is now available on Codeberg and Github. rtcqs is the continuation of the realtimeconfigquickscan project but then rewritten in Python. It comes with a Qt GUI and a few extra checks.

Dear all,

I’d like to announce rtcqs, the continuation of the realtimeconfigquickscan project. It’s a port to Python with some added extra’s, like a Spectre/Meltdown mitigations check and a Qt GUI. It has the approval of the original author of realtimeconfigquickscan to whom I owe a debt of gratitude, not only for the original code but also for his helpfulness with the continuation, or maybe even evolution of the project.

So check it out, indulge me with bugs, issues, improvements or any other useful feedback on the Codeberg repo which you can find at at https://codeberg.org/rtcqs/rtcqs

Happy system tuning and happy holidays!

Jeremy

While setting up a solution to fully automate the deployment of SSL certificates at work I piggybacked on the flow and focus to rewrite the realtimeconfigquickscan Perl code in Python. As part of the certificate deployment project I wrote an application to decrypt, re-encrypt and base64 encode PFX files so they can be uploaded to a vault solution. This way I ran into PySimpleGUI which enabled me to quickly put together a nice looking Qt GUI.


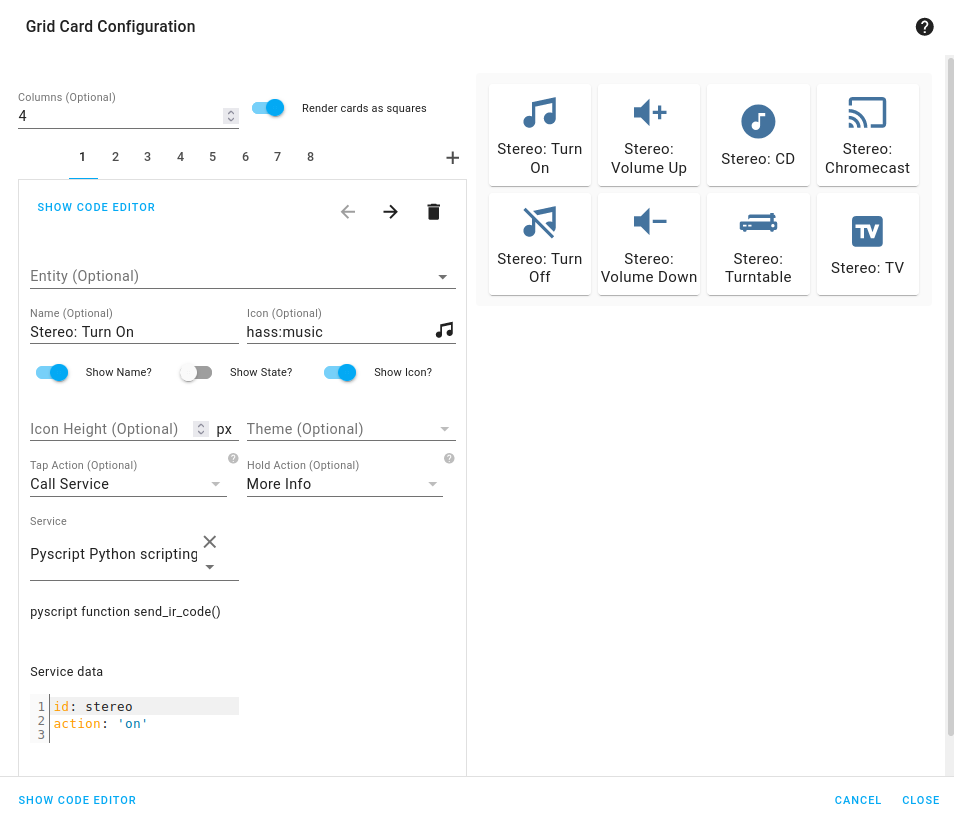
rtcqs main window

The code could be more terse and probably contains some typical non-programmer idiosyncracies. First improvement will be to make the code more dynamic so the GUI gets generated instead of using hardcoded values like it does now. And I’d like to add a power management check but then I first need to read up on that subject. There are also some checks that might need some more scrutiny like the swappiness and max_user_watches checks to verify if those checks are really needed for a real-time audio environment.

rtcqs released

New job

Working at home during the Intelligent Lockdown got me thinking about a lot of stuff, including my job at Cyso. I started weighing the many positive aspects against the negative ones and unfortunately the balance tilted too much towards the negative side. So when I got contacted by Evidos I decided to bite the bullet because their offer just ticked so many boxes. Started there in August and I’m now at the point where things are starting to roll. I’m hired as a cloud engineer but as a jack of all trades I already find myself meddling with all kinds of things. Besides maintaining the current cloud platforms, which are mainly used for testing purposes, I’m also heavily involved in the upcoming migration of the current setup into the cloud. And I offer a fresh outlook on a wide variety of subjects that could be done better in my opinion. Think of monitoring, automation and security but also how operational work could be organized better, how existing processes could be improved and I’ve made a start with setting a proper standard for documenting all the things we do.

Evidos itself is a company that does digital signing. Think of all kinds of contracts, deeds or other official documents that need a signature. So no need to go to a notary office, estate agent or your new employer physically, just add your signature in a digital way to the official documents and end up with documents that have been fully signed by all involved parties with a solid judiciary basis. This just saves a lot of time, paper and physical encounters that should be avoided as much as possible these days.

For me this means improving my skills when it comes to encryption standards and methods, security awareness and compliancy. And a great opportunity to make good use of the knowledge I’ve amassed over the years. So far I’m happy about the decision I’ve made, it’s quite a step to change jobs, especially when you already work for a great company with a permanent contract and also given the current circumstances. But sometimes you’re just forced to step back and reconsider. I’m glad that happened, I’m regaining my enthusiasm to work with Linux and open source software in general which is a good sign and I’m starting to find more focus and peace in my current job. A good thing, not just on a professional level but also on a personal level.

New job

RPi 3 and the real time kernel

As a beta tester for MOD I thought it would be cool to play around with netJACK which is supported on the MOD Duo. The MOD Duo can run as a JACK master and you can connect any JACK slave to it as long as it runs a recent version of JACK2. This opens a plethora of possibilities of course. I’m thinking about building a kind of sidecar device to offload some stuff to using netJACK, think of synths like ZynAddSubFX or other CPU greedy plugins like fat1.lv2. But more on that in a later blog post.

So first I need to set up a sidecar device and I sacrificed one of my RPi’s for that, an RPi 3. Flashed an SD card with Raspbian Jessie Lite and started to do some research on the status of real time kernels and the Raspberry Pi because I’d like to use a real time kernel to get sub 5ms system latency. I compiled real time kernels for the RPi before but you had to jump through some hoops to get those running so I hoped things would have improved somewhat. Well, that’s not the case so after having compiled a first real time kernel the RPi froze as soon as I tried to runapt-get install rt-tests. After having applied a patch to fix how the RPi folks implemented the FIQ system the kernel compiled without issues:

Linux raspberrypi 4.9.33-rt23-v7+ #2 SMP PREEMPT RT Sun Jun 25 09:45:58 CEST 2017 armv7l GNU/Linux

And the RPi seems to run stable with acceptable latencies:

Histogram of the latency on the RPi with a real time kernel during 300000 cyclictest loops

So that’s a maximum latency of 75 µs, not bad. I also spotted some higher values around 100 but that’s still okay for this project. The histogram was created with mklatencyplot.bash. I used a different invocation of cyclictest though:

cyclictest -Sm -p 80 -n -i 500 -l 300000

And I ran hackbench in the background to create some load on the RPi:

(while true; do hackbench > /dev/null; done) &

Compiling a real time kernel for the RPi is still not a trivial thing to do and it doesn’t help that the few howto’s on the interwebs are mostly copy-paste work, incomplete and contain routines that are unclear or even unnecessary. One thing that struck me too is that the howto’s about building kernels for RPi’s running Raspbian don’t mention the make deb-pkg routine to build a real time kernel. This will create deb packages that are just so much easier to transfer and install then rsync’ing the kernel image and modules. Let’s break down how I built a real time kernel for the RPi 3.

First you’ll need to git clone the Raspberry Pi kernel repository:

git clone -b 'rpi-4.9.y' --depth 1 https://github.com/raspberrypi/linux.git

This will only clone the rpi-4.9.y branch into a directory called linux without any history so you’re not pulling in hundreds of megs of data. You will also need to clone the tools repository which contains the compiler we need to build a kernel for the Raspberry Pi:

git clone https://github.com/raspberrypi/tools.git

This will end up in the tools directory. Next step is setting some environment variables so subsequent make commands pick those up:

export KERNEL=kernel7
export ARCH=arm
export CROSS_COMPILE=/path/to/tools/arm-bcm2708/gcc-linaro-arm-linux-gnueabihf-raspbian/bin/arm-linux-gnueabihf-
export CONCURRENCY_LEVEL=$(nproc)

The KERNEL variable is needed to create the initial kernel config. The ARCH variable is to indicate which architecture should be used. The CROSS_COMPILE variable indicates where the compiler can be found. The CONCURRENCY_LEVEL variable is set to the number of cores to speed up certain make routines like cleaning up or installing the modules (not the number of jobs, that is done with the -j option of make).

Now that the environment variables are set we can create the initial kernel config:

cd linux
make bcm2709_defconfig

This will create a .config inside the linux directory that holds the initial kernel configuration. Now download the real time patch set and apply it:

cd ..
wget https://www.kernel.org/pub/linux/kernel/projects/rt/4.9/patch-4.9.33-rt23.patch.xz
cd linux
xzcat ../patch-4.9.33-rt23.patch.xz | patch -p1

Most howto’s now continue with building the kernel but that will result in a kernel that will freeze your RPi because of the FIQ system implementation that causes lock ups of the RPi when using threaded interrupts which is the case with real time kernels. That part needs to be patched so download the patch and dry-run it:

cd ..
wget https://www.osadl.org/monitoring/patches/rbs3s/usb-dwc_otg-fix-system-lockup-when-interrupts-are-threaded.patch
cd linux
patch -i ../usb-dwc_otg-fix-system-lockup-when-interrupts-are-threaded.patch -p1 --dry-run

You will notice one hunk will fail, you will have to add that stanza manually so note which hunk it is for which file and at which line it should be added. Now apply the patch:

patch -i ../usb-dwc_otg-fix-system-lockup-when-interrupts-are-threaded.patch -p1

And add the failed hunk manually with your favorite editor. With the FIQ patch in place we’re almost set for compiling the kernel but before we can move on to that step we need to modify the kernel configuration to enable the real time patch set. I prefer doing that with make menuconfig. You will need the libncurses5-dev package to run this commando so install that with apt-get install libncurses5-dev. Then select Kernel Features - Preemption Model - Fully Preemptible Kernel (RT) and select Exit twice. If you’re asked if you want to save your config then confirm. In the Kernel features menu you could also set the the timer frequency to 1000 Hz if you wish, apparently this could improve USB throughput on the RPi (unconfirmed, needs reference). For real time audio and MIDI this setting is irrelevant nowadays though as almost all audio and MIDI applications use the hr-timer module which has a way higher resolution.

With our configuration saved we can start compiling. Clean up first, then disable some debugging options which could cause some overhead, compile the kernel and finally create ready to install deb packages:

make clean
scripts/config --disable DEBUG_INFO
make -j$(nproc) deb-pkg

Sit back, enjoy a cuppa and when building has finished without errors deb packages should be created in the directory above the linux one. Copy the deb packages to your RPi and install them on the RPi with dpkg -i. Open up /boot/config.txt and add the following line to it:

kernel=vmlinuz-4.9.33-rt23-v7+

Now reboot your RPi and it should boot with the realtime kernel. You can check with uname -a:

Linux raspberrypi 4.9.33-rt23-v7+ #2 SMP PREEMPT RT Sun Jun 25 09:45:58 CEST 2017 armv7l GNU/Linux

Since Rasbian uses almost the same kernel source as the one we just built it is not necessary to copy any dtb files. Also running mkknlimg is not necessary anymore, the RPi boot process can handle vmlinuz files just fine.

The basis of the sidecar unit is now done. Next up is tweaking the OS and setting up netJACK.

Edit: there’s a thread on LinuxMusicians referring to this article which already contains some very useful additional information.

RPi 3 and the real time kernel

Working on a stable setup

Next step for the synth module project was to get the Raspberry Pi 2 to run in a stable manner. It seems like I’m getting close or that I’m already there. First I built a new RT kernel based on the 4.1.7 release of the RPi kernel. Therefore I had to checkout an older git commit because the RPi kernel is already at 4.1.8. The 4.1.7-rt8 patchset applied cleanly and the kernel booted right away:

pi@rpi-jessie:~$ uname -a
 Linux rpi-jessie 4.1.7-rt8-v7 #1 SMP PREEMPT RT Sun Sep 27 19:41:20 CEST 2015 armv7l GNU/Linux

After cleaning up my cmdline.txt it seems to run fine without any hiccups so far. My cmdline.txt now looks like this:

dwc_otg.lpm_enable=0 dwc_otg.speed=1 console=ttyAMA0,115200 console=tty1 root=/dev/mmcblk0p2 rootfstype=ext4 rootflags=data=writeback elevator=deadline rootwait

Setting USB speed to Full Speed (so USB1.1) by using dwc_otg.speed=1 is necessary otherwise the audio coming out of my USB DAC sounds distorted.

I’m starting ZynAddSubFX as follows:

zynaddsubfx -r 48000 -b 64 -I alsa -O alsa -P 7777 -L /usr/share/zynaddsubfx/banks/SynthPiano/0040-BinaryPiano2.xiz

With a buffer of 64 frames latency is very low and so far I haven’t run into instruments that cause a lot of xruns with this buffer size. Not even the multi-layered ones from Will Godfrey.

So I guess it’s time for the next step, creating a systemd startup unit so that ZynAddSubFX starts at boot. And it would be nice if USB MIDI devices would get connected automatically. And if you could see somehow which instrument is loaded, an LCD display would be great for this. Also I’d like to have the state of the synth saved, maybe by saving an .xmz file whenever there’s a state change or on regular intervals. And the synth module will need a housing or casing. Well, let’s get the software stuff down first.

Working on a stable setup

CarPC v1.0

As our collection of MP3 CD’s was wearing out I thought why not put a small embedded board with a big drive in our car? I dug up a Cubieboard2 that was gathering dust and started hacking. The goal:

  • Small system based on Debian Jessie
  • MPD to serve the audio files
  • Remote control via WiFi
  • Big drive
  • Acceptable boot time
  • Basic protection against file system corruption

Putting a bog standard Debian Jessie on the Cubieboard2 was quite straightforward with the help of the linux-sunxi.org wiki. The board booted with the standard kernel but unfortunately no sound. Luckily I had just received some ultra-cheap PCM2704 USB audio interfaces and these worked and sounded great too. WiFi worked out of the box but the rtl8192cu driver of the 3.16 kernel for the Realtek RTL8192CU chipset has the tendency to quickly go into suspension and as this driver doesn’t have any power management options I ended up with a hacky for loop in /etc/rc.local that pings all IP’s in the DHCP range. I quickly dropped this iffy set-up as it just didn’t work out that well and ended up using a DKMS based solution that made it possible to control power management of the WiFi dongle. Next hurdle was hostapd that stopped working with this alternative driver. But with the help of the hostapd-rtl871xdrv GitHub repo I managed to cook up a fully working hostapd Debian package.

Next up was the hard drive. I first tried a USB drive but the Cubieboard2 just couldn’t provide enough juice to power the drive properly together with the WiFi dongle. I also tried with my Raspberry Pi’s but those had the same issues. So I had to resort to a SATA drive. Of course I bought a 3.5″ drive first because those are cheaper. But you can’t power a 3.5″ drive with the SATA cable that comes with the Cubieboard2 and as I had a bit of a deadline I returned it for a 2.5″ drive and that works like a charm. I installed MPD, copied my music collection to the hard drive, fired up MPD and was greeted with a segmentation fault. Apparently the Jessie MPD package has issues with the sticker database file so I installed MPD from the backports repo and that version runs without any complaints so far.

For some basic protection against corruption by sudden power loss I created separate partitions for /home and /var on the SD card that are mounted rw with a couple of options to reduce corruption (sync,commit=1,data=journal) and / is mounted ro, just like the big hard drive with the audio files. /tmp is being mounted as tmpfs in RAM. Boot time is about 15 seconds and I’m OK with that. To remotely shut down the CarPC via WiFi I use a JuiceSSH homescreen shortcut of a connection that runs a simple shutdown -h now snippet.

After I had mounted everything in our car the thing wouldn’t boot though. Swapped the 1A USB car adapter for a 2.1A version and then the CarPC came up properly. Installed MPDroid on my Nexus 5 to control MPD via WiFi and so far, so good!


Cubieboard2 based CarPC


Addendum

Sometimes the CarPC became unreachable via WiFi. The culprit was that the DHCP service (udhcpd) didn’t always come up because it was sometimes started before hostapd. I fixed this by copying /var/run/systemd/generator.late/udhcpd.service to /etc/systemd/system/udhcpd-custom.service and adding hostapd.service to the After line and adding a Requires=hostapd.service line. I also added a [Install] stanza with the line WantedBy=multi-user.target. I then disabled udhcpd.service and enabled udhcpd-custom.service.

Addendum 2

Hostapd didn’t always start flawlessly either so I copied /var/run/systemd/generator.late/hostapd.service to /etc/systemd/system/hostapd-custom.service and added sys-subsystem-net-devices-wlan0.device to the After and Wants lines. Also added an [Install] stanza, disabled hostapd.service and enabled hostapd-custom.service.

CarPC v1.0

Downscaling and upgrading

For years I’ve used Focusrite Firewire interfaces, first the Saffire Pro 10 IO and after that its successor, the Saffire Pro 40. Both great devices but recently I decided to make the switch to USB. The reason was twofold:

  • I was barely using more than 2 ins or outs simultaneously
  • Firewire is being phased out and my notebooks don’t have any Express Card slots either, only USB ports
  • The Pro 40 isn’t very portable

So when switching to USB I would need:

  • Same or better quality preamps and AD/DA convertors
  • At least 2 ins and outs
  • Portability
  • Possibility to achieve similar latencies as with the Pro 40
  • Works well with Linux

This narrowed down the choice significantly. I could go for a Focusrite Scarlett but from what I found on the net there were some issues with these devices. I’ve also looked at some Presonus devices but actually I had already set my mind on a different device: the RME Babyface.


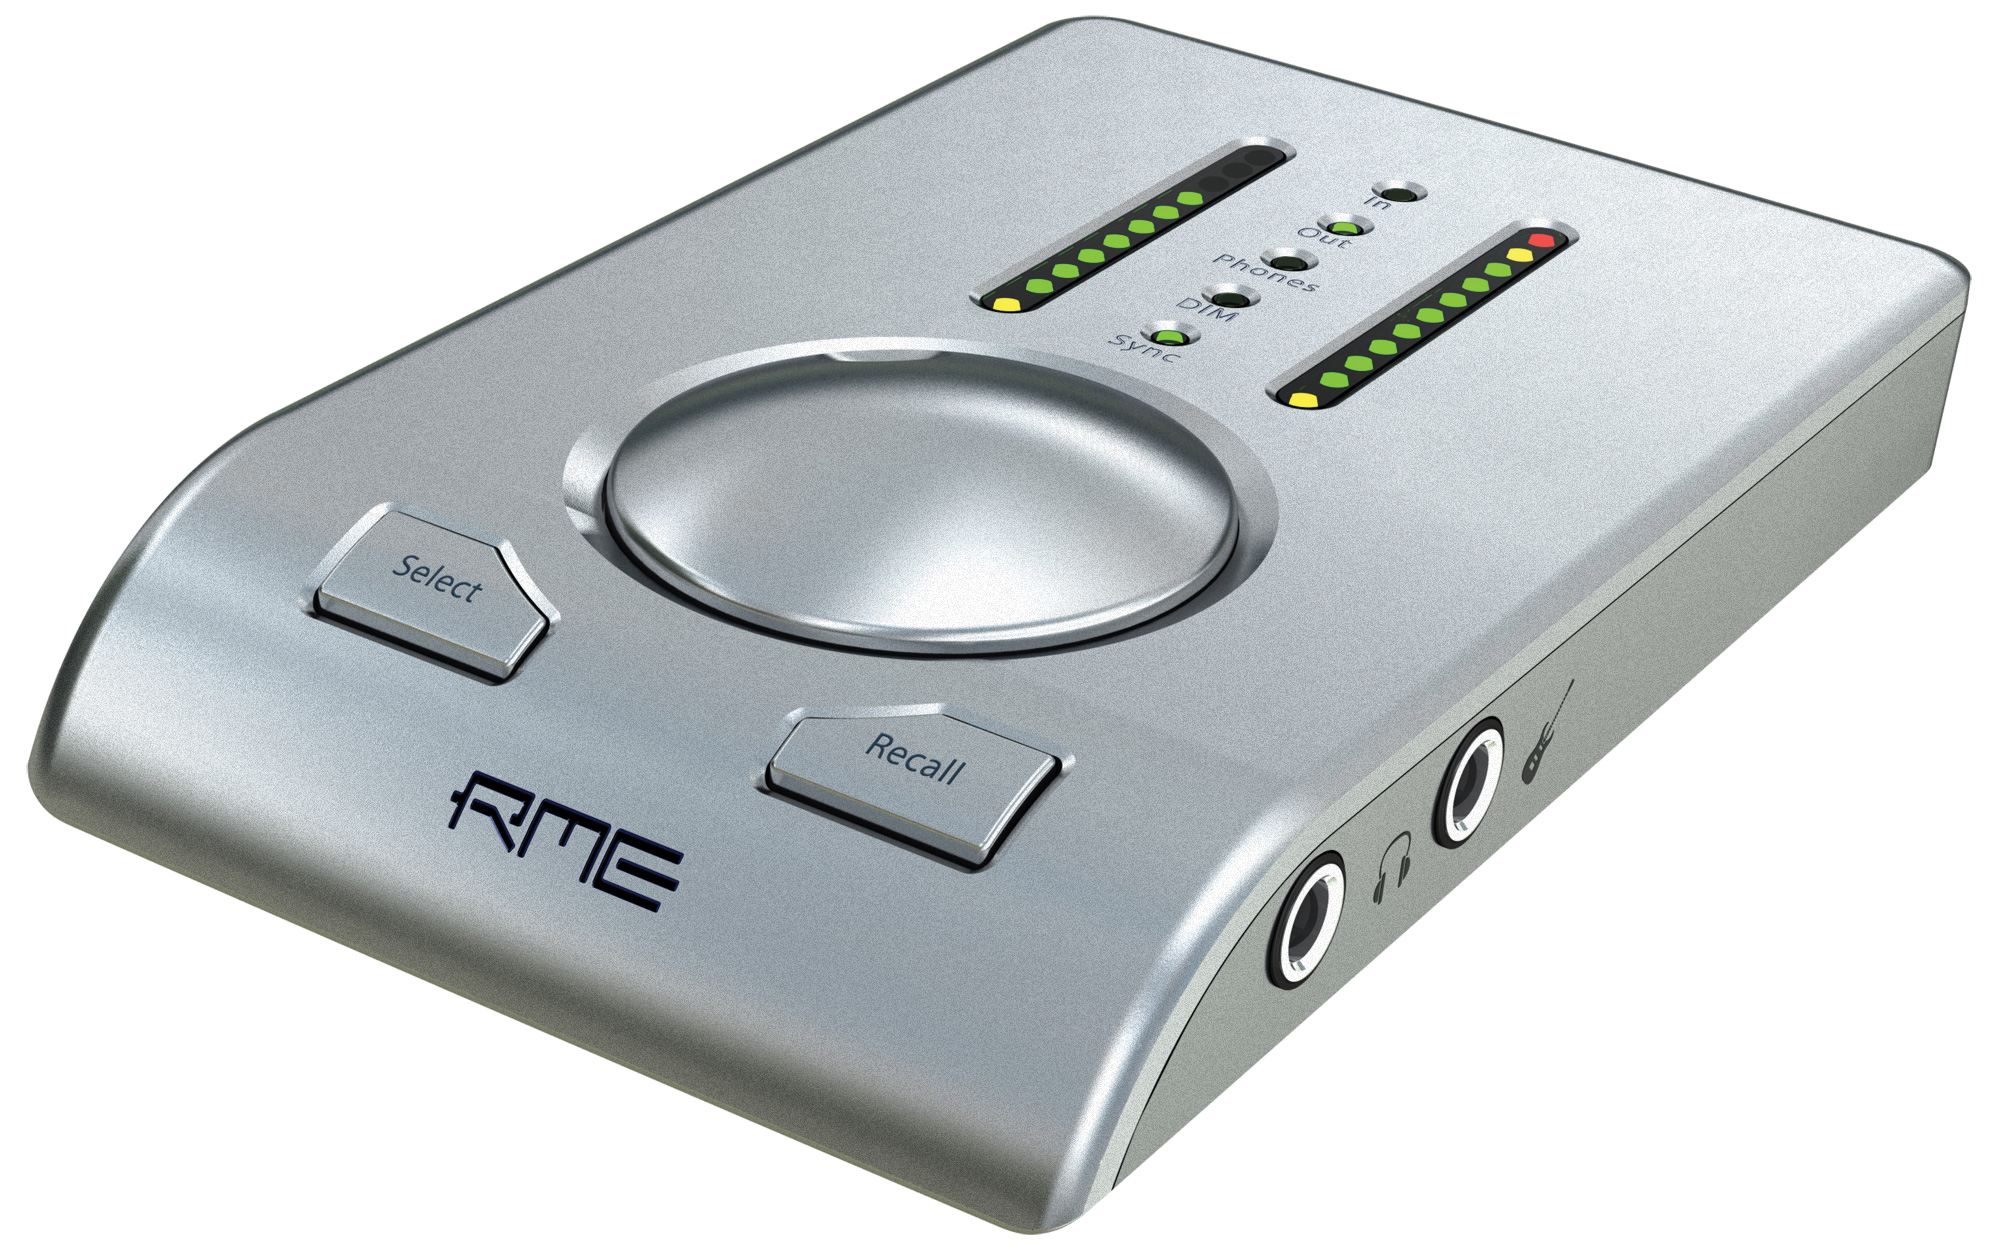
RME Babyface

So when I found a webshop that offered the Babyface at a reduced price (almost 15% off) I put my Focusrite up for sale and bought the Babyface. The Focusrite was sold within a week and the Babyface easily met my expectations:

  • When in CC (Class Compliant) mode it works out of the box
  • It’s highly portable, the Babyface is actually specifically made for this purpose as it comes with a nice pouch
  • It has 2 ins and outs and the great thing is that it’s possible to extend the IO via ADAT
  • The preamps and AD/DA converters are simply top notch, they’re so good that I’m considering switching cans and studio monitors as this device is merciless, it simply doesn’t work well with my current setup
  • When connected to an USB3 port (XHCI) the Babyface can run with nominal latencies of 0.5ms (this is with 8 samples), i.e. it beats the other two OS’s mentioned on the RME product page

I can live with not being able to control the device from within Linux, almost all settings can be done on the device itself. Upgrading the firmware can be done with a VM so that’s covered too. The only real drawbacks are that it’s an USB device so it’s a bit more picky with regard to your system setup and it consumes a bit more CPU compared to Firewire. But all in all this is a great sounding device that works well with Linux when in CC mode and it fits my specific user case very well.

Downscaling and upgrading

The Infinite Repeat – Cala Del Aceite

Finally got around finishing a new track. And it’s just 65BPM so no four to the floor this time. I posted the demo a while ago, this is more or less a definitive version (definitive is a fluid term in my dictionary).

http://theinfiniterepeat.com/music/the_ … aceite.ogg

This song is about one of the most beautiful places I know on this
planet, Cala Del Aceite in the most southern part of Spain:

http://www.conilplaya.com/fotos/playasd … eConil.htm

Tools used:

  • Qtractor for recording and mixing
  • seq24 for sequencing
  • The necessary plugins:
    • drumkv1 to hold the drum samples (drum samples are all from
    • http://samples.kb6.de/)
    • a lot of plugins that are part of Distrho or Carla: Noize Maker, Tal
    • Reverb III, ZynAddSubFX-LV2, Nekobi
    • MDA subsynth
    • FluidSynth DSSI for the Rhodes
    • linuxDSP plugins (EQ500, DYN500, MBC2B on the master bus)
    • Calf Vintage Delay
    • LADSPA comb filter, Fast Lookahead Limiter
    • GxZitaReverb

The background vocals for the choruses are sung by my wife. The ocean
sample is from Freesound:

http://www.freesound.org/people/dobroide/sounds/93653/

Cádiz is pretty close to Conil, hence the choice.

Thanks to everyone for making this possible. Especially falkTX and rncbc, couldn’t have done this without your valuable work.

Making promises that I can’t keep
It’s pushing me, pushing me into a deep
State of sadness, state of doubt
A state of awareness I can’t live without

Making mistakes, so hard to bear
It’s driving me, driving me to a point where
I can’t escape, I can’t shy away
From the daemons I refuse to obey

All is forgiven, all is well…

Awaiting the day that I’ll be relieved
From this burden, this burden that has grieved
So many loved ones, so many friends
All the people on which I depend

Stand up, act now, it’s time for a change
Lingering won’t help, help to rearrange
The current imbalance, the current state
Of things so rush now don’t hesitate

All is forgiven, all is well…

Creative Commons License
Cala Del Aceite by The Infinite Repeat is licensed under a Creative Commons Attribution-NonCommercial-ShareAlike 4.0 International License.

The Infinite Repeat – Cala Del Aceite

Wolfson Audio Card for Raspberry Pi

Just ordered a Wolfson Audio Card for Raspberry Pi via RaspberryStore. I asked them about this audio interface at their stand during the NLLGG meeting where I did a presentation about doing real-time audio with the RPi and they told me they would ship it as soon as it would become available. They kept their word so I’m hoping to mount this buddy on my RPi this very week. Hopefully it will be an improvement and allow me to achieve low latencies with a more stable RPi so that I can use it in more critical environments (think live on stage). It has a mic in so I can probably set up the RPi with the Wolfson card quite easily as a guitar pedal. Just a pot after the line output, stick it in a Hammond case, put guitarix on it and rock on.

Wolfson Audio Card for Raspberry Pi

Wolfson Audio Card for Raspberry Pi

LAC2014: submission accepted!

My submission for the Linux Sound Night at LAC2014 with The Infinite Repeat has been accepted. The Call for Papers page mentions the term “danceable” so I’m going to focus on that. Making danceable music is quite a challenge for me but it should definitely be doable to produce a solid set, especially now that I’m the proud owner of a Korg Volca Keys. I’m definitely going to integrate it in my current setup as the Volca reacts great on MIDI sent from my workstation. It has some fat sounds that just scream dance floor.


Korga Volca Keys

I’m really looking forward to this year’s LAC. It seems falkTX and avlinux are going too, it’d be great to meet these guys in real life!

LAC2014: submission accepted!

LV2 gaining momentum

The number of new LV2 plugins being released is steadily growing. The last couple of months at least the following LV2 plugins have been released:

  • Bitrot (a set of LV2 and LADSPA plugins for glitch effects)
  • beatslash-lv2 (a set of plugins for live beat repeating and beat slicing)
  • deteriorate-lv2 (a set of plugins to deteriorate the sound quality of live inputs)
  • midimsg-lv2 (a set of plugins to transform midi output into usable values to control other plugins)
  • QmidiArp (LV2 plugins of the three QMidiArp modules)
  • x42-plugins (collection of LV2 plugins: tuner, oscillator, x-fader, audio-level meters, midi filters etc.)
  • BLOP-LV2 (port of the LADSPA BLOP plugins)

Haven’t tried them all of them yet but the ones I did try (the QmidiArp modules as plugins and some of the x42 plugins) proved to be very promising. Besides new plugins being released work continues on a great number of plugins, the LV2 framework itself and on tools facilitating in the creation or building of LV2 plugins. Especially falkTX is in the vanguard with his current work on getting his Carla plugin host to work as a LV2 plugin. This would open up a lot of possibilities like using it in hosts that don’t support all plugin frameworks (think Ardour and DSSI support). In the meanwhile the guitarix team continues to add great LV2 plugins to their ever growing collection and Dave Robillard, the main author of LV2, doesn’t sit still either with releasing updated versions of the building blocks that form the LV2 framework.

LV2 gaining momentum